Saturday, December 30, 2023

6mm WWII German Aircraft for Barbarossa

I almost forgot about these.  Nine aircraft, generally for Barbarossa (well, and a couple for France 1940).  Castings are from I-94/Raiden, Scotia-Grende, ad Heroics & Ros.

Hs 126, Ju87, Fw 189

Ju 88

Bf 109F

Combined with earlier aircraft that I've done, this gives me enough to get things going, I hope.  

My bin of early war German aircraft.


Friday, December 29, 2023

A 6mm Timber Artillery Bunker for the Soviets

While completing the Soviet 6mm fighting positions a few months back, I started working on a covered artillery bunker for the Soviets.  This type was of earthen and timber construction.  I actually need several of these for 76mm, 45mm, and machineguns.

In this case, I just built a one-off bunker to experiment with construction method a little, which is generally similar to the open positions that I built previously with the addition of plastic work to model the timber part of he construction.

The basic shape of the bunker was cut, mounted to a base, some acrylic paste added to the foam where the plastic would be glued, and the plastic cut and fitted.  The process proved to be a little more tedious than hoped for, particularly as the plastic had to be glued in place, rather than solvent welded.  The solvent readily dissolves the foam, and the acrylic paste doesn't provide adequate barrier.

In any event, here is the finished the bunker:  


The last view includes a 45mm ATG and crew, each 
mounted on 1/2" square bases.


The finished bunker measures about 3.5" wide and 7/8 inch tall.  I think it came out okay, useable, but I had hoped for a little more.  

I'll have a few more in process with a couple of revisions to construction.  I'll need to get those wrapped up over the weekend.

A Wrap Up of Our Star Fleet Battles Campaign 2017-2019

We have decided to put our Star Fleet battles campaign of the General War to rest after over four years of inactivity.  The campaign was paused due to the Covid-19 pandemic, and then further postponed by some other real life issues.  

As the campaign stood, the Lyran empire had made some minor gains in Kzinti space, and had destroyed the majority of the Kzinti fleet (though with little actual benefit).  The Klingons had crossed the Kzinti border in several places, destroying base stations, and with forces converging on the first Kzinti Starbase.  Kzinti space would likely have been reduced to the homeworlds, maybe a starbase, and maybe a tether to the Federation.

The Hydrans had massed most of their fleet into one invading force in Lyran space, with the Lyran's having lost a planetary system, and the Hydrans having the capacity to take at least one more Lyran system, and causing a lot of damage to the Lyran fleet.  The Lyrans had tactical victories in most of their battles, but were losing the strategic situation.

The Klingons were beginning to enter Hydran space, and in time would likely have conquered the Hydran empire, as the Hydran forces would have been greatly reduced in numbers by the Lyrans, and were at a strategic disadvantage which would have likely lead to most of their surviving fleet being cut off from supply by the Klingon advance.

The Klingons would have found themselves in possesion of much, if not all, of Hydran space, a big chunk of Kzinti territory, and a notable chunk of southern Lyran territory, after defeating the Hydrans.  The Lyrans at best could have traded back some Kzinti space to the klingons, who may or more likely may not have given the Lyrans back their lost territory.

I played the Lyran and Klingons as two separate "characters", always making decisions based on what was in the interest of the respective empires, rather than as a single unified force.  Thus the Klingons did not send their available fleet to aid the Lyrans in the big battle with the Hydrans, as greater Lyran losses in that battle served the klingon interest every bit as much as Hydran losses in the battle.

Depending on how long the strategic rules kept the Federation from getting involved, there is even a chance that the Klingons could have openly attacked the Lyrans and taken their home world, resulting in almost the entire "western half of the map becoming Klingon territory.

The Federation had amassed a large fleet with the intent of eventually attacking the Klingons, but were restricted by a series of rules whereby the Federation could be released early (relative to the General War timeline) to go to war with the Klingons.

If the Federation had sent an expeditionary force into Kzinti space (which they could have done), and they had been attacked by Lyran or Klingon forces, it would have released the Federation for premature extry into the war and kept the Klingons honest.  But this did not happen.

As things stood at the end of the last turn, the Klingons probably had enough forces to stop the Federation from taking the Klingon Home world, and could have likely pushed the Feds back into Federation space, before the Federation ship building program (which had not yet ratcheted up) could have had any effect on the game.

The question is whether the Klingon construction rates with the gained Hydran, Kzinti, and possibly Lyran resources and construction rates could have come up to speed fast enough to outmatch the Federation construction rate, and given the Klingons the ability to defeat the Federation, once they became the primary Klingon focus.

My feeling is that the Klingons would not have consolidated the conquered resources fast enough, and that eventually the Federation would have been able to conquer the Klingon homeworld, and destabilize the empire.

Involvement by the Romulans (my favorite race in the game) and Gorn was so far down the timeline, that I have no feel for how they might have impacted the war, or if they ever would have had the chance.

In any event, the Kzinti empire was down to about a dozen ships, most serving as a task force of the Hydran fleet and remainder in Kzinti territory could not defend much beyond their homeplanets.

The Hydrans had achieved operational overreach, and could not have gotten their forces back to their homeworld in time to stop the Klingons.

The Lyrans were in the process of expending their fleet to destroy much of the Kzinti and Hrdran fleets, at the expense of not being able to control their own space. The Lyrans won most of the battles, and the Klingons were winning the war.

The campaign lasted about 18 months before Covid hit, and we had some great fun, some really odd situations, and it would have been interesting to see how it would have played out.  But being four years removed from the campaign, it just feels like something that we did, rather than something that we are doing, so yesterday, while playing a pick-up game of... Star Fleet Battles, we dicided to put the campaign to rest, and discussed starting over with a General War campaign.

Wednesday, December 27, 2023

A Few More Aircraft for WWIII-1958


Here is a pair of F-86s in West German markings from I-94 Enterprises: 


And two more Hawker  Hunters for the RAF:


These will give NATO a little more support in my 1958 WWIII games.

Tuesday, December 26, 2023

One day, while watching Hotel Rawanda...

... my daughter, who was in high school at the time, began to offer some views on the conflict in Rawanda and about the Hutu and Tutsi.  This took me by surprise, as I was half shocked that she knew of Rawanda, let alone had any oppinions about the war there and the horrors that took place between the Hutu and Tutsi.  While I doubt that the goings on there play much part in the pursuit of most gamers, in my case, I had started my African imagi-nations campaign some years prior, and the history of Rawanda was part of the research that eventually manifested on my table as the Uwanda-Mugabia War.

My daughter does not share my passion for history, though she is frequently curious about historical events, and asks me questions usually leading with, "In one sentence or less, why did bla bla bla....". Inevitably I offer a sentence in response with the qualifier, "...but that is over simplifying things."  Which leads to the also inevitable dissertation that she was hoping to avoid.

Anyway, as she explained her views, I tried to recover from the shock that war in Rawanda had made it to my daughter's social studies classroom at school.  Though she spent a little time studying the ancient world, mostly focussing on several religious groups (rather than empires and military conquest as my schooling had done), most of her school history covered US interests, spanning the American Civil War to Vietnam.

This got me thinking about the contrast in both the bits of history, the interpretations of that history that she and I received in school, and in general, my own experience learning history through the miracle of public education.

She also spent a little time studying what we call "Ohio History".  In my day (mid 1970's), we used an early 1950s vintage book, illustrated with red ink line drawings (an absolutely horrible little book), explaining how the noble and heroic white dudes freed Ohio from the clutches of the savage Indians.  

My daughter's version spent more time addressing the injustices imposed by the white dudes on the mostly peace loving native inhabitants of the Ohio territory.  We both found it curious how the history of 200-300 years ago had changed in the last thirty years.  If nothing else, it made a dramatic point to her about tryng to maintain a little objectivity with respect to how one embraces history.

This morning, while reading up a bit on Russia's role in the Seven Years War,  it occurred to me that the SYW was never mentioned in any part of my schooling.

Imagine that.  A war that was closely tied to the existance and shape of my nation, and that was maybe the first truly "world war",  was utterly irrelevant to the public educators of my day.  

My public education relating to history was pretty sad really.  I generally disliked history in school, mainly because of how it was presented, mostly as a rapid succession of dates, places and names of those who "liberated" distant lands from native inhabitants.  Curiously, separating native peoples from their land and culture was always presented as a good thing, rather than just a thing.   

The reality is that there was almost no study of the history relating to the heavily stressed lists of anitquarian details that we students were expected to memorize.  Very little about the how and why of what happened. 

An example of the scope of study and how it was addressed in class and on our tests follows.  In class:  Inca, people conquered by Pizarro of Spain, 1532.  There would be little more than the insinuation that it was good for both the Inca and the Europeans who did it.  But on the test:, "Who conquered the Inca?"  Answer: "Pizarro, Spain, 1532".  That's it.  Seriously.  No other names, nothing about cultures, devoid of any substance.

One day in history class, the day that we studied the entire 20th century (which by the way had apparently ended in 1945, despited it being 1977 at the time) in my 8th grade history class, I learned an important lesson about WWII (which we studied for about 4 minutes).  World War II, won by the US, who, for all practical purposes, defeated Hitler's Germany single-handedly, and in a sort of side conflict, dropped the first atom bomb on Japan.   World War  II, US defeats Germany, Japan glows in the dark, 1945, the end.  At least in my mid-1970s history class.

I had a notable interest in WWII at a young age, and started acquiring my library on the conflict before the age of eight.  As a result, the scope of my knowledge on the subject was somewhat greater than what was presented in class.  As Mrs. Quinn was wrapping up her four minute presentation of WWII, she pointed out a photo in our book that showed the M65 atomic cannon firing the test round circa 1950, with the mushroom cloud rising in the distance, and explained that it was a picture of a US artillery piece on a Pacific island, viewing the atomic bomb which had just been dropped on Hiroshima off in the distance.  The caption in the book did not directly adress the photo.

Having the same pic in several of my own books, and "knowing" that she was in error, I quickly raised my hand, was called upon to speak, and explained, "Why no Mrs. Quinn, that is the picture of the atomic cannon...."  It must have looked like a scene from "Young Sheldon" (US TV series).  Her face contorted, and needless to say, it did not end well for me.  I spent the next several minutes learning that the most important fact about WWII was that you don't correct Mrs. Quinn in front of the class.

In all fairness to Mrs. Quinn, she was tasked with teaching the history of the western world from the time of the discovery of the Americas through about 1977 (i.e, 1945) in her year with us.  And in retrospect, she was sometimes very passionate about seemingly irrelevent historical tidbits that she would present in class, true historical elements that were never included on the tests, and no doubt, points of particular interest to her.  All of these years later, I kind of regret that she didn't have the opportunity to actually teach history.

My parents had "geography" and "civics" when in school, by my day, they were combined into "Social Studies".  Basically, it was geography the first couple of years, types of land formations and waterways, then continents and countries.  From about 5th grade on it got more into history (well, dates and places anyway), with a mix of geograpy as needed.  

In fifth grade, Ohio history was a hot topic, where we were introduced tot he names, date, and places school of history.  Over the next few years, there was an overview or mostly western history from the pharaohs to WWII (WWII actually got honorable mention there too), Central and South America from the establishement of modern nation states (curiously, completely failing to mention the US involvement in any of the events or conflicts there). Then we touched on the discovery of the Americas and European conquests there, an introduction to law, and US governmental structure, the glory that was Theodore Roosevelt (a teachers personal hero), the industrial revolution and history of labor, and the history of the study of psychology (??).  History ended my Junior year with the French revolution and US economics.  I sometimes wonder if the chaos as presented was the plan, or disjointed bits of endlessly changing curriculums.

Ironically, I really disliked history in school; then, went home and studied ... history (and a bunch of other things. I used to think it was fun to come home and read encyclopedias) (Hmmm, used to?).  For over five decades now, the study of history has been a hobby.  Much of it linked to, but not exclusively related to gaming.  It may be "bunk",  but I find it fascinating.

To be honest, I remember remarkably few of those dates, and maybe a slightly greater number of the names and places that my educators thought to be important.  In place of those many lost dates, I did discover many other dates, names, places, and even more interesting, a little of the how and why associated with some of them.

Despite my effort, I realize that I have learned very little, and no doubt have utterly failed to embrace it in its own context, but I will always remember that most important lesson about WWII: 

Don't correct Mrs Quinn in front of the class.


Oh, and if you haven't seen it, give Hotel Rawanda a look.  I thought it was a pretty well done, and note that it is a movie, not a documentary.

Monday, December 25, 2023

6mm CF-100s from I-94 Enterprises

Another product of my aircraft decal frenzy is a pair of CF-100s from I-94 Enterprises.  Here is a pic:

Probably should have done them in camo for use in Europe, 
but this is the way I remember them from when I was a kid.

Given my approach to my 1958 campaign, I'm not sure how much I will game the Canadian forces in this version of the Cold War, but at least they will offer some air support for other NATO forces, if nothing else.

These are very nice models with no flash, finished with Flight Deck Decals.


Sunday, December 24, 2023

6mm 1940 French Aircraft Completed

During my recent decal frenzy,  I Finished the second half of my French Air Force for 1940.  Here are a few pics:

MB-174s


A single Potez 63/11


Breguet 693

Happy to finally get these off of the work table.


Saturday, December 23, 2023

6mm Soviet Aircrft Finally Done

I finally got my 6mm Soviet aircraft for Babrbarossa done, well sort of.  I ended up having decals for about two thirds of them, so an order to Flight Deck Decals will be happening soon.  In any event, here are a few pics:

Pe-2, Su-2, and Il-2

Yak-1 and LaGG-3

Mig-3 and I-16 


I-153, I-15, and LaGG-1

I also had a bunch of aircraft for other periods and scales that I was pooling together to complete the decal process all at once, and will be posting pics of some of the them in the coming days.

Friday, December 1, 2023

Still Slowly Moving Along

November remained a slow month on the hobby front, but I did manage to sneak down to the basement from to time, making a little progress on 6mm Soviet aircraft for 1941.  Here is a pic of where they stand at the moment:

6mm Soviet aircraft mostly awaiting black camouflage.

They are currently ready to receive camouflage and detailing, then decals.  I also have a handful of early Cold War aircraft in both 6mm and 15mm that are awaiting decals, so hoping to finish them all at once.

Mounting and cutting the counter sheets for the campaign map this weekend will move me another step closer to getting the war started in the east.

Romanian, German, and Soviet Counter Sheets for the start 
of my Barbarossa campaign.

Despite the slowdown over the last couple of months, my Barbarossa campaign will still start a little early, likely during the upcoming Christmas break.

My anticipation is building; just a matter of being patient a little longer.  

Take care, and be safe out there.


Monday, October 30, 2023

Inching Closer to Barbarossa

My hobby was rescued for a day by rain this past weekend (all day, all night, all rain).  

I got the 6mm Romanian infantry flocked, and even did a little work on the Soviet aircraft too.  I'm going to try to finish up the planes and buildings over the next couple of weeks, but we will see how it goes.  Sorry for the lack of pics, but admittedly, my 6mm infantry aren't much to look at.  I promise to share pics of the aircraft and buildings when they are done though.

Otherwise, there wasn't much time for hobbying, as I spent most of the last week in a wind tunnel, conducting some testing.  A first for me, and an absolutely fascinating experience.  Hoping to do more of that in the future.

Looking forward, I think things will lighten up a bit in a couple more weeks, and I can get back to normal hobbying.  The Barbarossa campaign still needs a Brest fortress of some sort and more bunkers and emplacements, and then I think I can get things started on the table top.

Making progress.


Monday, October 16, 2023

Minor Progress (6mm Barbarossa '41)

The last couple of weeks have seen a little progress on the house, with a couple additional  minor problems cropping up, and surprisingly, a little progress on the hobby front as well.

The Romanian infantry and cavalry are now painted and awaiting flock.  I didn't bother taking pics as the painting is pretty basic and on 6mm figs, so nothing to get too excited about. Still, progress is progress, and Barbarossa is a little closer to the tabletop. 

With any luck, I'll get the figs flocked over a couple of week nights, and then move back to working on the buildings next weekend.


Tuesday, October 3, 2023

A Break in the Action

This weekend was pretty productive with significant progress on remaining vehicles, aircraft, buildings, and terrain for the Barbarossa campaign, but it looks like everything hobby is going to come to a screeching halt.

Yesterday evening, when it began raining in the front hall, I was pretty sure something was amiss.  It doesn't usually rain in the front hall, and even though it was just a light sprinkle, I grew concerned.  

Turns out that the new weather pattern wasn't caused by global warming, and after ripping out a wall  and some searching between the upstairs floor and ceiling, I found a possible source.  A very slow leak in our prehistoric plumbing that has been very slow for some time.  I then discovered that the real culprit of the evening rain was caused by a second leak, in the drain to the tub.

At a minimum, it will cost replacement of a wall and ceiling, and depending on the general condition of the old pipe, could involve a lot more then that.  The start of the repair will involved being on my knees quite a bit, and also being upside down a little while.  

The tricky part is that about ten days ago, I was involved in a fall while hiking, that resulting in injuring both patellar tendons, so I can't kneel, and getting up and down is quite a complicated procedure.  Despite the hand sized area on the side of one knee, where I have no tactile sense in the skin (compressive nerve injury), under the skin it hurts profusely if pressure is applied to the knee.

The fall resulted from the combination of a fallen tree, and someone else doing something dumb, then literally sliding under my feet.  Forty-five feet later, down a 65-70 degree incline, I performed a lovely tuck and roll into a bristling clump of poison ivy, just after ramming planet earth with both knees. 

The reality is that I came out of it smelling like a rose.  I've dealt with enough accidents at work over the years (working accident reconstruction) to know that I shouldn't have walked away from that, let alone just brushing myself off and been able to hike another 4.3 miles after the fall.  As Yukon Cornelius said, "The bumble bounces."

Did I mention poison ivy?  A goodly portion of my back and a little of my arm are covered in it.  I look like I have leprosy, though this might itch a bit more? Not sure.

Anyway, I suspect that I won't be getting much hobby time in the coming days, while I tend to disassembly of the house.  Despite all that has happened, the worst part of all of this clearly is the loss of hobby time.

Oh well; ache, itch, repair.  Be careful out there.

Thursday, September 28, 2023

Fog, Mist, and Streams

As I've been preparing for my upcoming WWII campaign, I've been considering a number of things that I often omit from my games, and how I might add them into my campaign.  Morning fog and mist is one of those things.

Some years ago, while reading about a WWII infantry skirmish, the effect of mist rising off of a stream on the battlefield and how it impacted line of sight and tactical movement caught my interest. So, I set up a game that incorporated this.

The game involved  WWII infantry with one side needing to advance and cross a stream during the battle.  The game was played with 15mm figures, and incorporated a four inch wide stream.  the mist was represented by clumps of pillow stuffing from the craft store.

"Clouds" of mist approximately as wide as the stream and 6-10 inches long were placed on the stream with similar, maybe slightly smaller spacings left clear.  A die was rolled to indicate wind direction, and in the first case, the mist moved with the direction of the stream, such that you basically had clumps of fog floating down the length of the stream, intermittently blocking line of sight for figures as they moved.  It also provided cover for advancing figures, at least at times.

Wind speed was kept relatively minimal, and with slight variation dependent on a die roll each turn.  The experiment worked out to great effect, causing some noteworthy variability in sighting and movement.

Later, I tried this again, with the mist drifting off towards one bank of the stream, with the mist trailing off to a variable distance that could change slightly each turn with a die roll, again this worked well, and had a slightly different effect on the game.

The last form of the experiment with the pillow stuffing, was for patchy fog, which drifted and slowly dissipated during the game.  Similarly, the fog could have been accumulating during a game, though I've never tried that.

The only negative to this was that at the time, I had used loose lichen as foliage, and the pillow stuffing tended to "grab" the loose pieces.  Some effort was made to detach the lichen, when moving the mist/fog.

In my upcoming games, I will be using a greater proportion of foliage that is mounted on bases, which reduces this annoyance a little.  I also plan to experiment with trimming the loose tendrils of stuffing on the underside of the "puffs" and will experiment with giving them a spray of Dullcoat to see if that reduces their tendency to cling to the foliage.

I've seen a few rare instances of this type of thing being tried on the tabletop, but suspect that it was more common in reality, than on the game table, so thought I'd share the thought.

Monday, September 25, 2023

Soviet Field Fortifications for Barbarossa

I've been collecting information on Soviet fortifications all year, though till now have little more than a stack of notes and rough sketches to show for it.

A couple weekends back, I started getting some work accomplished on these, and thought I'd share the progress.  This batch focusses on earth and timber field construction for use with 6mm miniatures.   I had to modify Soviet designs to work with my 6mm squad basing system, and decided to dispense with the timber detailing, as that would have only resulted in the positions being a little more oversized in width.

In my case, rather than having individual fighting positions for each soldier (that will come in 15mm), each 6mm fighting position accommodates a squad or weapons team.  

Though I intend make some more proper company strongpoints with fighting positions interconnected by trenches.  These are designed to be used separately, offering greater adaptability to other terrain, and as supplementary positions when used the larger fixed strongpoints.

Thus far, I've gotten the squad positions, mortar pits, some anti-tank gun, and anti-aircraft positions in done, and figured I'd share the method used to make these.  The ATG positions are the most complex thus far, and are initially intended for use with 45mm guns, but should work fine with 57mm or 76mm guns.

The gun positions feature what would normally be a raised platform position in the center for the gun, slightly sunken, but higher in elevation than the cutout for crew cover and a position ramping down to protect the gun to the left.  In practice, the gun would be pulled up a ramp and into firing position on the center platform.  Originally, I was going to do these as more developed positions with covered cutouts for the gun and crew, but decided to make them open to contrast some of the other positions with overhead cover for the crews or infantry.

In my free standing ATG positions, there is no raised gun platform, the gun simply sets in a slightly recessed center in a raised mound of earth, with the cutouts for the crew and gun at the same elevation as the firing position.

The positions are designed around my basing system to accommodate the typically 1/2 inch square bases that I use for gen crew and for mounting the smaller cannons.  All of the positions designed to receive figure stands will be designed around this 1/2 square base sizing, thus trenches will be wider in scale (in later pieces), than they should be for Soviet practices.

Anyway, back to the construction...

The first thing was to find sources with drawings from which to design the miniature positions.  I used several sources, but a most useful find was the 1946 Handbook on USSR Military Forces Chapter VI Fortifications.

From my stash, I found some pre-cut slabs of foam of the right thickness, about three eights inch thick (split on a bandsaw previously, though 1/2 inch and thinner stock is available from many DIY stores, and would work fine), and sketched a plan view of the position onto the foam with a pen.  In some of the photos below, I'll show the tool or tools used to complete the step.  Primary tools were a hobby knife, some Perma-Grit round sanding sticks (mine are older combination coarse/fine grit), and a Squadron coarse flexible sanding stick.

Plan view of the anti-tank gun pits on the foam 
with my original sketch.

The position was then rough cut out of foam with a 
hobby knife, and the center and edges were sanded 
to basic shape with the Perma-Grit sanding sticks.  

I modified the design a little, changing the outline for the 
berms or parapets of earth piled around the pit.  The cutouts 
have also been roughed out.

The berms were rough shaped by sanding down to the 
depth of the berms.


The surrounding foam was rough sanded to create a 
"mound" profile, the firing slit was shaped, and the 
entrance was located.

The entire piece was sanded close to final shape with the 
entrance being opened up completely and the firing slit 
lower a little.  The foam is now setting on a piece of .04 inch 
thick styrene plastic sheet, which will eventually be its base.

A plan view showing the crew and gun in the cutout positions, 
also notice that I've traced the perimeter of the foam onto the 
plastic base.

The base was cut out leaving a small border around the 
foam.

The base was then sanded on a slight diagonal with a Dremel 
and barrel sander to  make a smoother transition with the foam. 
The berms were also softened a little.

One step or light weight spackle was then applied to the edges, 
where the foam meets the base, and blemishes in the foam 
were filled.  Once dry the piece received a light final sanding.


The next step was to brush on a coat of acrylic paste.

These are some of the mortar pits after receiving the paste.  
Note that some of the ink markings that weren't completely 
sanded away have bled through the paste.  As is, they will
 continue to bleed through the paint and can sometimes 
be visible through the flock.  To stop that from happening, 
spray a light coat of Dullcoat over the pieces, and once dry, 
it will usually block the ink from bleeding through any further.


A base coat of green and yellow ochre was applied.


An finally, the positions were flocked using artist's 
matte medium with Woodland Scenics' flock.

Here are a couple pics showing more of the fighting positions completed to this point.

Clockwise from top left, an ATG position, and AA gun pit, 
a mortar pit, and an infantry position.


And a group picture.

I still have artillery positions to make, some company strongpoints (2 or 3), plus the bunkers for the Stalin line.  Lots of work to do yet, but making progress.

Monday, September 18, 2023

AAR-3: West of Ohrum

The following is the third battle in my World War III-1958 campaign.  It comes 18 months late, as my campaign, started in late January of last year lost some luster given real world events.  In any event, I am back to gaming WWIII, and the latest battle between Soviet 10 Tank Division and British 6 Armored Division follows:

______________________________________ 

As the Soviets advanced into West Germany, the British army found itself deployed very far forward; in fact, well forward of the defensive lines that they had practiced defending for so long.  The result being that the Soviets rapidly and repeatedly ran into hastily prepared British lines of defense.  Thus far, the war was really unlike what either side had expected, given the starting positions of NATO forces and with the weather radically impacting the battlefield, nearly eliminating the affect of air power.

Though losses had been a little higher than expected, the Soviets where making good time, and quickly resumed the advance a little west of Sottmar and north of Kissenbruck.  They once again ran into fresh British forces defending generally along the forested hills west of Ohrum.

The Soviets intended to punch through the heavily wooded Oderwald and then turn north, avoiding the city of Wolfenbuttel, as the Soviets wanted to avoid getting bogged down in city fights, preferring to isolate cities and let follow-on forces deal with clearing them.

The region was still covered by the low cloud deck with intermittent rain, limited visibility and little to no air support.


THE MAP

I've taken some liberty (more than I would have liked) in adapting my terrain to the map, trying to capture the major terrain elements that I think will be important to the game.   Photos of the battlefield on the table follow:

Soviet view of the battlefield looking west.  Ohrum is if the 
foreground, center

British view looking east.
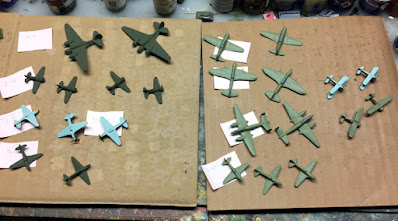
BRTISH FORCES

British forces feature a fresh armored regiment, the 20th Hussars Armored Regiment, with three squadrons equipped with Centurion Mk III tanks, supported by two companies of infantry from the 2nd Motor Battalion, Kings Royal Rifle regiment.  Six batteries or artillery are now available for support, though that could change during battle.

UK 20th Hussars Armored Regiment.

    The two infantry companies and recce assets.


SOVIET FORCES

The Soviet attack is built around a T-55 regiment and a heavy tank battalion featuring T-10s, supported by two infantry battalions in BTR50P, and other supporting elements, including six batteries of tube artillery and three rocket batteries.  

Soviet BHQ and T-10 battalion

T-55 regiment, HQ, and models denoting available artillery 
batteries.

The two infantry battalions, all are in BTR-50P.

Divisional recce and air defense.

THE BATTLE

The Soviets are attacking generally east to west from a point just east of the town of Ohrum, with British forces defending on a north/south line in the cover of the forested Oderwald.  Once the Soviets advance through the cover of the town and growth along the north south stream running through Ohrum, they will traverse 1800-2400 meters of open farm land, however, the misty light rain has reduced visibility to no more than 1600 meters.


BRITISH DEPLOYMENT

Two British armored squadrons are deployed across the leading edge of the Oderwald, supported by two infantry companies.  Both companies are holding their Bren mounted sections as a reserve and the third tank squadron is also being held in reserve.

Various reconnaissance platoons are located in two lines, the first just west of the north south road to the west of Ohrum, and the second further west in the open farm land between Ohrum and the Oderwald.


THE SOVIET ADVANCE

Soviet recce elements advanced on three lines, following the north, central (Ohrum), and south roads.  Each lead by a platoon of the BDRMs, and followed by platoons of PT-76 light tanks in the center and south.

First siting of a soviet BRDM by Daimler armored car occurred on the west edge of Uhram at only about 800 meters range, the Daimler had a clear shot but missed, scattering the BRDM platoon, until the PT 76s could arrive to offer some return fire.  The Daimler shifted position slightly, but stayed put as they were hoping to be able to report more than having seen a single Soviet armored car.

First sighting, the Daimler misses its shot at the now 
panicked BRDM.

The two advancing platoons of PT-76s moved to engage the British near Ohrum, with one platoon advancing through Ohrum, and the other advancing south of the town, hoping to possibly flank any British recce watching the road out of the village.

Pt-76s moving across the stream south of Ohrum...

... and through Ohrum itself.

The attack through the town resulted in the one PT-76 being destroyed, and the British losig two armored cars.  The PT-76s to the south were advancing through trees and underbrush around the stream and weren't sited until at very close range. At which point, the two remaining Ferret Mk Is attempted to flee, but were destroyed by the PT-76s.

To the north, a pair of Daimlers spotted and destroyed a BRDM that had crossed the stream, and then disabled a second BRDM as it crossed the train tracks on the north road.

Given reports of the PT-76s to the south, followed by cannon fire, the Daimlers and Ferrets to the north dropped back to the second recce line, unknowingly taking fire from PT-76s advancing out of Ohrum.

The Daimlers withdrawing after engaging the BRDMS 
on the north road.

During the recce skirmish, both sides lost four vehicles.

After a few minutes to reorganize, the BRDMs in the center and south continued the advance, following by the PT-76s.  The British second recce line located the Soviets recce assets, again, about 800 meters distant in the misty rain, and received orders to withdraw, after contacting the advancing Soviet recce.

British recce can be seen just east of the farm 
at the top center above.


To the North, British recce formed a line some 1400 meters ahead of the Oderwald, and could hear the rumbling in front of them for some time, prior to seeing the lead platoon of T-55s.  The armored cars reported possible Soviet battalion strength and were soon ordered to withdraw.  Unfortunately, Soviet artillery landed as they were withdrawing and destroyed three of the armored cars.


British recce to the north, just before the Soviet atillery hit.

To the south, British recce was just arriving at the farm in the center of the open land between Orhum and the Oderwald, when Soviet artillery began to fall, killing the last of the recce in the center, and setting the farm buildings on fire.  British forces deployed in the trees to the west could see the low hanging smoke, and smoldering fires of the farm through the mist and rain.

Looking west, fading artillery fire to the north (left), the farm 
burning (right of center), PT-76s advance on the south 
(right, center), and T-55s ling the battlefield in the distance.


To the North, the T-55s came into view of the Centurions in east edge of the forest, and they began taking shots, destroying the first T-55 at about 1200 meters.  Over the next couple of minutes, shots were exchanged, with the British slowly taking casualties, and succeeding at mostly bouncing 20pdr shots off of T-55 turrets.  The T-55s continued to move forward, while exchanging with the British.

The first T-55 is hit.

In the south, the last platoon of BDRMs continued to advance until making contact with the Centurions in the trees, but having no where to hide, and no way to fight, they didn't last long.  The PT-76s following the BRDMs could see the shots from the Centurions and called for artillery along the leading edge of the woods, which came, but not before several of the PT-76s were destroyed.  The Light Tanks shot back, but scored no hits.

Soviet Artillery hits (top center), while the surviving PT-76s 
get to into some cover (lower left).


Artillery fell on the Centurions to the south, putting the one tank out of action, and forcing the others to move.

To the extreme south of the Birtish line, three PT 76s happened into the southernmost Centurion III troop, some British infantry, and one of the British infantry company HQs.

PT-76s rushing into cover and British forces.

One PT-76 engaged the M3 scout cars from the HQ section, while the others bounced rounds off of the front of the Centurions.  The Light tanks were able to maneuver into position to get side shots on the first Centurion, destroying it, while the one PT 76 continued to the shoot up the infantry CHQ.

Initially, the Centurions could neither see, nor fire on the 
PT-76s.

The last Centurion of the troop managed to kill two of the PT-76s before being destroyed, while the infantry desperately tried to get a Bazooka (M20) team close enough to the last PT- 76 to get a shot.  The remaining elements of the CHQ skedaddled, while the tank tried to pick off infantry with its machinegun.  The bazooka finally got into position and fired at the side of the light tank, tracking it, but were killed by the PT-76's MG.

The Bazooka team missed their first shot, hit their 
second, immobilizing the PT-76, but did not survive.  
Their effort did allow the rest of the British infantry 
to get away from the PT-76 though.

The PT-76 found itself still able to fight, but being in a slight depression, could no longer see any of the British infantry.  

Elsewhere, a line of T-55s was sited to the south and then in  the center, quickly turning into successive lines of advancing tanks.  

The "Red Hoard" advances.

Just as the Centurions in the center and south were starting to fire, Soviet artillery came down along the eastern edge of the forest, interrupting line of site and British fire.  Initially at least, no British casualties were taken, but the Centurions were not able to do much about the advancing Soviet tanks.

The Artillery was lifted and the tanks began exchanging shots, as the T-55s continued to advance.  The Centurions held their own in the center, covering for the loss of the the platoon to the PT 76s  at the extreme south. 

Soviet T-55s continue the advance in the North.

In the north, the Centurions did well, but were simply outnumbered, and were in danger of being overrun, possibly allowing the Russians to turn the flank, so the reserve tank squadron was committed to shoring up the British north.  They arrived on the eastern crest of the Oderwald, while the T-55s were about 800 meters from the wood's edge.  The forward deployed infantry where withdrawing to the same crest as the Centurions, with the hope being that the reserve Centurions would break the T-55 battalion and then turn south on the central T-55 companies.

The southern British infantry company sent their reserve platoon mounted in Bren carriers to try to stiffen the extreme southern edge of the line, as they currently had little to no anti tank capability.  The company commander was now rethinking the decision to not deploy their 6 pounder AT guns.  While they were nearly hopless against T-55s, nearly hopeless was better than the utterly hopeless that they now found themselves with.

In the center, the Soviets had taken more casualties than in the north, and the battalion HQ raced forward to urge on the attack, but this quickly faltered, as casualties mounted.  The surviving T-55s were too few, and to scattered, and began looking for cover amongst the cemetary of dead tanks.

The photo is slightly out of sequence, but shows the burden 
endured by the T-55 battalions to in the center and south 
portions of the battlefield. The artillery hitting to the left above, 
are Soviet BM-13 rockets, mentioned a few parapgraphs below.

British leadership sighed in relief, but had not yet spotted the battalion of T-10s advancing along the center and southern portions of the battlefield, and similarly had no indication of the two infantry battalions behind them.

The Soviet T-10 battalion, still just out of site.

At this point, Soviet losses had been heavy, with two of the T-55  battalions having stopped their advance, and the third  in the north on the verge of the same.  British tank losses had been heavy, and their commanders were already at the limits of their ability to hold the line, which their superiors were very much hoping to do here.  The next few minutes would be crucial to both sides, and the battle was very much up for grabs.

The T-55 battalion to the north was reduced to abut a 
company in size, but British numbers were equally depleted.

The range had been closed such that the exchange of cannon fire was quite lethal.  The British armor in the center simply couldn't hold out, and began to withdraw, taking their infantry with them.  The T-55s facing them were fragmented, in disorder, and began inching rearward.  British artillery began to fall just forward of the T-55s, missing the Soviet tanks due to their stalled advance, but afforded some cover to the now withdrawing British forces in the center.

To the north, the T-55s kept coming, and began to exchange with the reserve squadron of Centurions deployed further back in the Oderwald.  For the moment, the battle continued here.

T-55s in the north, on the verge of entering the Oderwald.

In the center and south, behind the T-55s, was the the battalion of behemoth T-10s.  Their guns had shorter effective range against the Centurions, but their frontal armor was nearly impervious.

The T-10s followed by the two BTR-50, were just 
entering into view as the British began withdrawing.

In the north, tanks exchanged fire, slightly to the favor of the British, until Soviet rockets began falling on the British.  Losses weren't heavy due to the rockets, but their blast obstructed the Soviet tanks from the view of British gunsights, and the decision was made to withdraw.

The Soviets had won another battlefield, though at siginificant cost.

____________________________________________

This battle took a long time to play out, dozens of turns, but in the span of four turns late went from the possiblity of the Soviets being stopped or flanked, to breaking the British line.

The combination of destroyed and immobilized T-55s proved a tremendous challenge to the Soviet battalion commanders, who were successful at pushing their shattered forces forward until just before the very end.  

From the British perspective, command had been similarly challenged, somehow holding the line longer and with far greater casualties than one could reasonaby expect, admirable, honorable, but not victorious.

Loses were as follows:

Soviet:

7xBRDM

9x PT-76

39x T-55

Additionally, 1x PT-76 and 9x T-55 were temporarily lost to mobility hits, but recovered after the battle.

British:

4x Ferret Mk1

4x Daimler

4x Daimler Mk2

1x M3 halftrack

2x M3A1 White Scout car

1x UC/Bren Carrier

22x Centurion III (two were mobility losses)


This was another brutal game, and despite the British inflicting heavy loses on the Soviets, 6AD looks to be in trouble.  I'm going to move north with the next battle, and see if the West Germans fare any better than the British.