Well, after the last round of battles, I've had some time to roll some dice, and things are happening behind the scenes in Mugabia...
"Yes, Comrade Secretary, it is an honor to speak with you! Yes, yes, I wish the circumstances were different as well.... Indeed, our large round friend does have a greater problem than he knows..."
It was not every day that the Soviet ambassador to Mugabia took a call from such a high ranking official. And it was not everyday, that the ambassador was accused of letting a situation get so out of hand. Unfortunately for the ambassador, there was little that could have been done without a greater commitment from his government. But, that was indeed the heart of the problem, a lack of commitment.
The Mugabian President had deployed his troops more to control the ULF and any unrest that they might cause in his own country, than to warn Uwanda of considering greater action. This deployment, supported by his belief that Uwanda would never escalate the situation, was most practical for its intended purpose. And up until now, Soviet leadership hadn't cared much if their round friend didn't heed their warnings, despite the efforts of the ambassador.
The Mugabian President had been more enamored by the Cubans, than the Soviets, and caught up in the enthusiasm of "the revolution", more than the threat on hi border. The Cubans had been effective at training some of the Mugabian troops, but hadn't helped prepare the President for the issue at hand.
Unfortunately, two days into the endeavor, a large portion of Mugabias army was well behind, or out of position to stop Uwanda's forces, while their Air Force was largely a memory. Even with regrouping and re-supply, Uwanda would be at the Mugabian capitol in no more than a week.
Unless Uwanda committed a colossal error soon, some sort of intervention would have to occur to prevent the a Mugabian calapse. Two days into the war, and the only significant obstacle standing before Uwanda, was the Mugabia Presidential Guard. A force more elite in their dress, than their combat skills.
"Yes Comrade Secretary. Yes, the Cubans have complicated the situation... Yes, I should have done more to intervene... Might a discussion with Comrade Castro bring the situation into a more favorable light. Oh, I see..."
As the ambassador listened to the list of what had gone wrong, he realized that he had authored the list of recommended actions that was now being read to him. This offered no comfort to a man who was expected to take the blame for the inaction of his superiors. Now that the situation demanded the attention of those superiors, several of those recommendations were being enacted, though maybe too late.
First, a naval group had been rerouted to Mugabia, this would bring a small, but formidable landing force of Soviet troops and aircraft. If it could get there in time, Uwanda would be hard pressed to match its firepower, and was sure to understand that it would only be the tip on the spear.
Second, airborne forces were being put on alert, should they need to "drop in" and save the day, if Uwanda didn't wait for the arrival of the Soviet Navy.
And lastly, a group of advisers would soon be arriving. Though they could be most persuasive, the ambassador understood that the advisers might have to make... an adjustment to the leadership of Mugabia, if the round man couldn't be made to listen.
As he hung up the phone, the Ambassador was sweating, despite the air conditioning in his office. He feared that the adjustment in leadership might happen quickly and without adequate thought being given. Such an adjustment hadn't worked out thus far in Afghanistan, and far more consideration had gone into that.
Thursday, October 31, 2019
Wednesday, October 30, 2019
Cold War Micro Armor
My hobby time this year has been dominated by painting over 1500 6mm Cold War models, giving me a total of over 3400 miniatures for my Cold War project. So, for no good reason, I thought I'd set them out on the table in their trays and take a few pics.


Above are most of my Cold War French with AMX13s, ERC90s, AMX-VTTs, through AMX30s among those represented. Some of the French forces for the 1950s will be represented by my American models, but I still need to add a number of French vehicles for the later formations. Between the unique vehicles designs and evolving TO&Es over the years, I find the French among the most interesting forces to play.

This is one of my UK trays, featuring Conquerors, Ferrets, Scorpions, Saracens, Saladins, and FV432s and variants in this tray. Most of their heavy armor, Centurions, Chieftains, and Challengers are in another tray.

West German Leopard 1s and M48s. Leo IIs, light armor, and support are in two other trays.

Once of six US trays, this one features APCs; M114s, M75s, M59s, and M113s.

1950s vintage US tanks, M41s, M47s, and M48s in this tray. Another has M60 variants, and yet another is for M1s and M2s.

Possibly the most interesting of the dozen Soviet trays with SAMs, radars, FROGs, and various bridging and engineering vehicles. There are almost 1500 pieces of Soviet equipment in all.

A tray of mostly T80s with re-active armor, a small number of these still need painted. I've focused on finishing the 1950s and 1960s vehicles first, then will finish the remaining 1970s and 1980s models.

A tray of WWII Soviet hardware that served in the 1950s (and later), particularly in some of the Warsaw pact nations. Various JSUs, SU100s, JSIIs, and T34/85s.

Mostly T55s and T62s of varying types from C in C and GHQ.

And some rides for the Soviet infantry, BTR50s, BMP1s, BTR152s (I still need a bunch more of these), and BTR60s of various models.
I still have between 100-200 models that still need paint, most of which require some of the more complex assembly or repair. Next up are nearly 200 aircraft, and about three quarters of the required infantry.
I still need to acquire a goodly number of buildings, and decide if I'm going to face-lift my old terrain, while adding the new stuff, or just add the new stuff.

I store my micro armor in trays that slide into in one foot square wooden cubes (each holds six trays). I changed the design over the years, so the trays measure about 10 inches square or a little over 11 inches square and hold between roughly 150 to 250 vehicles depending on the size. Around 3200 models are shown in the photo above.

Above are most of my Cold War French with AMX13s, ERC90s, AMX-VTTs, through AMX30s among those represented. Some of the French forces for the 1950s will be represented by my American models, but I still need to add a number of French vehicles for the later formations. Between the unique vehicles designs and evolving TO&Es over the years, I find the French among the most interesting forces to play.

This is one of my UK trays, featuring Conquerors, Ferrets, Scorpions, Saracens, Saladins, and FV432s and variants in this tray. Most of their heavy armor, Centurions, Chieftains, and Challengers are in another tray.

West German Leopard 1s and M48s. Leo IIs, light armor, and support are in two other trays.

Once of six US trays, this one features APCs; M114s, M75s, M59s, and M113s.

1950s vintage US tanks, M41s, M47s, and M48s in this tray. Another has M60 variants, and yet another is for M1s and M2s.

Possibly the most interesting of the dozen Soviet trays with SAMs, radars, FROGs, and various bridging and engineering vehicles. There are almost 1500 pieces of Soviet equipment in all.

A tray of mostly T80s with re-active armor, a small number of these still need painted. I've focused on finishing the 1950s and 1960s vehicles first, then will finish the remaining 1970s and 1980s models.

A tray of WWII Soviet hardware that served in the 1950s (and later), particularly in some of the Warsaw pact nations. Various JSUs, SU100s, JSIIs, and T34/85s.

Mostly T55s and T62s of varying types from C in C and GHQ.

And some rides for the Soviet infantry, BTR50s, BMP1s, BTR152s (I still need a bunch more of these), and BTR60s of various models.
I still have between 100-200 models that still need paint, most of which require some of the more complex assembly or repair. Next up are nearly 200 aircraft, and about three quarters of the required infantry.
I still need to acquire a goodly number of buildings, and decide if I'm going to face-lift my old terrain, while adding the new stuff, or just add the new stuff.
Tuesday, October 29, 2019
AAR32: The Slugger Gets Slugged
The battle for Objective B32 was the last battle of the third day of the war. The battle had started with an expensive air encounter, and ended with a brutal clash on the ground. Objective B32 was key to blocking any future Mugabian counter attack from the south, and Uwanda was expending the the two most capable units available among the southern portion of their invading forces.

Objective B32 consists of a small town and cross-roads located in a shallow valley south of Objective 21.

Uwanda's attacking force consisted of two army task forces:
Task Force 1:
2x Saracen Overall HQ
1x mixed tank company of 6x Fireflys and 3x Centurions (3 under-strength platoons)
1x Infantry company (partial) with 7x Saracens and 6x squads of infantry
3x Ferrets
2x M42
1x Universal Carrier (Artillery HQ)
4x M7 Priest
Task Force 4:
2x Firefly platoons of 4x tanks each
1x infantry company of 13x M3 halftracks and 12 squads
1x Recce Squaron (reduced) with 3x Saladins, and 2x Ferrets
Air Support:
4x Skymaster loaded with 4 bombs each (if and when air superiority has been established)
Mugabia had three ground units available:
Garrison force B21 (much depleted from prior battles):
1x BTR60PK (overall HQ)
1x T34/85
1x BTR60PK w/squad
1x BRDM2
1x ZSU57/2
1x 122mm Gun w/truck
1x 120mm Mortar w/truck
3x BTR152 w/squads
Garrison Force 32:
10x T34/85
10x BTR60PK w/squad
2x BRDM
1x ZSU57
2x SU100
4x 120mm Mortar w/truck
Garrison Force 32-20:
7x BTR152 w/6 squads
2x Gaz67 (HQ)
2x ZU23/2 w/truck
4x 120mm Mortar w/truck
Air support:
4x Vautour with bombs (if and when air superiority was achieved)
The Plan:
Mugabian forces deployed around the town, in multiple lines of defense, hoping to force Uwanda armor to fight at close range with Mugabian infantry at every opportunity. The SU100s were deployed on a low rise to the southeast of the town.


Uwanda's forces initially would sweep around the the west side of the town before making contact. Then, TF1 was to attack straight down the main (west) road, intending to draw Mugabian forces toward the center of the town. TF4 would circle around the south side of the town, taking control of the south road, and cutting off any escape route for the Mugabians, then advance and clear out the Mugabians forces re-positioning to fight the frontal Uwandan attack from TF1.
The Mugabians knew the situation around them was chaotic, and had reports of Uwandan froces in every direction, so positioned their forces such that they could defend all three entry roads into the town.
The battle started as planned with Uwandan scouts deploying on the rise west of town, spotting a number of Mugabian positions. TF1 then attacked as planned, deploying Fireflys and Centurions off of the road as soon as contact was made.

The Mugabians scored the first hits, destroying a Firefly. Soon more were hit and destroyed on both sides of the road. In turn, the Fireflys destroyed T34s and BTR60s mostly along a tree line south of the road.

Mugabian mortars fired ineffectively at the Fireflys; while, the M7 Priests (deployed off table) fired with some effect against infantry in the tree line opposite the Fireflys. Centurions moved down the road, killing T34s in the town near the road, and then swung into the field to the south supporting the Shermans.

The Centurions eventually crossed the road into a field north of the road. T34s hit the Centurions, but could not destroy them, while taking losses to their numbers. Uwandan infantry deployed across the field from the Mugabians, behind the Centurions. The Centurions forced a morale failure on the part of the Mugabian infantry in the treeline, but two of the three Centurions took track hits about the same time, stalling their advance. Both vehicles continued to fight, and destroyed two more of the now withdrawing T34s.

Infantry from the south treeline (originally facing the Fireflys ), by this time, had redeployed along the road at the edge of town, and began engaging the tracked Centurions with RPGs. All three of the tanks were destroyed in time, while the infantry took few losses. The Uwanda infantry were positioned too far north to have significant effect on the Mugabians near the road.


As this fight was reaching its climax, Uwanda's TF4 had begun its advance to the south. Mugabia had also mobilized its small reserve of infantry to defend the western edge of the town just north of the west road.

TF4's advance was eventually spotted by a scout deployed on the hill with the SU100s, and they began to receive mortar fire. As the leading tanks of TF4 advanced to within 16oo meters of the SU100s, the SU100s opened up at long range. At first , they had no effect, firing at such long range, but then began scoring hits on the Shermans, knocking out several of the tanks, which were helpless against the SU100s at this range, while on the move.

Shortly after TF 4's tanks began brewing up, the mortars started scoring some hits on some of the half-tracks, and at about this time, word came from the battlefield commander, that the attack along the west road had completely stalled.

The commander of TF4 lost hope, as he watched his tanks burn up ahead, and gave the order to withdraw. By this point, the battlefield commander had ordered his forces to disengaged, losing his last tank in the process.

The Uwandan battlefield commander had request air support, but it was delayed by the fight for control of the airspace overhead. Word had never gotten to the Mugabian commander about the flight of Vautours, but as he didn't need them; it was not an issue.

Loses:
Uwanda:
10x Firefly
3x Centurion III
3x M3 halftrack
1x Saracen
27x KIA
9x WIA
Mugabia:
8x T34
4x BTR60PK
7x KIA
13x WIA
Captured:
1x Centurion III
2x M3 halftrack
The Uwandans got destroyed, paying heavily in the air, and on the ground, with surviving forces withdrawing back to objective 21. Despite the victory, the Mugabians are in disarray, and may not be able to take further advantage of the victory.
Uwanda's ground forces are badly depleted, particularly in the southern part of the invasion; while, Mugabias interceptor force is now nearly gone, out-numbered at least 5 to 1 by Uwanda's (now generally) superior F5 fleet.
B32 (Accidentally co-named B20) is in the lower right corner of the map.
Objective B32 consists of a small town and cross-roads located in a shallow valley south of Objective 21.

Uwanda's view of the battlefield looking east.
Uwanda's attacking force consisted of two army task forces:
Task Force 1:
2x Saracen Overall HQ
1x mixed tank company of 6x Fireflys and 3x Centurions (3 under-strength platoons)
1x Infantry company (partial) with 7x Saracens and 6x squads of infantry
3x Ferrets
2x M42
1x Universal Carrier (Artillery HQ)
4x M7 Priest
Task Force 4:
2x Firefly platoons of 4x tanks each
1x infantry company of 13x M3 halftracks and 12 squads
1x Recce Squaron (reduced) with 3x Saladins, and 2x Ferrets
Air Support:
4x Skymaster loaded with 4 bombs each (if and when air superiority has been established)
Mugabia had three ground units available:
Garrison force B21 (much depleted from prior battles):
1x BTR60PK (overall HQ)
1x T34/85
1x BTR60PK w/squad
1x BRDM2
1x ZSU57/2
1x 122mm Gun w/truck
1x 120mm Mortar w/truck
3x BTR152 w/squads
Garrison Force 32:
10x T34/85
10x BTR60PK w/squad
2x BRDM
1x ZSU57
2x SU100
4x 120mm Mortar w/truck
Garrison Force 32-20:
7x BTR152 w/6 squads
2x Gaz67 (HQ)
2x ZU23/2 w/truck
4x 120mm Mortar w/truck
Air support:
4x Vautour with bombs (if and when air superiority was achieved)
The Plan:
Mugabian forces deployed around the town, in multiple lines of defense, hoping to force Uwanda armor to fight at close range with Mugabian infantry at every opportunity. The SU100s were deployed on a low rise to the southeast of the town.

Mugabian forces deployed.

The SU100s looking west (left) above.
Uwanda's forces initially would sweep around the the west side of the town before making contact. Then, TF1 was to attack straight down the main (west) road, intending to draw Mugabian forces toward the center of the town. TF4 would circle around the south side of the town, taking control of the south road, and cutting off any escape route for the Mugabians, then advance and clear out the Mugabians forces re-positioning to fight the frontal Uwandan attack from TF1.
The Mugabians knew the situation around them was chaotic, and had reports of Uwandan froces in every direction, so positioned their forces such that they could defend all three entry roads into the town.
The battle started as planned with Uwandan scouts deploying on the rise west of town, spotting a number of Mugabian positions. TF1 then attacked as planned, deploying Fireflys and Centurions off of the road as soon as contact was made.

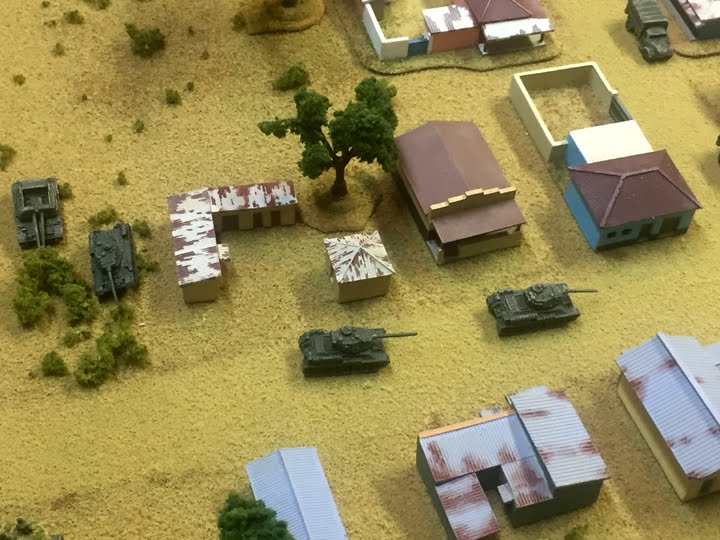
Mugabian forces in the distance.
The Mugabians scored the first hits, destroying a Firefly. Soon more were hit and destroyed on both sides of the road. In turn, the Fireflys destroyed T34s and BTR60s mostly along a tree line south of the road.

The shooting begins.
Mugabian mortars fired ineffectively at the Fireflys; while, the M7 Priests (deployed off table) fired with some effect against infantry in the tree line opposite the Fireflys. Centurions moved down the road, killing T34s in the town near the road, and then swung into the field to the south supporting the Shermans.

The battle progresses.
The Centurions eventually crossed the road into a field north of the road. T34s hit the Centurions, but could not destroy them, while taking losses to their numbers. Uwandan infantry deployed across the field from the Mugabians, behind the Centurions. The Centurions forced a morale failure on the part of the Mugabian infantry in the treeline, but two of the three Centurions took track hits about the same time, stalling their advance. Both vehicles continued to fight, and destroyed two more of the now withdrawing T34s.

Centurions crossing into the field north of the road.
Infantry from the south treeline (originally facing the Fireflys ), by this time, had redeployed along the road at the edge of town, and began engaging the tracked Centurions with RPGs. All three of the tanks were destroyed in time, while the infantry took few losses. The Uwanda infantry were positioned too far north to have significant effect on the Mugabians near the road.

Tracked Centurions.

Dead Centurions.
As this fight was reaching its climax, Uwanda's TF4 had begun its advance to the south. Mugabia had also mobilized its small reserve of infantry to defend the western edge of the town just north of the west road.

Uwanda's Task Force 4 advances.

Shortly after TF 4's tanks began brewing up, the mortars started scoring some hits on some of the half-tracks, and at about this time, word came from the battlefield commander, that the attack along the west road had completely stalled.

Uwanda's Infantry start to withdraw.
The commander of TF4 lost hope, as he watched his tanks burn up ahead, and gave the order to withdraw. By this point, the battlefield commander had ordered his forces to disengaged, losing his last tank in the process.

The Uwandan battlefield commander had request air support, but it was delayed by the fight for control of the airspace overhead. Word had never gotten to the Mugabian commander about the flight of Vautours, but as he didn't need them; it was not an issue.

Loses:
Uwanda:
10x Firefly
3x Centurion III
3x M3 halftrack
1x Saracen
27x KIA
9x WIA
Mugabia:
8x T34
4x BTR60PK
7x KIA
13x WIA
Captured:
1x Centurion III
2x M3 halftrack
The Uwandans got destroyed, paying heavily in the air, and on the ground, with surviving forces withdrawing back to objective 21. Despite the victory, the Mugabians are in disarray, and may not be able to take further advantage of the victory.
Uwanda's ground forces are badly depleted, particularly in the southern part of the invasion; while, Mugabias interceptor force is now nearly gone, out-numbered at least 5 to 1 by Uwanda's (now generally) superior F5 fleet.
Monday, October 28, 2019
AAR31: Blood in the Sky
The battle of Objective B32 contrasted greatly with the other battles of the day in that it started with the fiercely contested air battle. Uwanda was able to field two F5E Tiger IIs, and four F5A Freedom Fighters to clear the skies for close air support. Mugabia defended with four Mig 21s, and a pair of Mig 15s.
The F5Es were equipped with a two AIM-9L all-aspect Sidewinders missiles, while the F5As carried a pair of AIM-9B rear aspect only Sidewinders. The Mig 21s carried a pair of AA-2 Atoll missiles, a close copy of the AIM-9B. All of the fighters were equipped with their respective guns.
The shooting started with the pair of F5Es leading the way, each launching a missile at Mig21s to the left of the formation rapidly approaching. One of the missiles found its target, breaking up the Mig very quickly; a parachute was seen descending from the wreck. The other missile was successfully evaded.

Heart pounding, Jalil saw the missile coming in from ahead. At the last second, he dove turning sharply first one way, and then the other. He expected the explosion, but the missile passed behind him, turning sharply, but not sharp enough. Turning his head, he saw the missile had crossed behind him, now rapidly travelling away from his jet. "I can't believe it worked! That was not so hard as I thought." Now to kill the man that tried to kill him.

As the aircraft closed, the F5Es fired another pair of missiles at the other two Mig21s at very close range. Amazingly, both missiles missed their targets and the F5Es suddenly found themselves in gun range of the Migs,

While the remaining Mig from the first pair turned north, the other pair of Migs closed with the F5s for head on shots. Almost simultaneously, all four aircraft fired, one of the F5Es disintegrated, with the pilot somehow escaping from the airborne cloud of debris.

The surviving F5E turned and dove, while the Migs continued on their path, heading towards the two closest F5As. The other two F5As turned to engage the single Mig21 to the north. The single Mig in turn, headed for the surviving F5E. All the while, the two Mig 15 pilots listened on the radio to the fight taking place, while their aircraft screamed at maximum speed, trying to get their in time to take part.
The pair of Migs exchanged shots with the pair of F5As, all of the aircraft finding themselves caught in a complex furball. The single Mig suddenly found itself with a shot on one of the F5As, but missed, then received minor damage from another of the F5As. The F5E, lost by the single Mig, still trying to climb back into the fight took a hit from one of the pair of Migs, and trailing smoke, lost power. The pilot would survive the fight, but his jet would not make it home.

The pair of F5As engaging the pair of Migs, momentarily got the advantage, both firing a missile at one of the Migs, one of which killed the Mig.

The second Mig21 of the second pair lined up shots twice on an F5A, but missed both shots. The other F5A also missed a shot on him. By this time, all of the aircraft found themselves in a cluster, and both of the F5As that were chasing the Mig from the first pair, got missile shots on the Mig from the second pair. The first missile turned the Mig into a fireball, the second missile then hit the fireball.
The single remaining Mig from the first pair, found itself in a swarm of F5s, and decided to try to fight his way out of it. The Mig tried to lined up a shot one of the F5As, while being chased by two more. Unfortunately, before he could line up his next shot, an F5A behind him fired, wounding the Mig pilot, Jalil, and forcing him to try to disengage.
At about this time, the two Mig 15s arrived on the scene, the first pair of F5As spotted the newcomers, and announced their presence. All four F5As turned towards the Mig15s. The two lead F5As closed trying to get the advantage, so that they could fire missiles. The leading aircraft from each side, fired at the other, the Mig missed, but the F5 did not. Several round went through the engine of the Mig15, which immediately went into a dive.

The remaining Mig 15 lined up on the other F5A at long range, fired a burst and took minor damage from the F5. The F5 was riddled with damage losing engine power, flight control and weapons control, and a lot of fuel. The pilot was later rescued.

The Mig 15 continued forward, closing with the next closest F5A, firing a long range burst, and watching the F5A turn away, trailing smoke.
The Mig then found itself in the sites of a third F5A, and got a shot off, just before a couple 20mm rounds came through his cockpit. The Mig pilot died instantly, but would be remembered as a hero, as the fleeing Mig 21 pilot had seen how the Mig15 had saved him. The F5A took very minor damage, but his guns were fowled, and out of missiles, he had no weapons.

The disarmed F5A remained on station to assist his wingman in protecting the forces on the ground. After all, the enemy didn't know his guns were jammed. During the fighting in the air, the ground battle at B32 had gotten underway. Hopefully the close air support could now come in and help their cause.
Losses:
Uwanda:
2x F5E
2x F5A
Mugabia:
3x Mig21
2x Mig15
An expensive battle for both sides, resulting in likely delays for ground attack aircraft for both sides.
I was surprised at how bad the AIM-9Ls did v. the Mig 21s, 1 fo 4 not being a great success rate. Again, the superior guns of the Migs proved a great threat, allowing notable hits at much longer range, than what the F5's guns could do. The success of the Mig15s was a bit of a surprise, as lining up the shots is still hard, and the frequency of "pilots hit" and "pilot killed" was disproportionate in this game.
B32 is located in the lower right on the map above.
The F5Es were equipped with a two AIM-9L all-aspect Sidewinders missiles, while the F5As carried a pair of AIM-9B rear aspect only Sidewinders. The Mig 21s carried a pair of AA-2 Atoll missiles, a close copy of the AIM-9B. All of the fighters were equipped with their respective guns.
The shooting started with the pair of F5Es leading the way, each launching a missile at Mig21s to the left of the formation rapidly approaching. One of the missiles found its target, breaking up the Mig very quickly; a parachute was seen descending from the wreck. The other missile was successfully evaded.

F5Es fire their Sidewinders.
Heart pounding, Jalil saw the missile coming in from ahead. At the last second, he dove turning sharply first one way, and then the other. He expected the explosion, but the missile passed behind him, turning sharply, but not sharp enough. Turning his head, he saw the missile had crossed behind him, now rapidly travelling away from his jet. "I can't believe it worked! That was not so hard as I thought." Now to kill the man that tried to kill him.

Missile evaded!
As the aircraft closed, the F5Es fired another pair of missiles at the other two Mig21s at very close range. Amazingly, both missiles missed their targets and the F5Es suddenly found themselves in gun range of the Migs,

Gunfight!
While the remaining Mig from the first pair turned north, the other pair of Migs closed with the F5s for head on shots. Almost simultaneously, all four aircraft fired, one of the F5Es disintegrated, with the pilot somehow escaping from the airborne cloud of debris.

FrE being chased by an AA-2.
The surviving F5E turned and dove, while the Migs continued on their path, heading towards the two closest F5As. The other two F5As turned to engage the single Mig21 to the north. The single Mig in turn, headed for the surviving F5E. All the while, the two Mig 15 pilots listened on the radio to the fight taking place, while their aircraft screamed at maximum speed, trying to get their in time to take part.
The pair of Migs exchanged shots with the pair of F5As, all of the aircraft finding themselves caught in a complex furball. The single Mig suddenly found itself with a shot on one of the F5As, but missed, then received minor damage from another of the F5As. The F5E, lost by the single Mig, still trying to climb back into the fight took a hit from one of the pair of Migs, and trailing smoke, lost power. The pilot would survive the fight, but his jet would not make it home.

The "furball".
The pair of F5As engaging the pair of Migs, momentarily got the advantage, both firing a missile at one of the Migs, one of which killed the Mig.

Mig 21 in a bad way.
The second Mig21 of the second pair lined up shots twice on an F5A, but missed both shots. The other F5A also missed a shot on him. By this time, all of the aircraft found themselves in a cluster, and both of the F5As that were chasing the Mig from the first pair, got missile shots on the Mig from the second pair. The first missile turned the Mig into a fireball, the second missile then hit the fireball.
The single remaining Mig from the first pair, found itself in a swarm of F5s, and decided to try to fight his way out of it. The Mig tried to lined up a shot one of the F5As, while being chased by two more. Unfortunately, before he could line up his next shot, an F5A behind him fired, wounding the Mig pilot, Jalil, and forcing him to try to disengage.
At about this time, the two Mig 15s arrived on the scene, the first pair of F5As spotted the newcomers, and announced their presence. All four F5As turned towards the Mig15s. The two lead F5As closed trying to get the advantage, so that they could fire missiles. The leading aircraft from each side, fired at the other, the Mig missed, but the F5 did not. Several round went through the engine of the Mig15, which immediately went into a dive.

The Mig 15s arrive.
The remaining Mig 15 lined up on the other F5A at long range, fired a burst and took minor damage from the F5. The F5 was riddled with damage losing engine power, flight control and weapons control, and a lot of fuel. The pilot was later rescued.

An F5A going down.
The Mig 15 continued forward, closing with the next closest F5A, firing a long range burst, and watching the F5A turn away, trailing smoke.
The Mig then found itself in the sites of a third F5A, and got a shot off, just before a couple 20mm rounds came through his cockpit. The Mig pilot died instantly, but would be remembered as a hero, as the fleeing Mig 21 pilot had seen how the Mig15 had saved him. The F5A took very minor damage, but his guns were fowled, and out of missiles, he had no weapons.

The last Mig falls from the sky.
The disarmed F5A remained on station to assist his wingman in protecting the forces on the ground. After all, the enemy didn't know his guns were jammed. During the fighting in the air, the ground battle at B32 had gotten underway. Hopefully the close air support could now come in and help their cause.
Losses:
Uwanda:
2x F5E
2x F5A
Mugabia:
3x Mig21
2x Mig15
An expensive battle for both sides, resulting in likely delays for ground attack aircraft for both sides.
I was surprised at how bad the AIM-9Ls did v. the Mig 21s, 1 fo 4 not being a great success rate. Again, the superior guns of the Migs proved a great threat, allowing notable hits at much longer range, than what the F5's guns could do. The success of the Mig15s was a bit of a surprise, as lining up the shots is still hard, and the frequency of "pilots hit" and "pilot killed" was disproportionate in this game.
Thursday, October 24, 2019
AAR30: Resuming The Push
After a much longer break than expected, I fielded my first 6mm African imagi-nation battle. The battle took place at the village at Objective B6 on the map in north-western Mugabia, and featured Uwandan Army forces attacking the defending Mugabians.
Mugabian forces consisted of the following:
1x Motorised infantry company in 11 trucks with 9 squads of troops
1x T34/85 company of 10 tanks
3x 120mm motars w/truck
2x ZPU4 AA gun w/truck
2x 85mm ATG w/truck
2x BRDM2 scout car
2x SU100 tank destroyer
Uwanda's attacking force consisted of two elements:
Task force 7
2x Saracen Command post
8x Centurion III
1x Mech infantry company with 11x Saracens and 10 squads
2x Wombat
3x Saladin
Task Force 8
8x Centurion III
1x infantry company with 13 Saracens and 12 infantry squads
2x Wombat
1x Universal Carrier (Arty HQ element)
4x M7 Priest
The land surrounding Objective B6 is flat and open (good tank country, bad for infantry), with few trees and bushes separating largely unproductive farm fields.


The Battle
The battle started in the air (well, almost) with Uwanda's Air Force providing 4x F5A Freedom Fighters for top cover. they quickly chased away a pair of Mig17s, and a single Mig 15 without incident, providing safe passage for a flight of G91 attack aircraft that were never called upon.
The land battle commenced at 0800 with Uwandan Saladins approaching the village and scouts dismounting, trying to make contact with the enemy, a process that took some time and concerned their HQ.
Almost as soon as the scouts found the Mugabians, a Mugabian SU100 found one of the Saladins, began long range fire, chasing it from view.

Being aware of Uwanda's prior experiences with their tanks and Mugabian RPGs, the Uwandan commander decided to advance with his APCs, supported by the Centurions. He wanted his infantry to thin out the Mugabian rockets, before getting shots at the tanks.

In time Mugabians sighted and engaged the oncoming Saracens, first with an 85mm gun, then with the T34s, tracking one Saracen, and destroying another. Artillery destroyed the tracked vehicle and killed one of the squads. Centurions returned fire, destroying both the 85mm gun, and three T34/85s.
At around 800 meters range, the Uwandan infantry deployed into cover, and began exchanging fire with the Mugabian infantry. The Mugabian BRDM began firing its heavy machinegun, but was quickly dispatched by a Centurion.

The infantry closed to inside 600 meters, exchanging fire all and the way, but only inflicted very light casualties on the Mugabians at this range. Given the condition of the Mugabian forces, light casualties were enough to push them pass the breaking point, Mugabian morale failed and troops began to fall back.

The Mugabian commander tried to employ his reserve, but it was simply too small, had too far to move, and could not save the flank. Some T34s advanced near the road engaging Centurions, but were outnumbered and out-gunned, and quickly silenced. As Mubabian infatry were overtaken, a small number of troops surrendered.


The Mugabian commander knew the cause was lost and had already ordered a withdrawal. Objective B6 was now Uwanda territory. And, unknown to the Mugabain commander, so was the objective to which his forced retreated.

Losses:
Uwanda:
2x Saracen
1x Landrover/Wombat
14x KIA
Mugabia:
5x T34/85
5x trucks
2x ZPU4
1x BRDM
2x 85mm gun
15x KIA
23x WIA (Pow)
13x POW
Captured by Uwanda:
1x T34/85 (tracked)
4x trucks
1x GAZ69
1x 85mm gun
1x ZPU4
Thoughts:
As I set up the game, I realized that this was quite the mis-match, and despite much anticipation, the game was a bit anti-climactic. The T34/85s are no match for the Centurions, Mugabia didn't have enough infantry to cover the ground that needed covered, and pulling back into a tighter circle around the town would have made then a choice target for air attack.
It is probably well enough that the game was so lop-sided, as I got re-acquainted with 6mm scale, ranges and movement. It was a little bit of an adjustment for me, and I'm glad that it didn't happen in a closely contested battle, where I might have erred with respect to scale, such that it skewed the outcome of the game.
The next battle at Objective B32, which is already in process, is a very different creature, full of drama and surprises.
Objective B6 is a Mugabian town roughly top center above
Mugabian forces consisted of the following:
1x Motorised infantry company in 11 trucks with 9 squads of troops
1x T34/85 company of 10 tanks
3x 120mm motars w/truck
2x ZPU4 AA gun w/truck
2x 85mm ATG w/truck
2x BRDM2 scout car
2x SU100 tank destroyer
Uwanda's attacking force consisted of two elements:
Task force 7
2x Saracen Command post
8x Centurion III
1x Mech infantry company with 11x Saracens and 10 squads
2x Wombat
3x Saladin
Task Force 8
8x Centurion III
1x infantry company with 13 Saracens and 12 infantry squads
2x Wombat
1x Universal Carrier (Arty HQ element)
4x M7 Priest
The land surrounding Objective B6 is flat and open (good tank country, bad for infantry), with few trees and bushes separating largely unproductive farm fields.

The battlefield generally looking east toward the Mugabian forces.

Mugabians blocking teh road into town.
The Battle
The battle started in the air (well, almost) with Uwanda's Air Force providing 4x F5A Freedom Fighters for top cover. they quickly chased away a pair of Mig17s, and a single Mig 15 without incident, providing safe passage for a flight of G91 attack aircraft that were never called upon.
The land battle commenced at 0800 with Uwandan Saladins approaching the village and scouts dismounting, trying to make contact with the enemy, a process that took some time and concerned their HQ.
Almost as soon as the scouts found the Mugabians, a Mugabian SU100 found one of the Saladins, began long range fire, chasing it from view.

Mugabian forces along the western (left) frnges of town(really, they are there).
Being aware of Uwanda's prior experiences with their tanks and Mugabian RPGs, the Uwandan commander decided to advance with his APCs, supported by the Centurions. He wanted his infantry to thin out the Mugabian rockets, before getting shots at the tanks.

Following the Uwandan advance. Mortars and M7s are landing rounds.
In time Mugabians sighted and engaged the oncoming Saracens, first with an 85mm gun, then with the T34s, tracking one Saracen, and destroying another. Artillery destroyed the tracked vehicle and killed one of the squads. Centurions returned fire, destroying both the 85mm gun, and three T34/85s.
At around 800 meters range, the Uwandan infantry deployed into cover, and began exchanging fire with the Mugabian infantry. The Mugabian BRDM began firing its heavy machinegun, but was quickly dispatched by a Centurion.

Uwanda's infantry dismounting (roughly center of the photo).
The infantry closed to inside 600 meters, exchanging fire all and the way, but only inflicted very light casualties on the Mugabians at this range. Given the condition of the Mugabian forces, light casualties were enough to push them pass the breaking point, Mugabian morale failed and troops began to fall back.

Mugabian infantry falling back.
The Mugabian commander tried to employ his reserve, but it was simply too small, had too far to move, and could not save the flank. Some T34s advanced near the road engaging Centurions, but were outnumbered and out-gunned, and quickly silenced. As Mubabian infatry were overtaken, a small number of troops surrendered.

T34/85s other side of the road preparing to die.
The reserve wondering about pointlessly.
The Mugabian commander knew the cause was lost and had already ordered a withdrawal. Objective B6 was now Uwanda territory. And, unknown to the Mugabain commander, so was the objective to which his forced retreated.

The overall situation near the end.
Losses:
Uwanda:
2x Saracen
1x Landrover/Wombat
14x KIA
Mugabia:
5x T34/85
5x trucks
2x ZPU4
1x BRDM
2x 85mm gun
15x KIA
23x WIA (Pow)
13x POW
Captured by Uwanda:
1x T34/85 (tracked)
4x trucks
1x GAZ69
1x 85mm gun
1x ZPU4
Thoughts:
As I set up the game, I realized that this was quite the mis-match, and despite much anticipation, the game was a bit anti-climactic. The T34/85s are no match for the Centurions, Mugabia didn't have enough infantry to cover the ground that needed covered, and pulling back into a tighter circle around the town would have made then a choice target for air attack.
It is probably well enough that the game was so lop-sided, as I got re-acquainted with 6mm scale, ranges and movement. It was a little bit of an adjustment for me, and I'm glad that it didn't happen in a closely contested battle, where I might have erred with respect to scale, such that it skewed the outcome of the game.
The next battle at Objective B32, which is already in process, is a very different creature, full of drama and surprises.
Wednesday, October 16, 2019
A Funny Thing Happened
Yesterday, I got up, went to the basement for another painting session, and was confronted with this:

That empty area in front of all that paint has been filled with a constant parade of no less than 80 pieces of micro-armor trudging through the painting line since January. Over 1500 miniatures later... emptiness!
I sat there for a few minutes, sort of lost, wondering what I should work on next. Then suddenly it hit me; I still had those African buildings to finish. The same buildings that I've been needing to finish for about a year. The ones that I just couldn't seem to make any progress on. The ones that gave way to the 1500 pieces of micro armor all those months ago. And something else happened. All of a sudden, I could "see" them.
By "see" them, I mean, see what they should look like, and want to paint them. Something that hadn't happened in all the time that I had been trying to get them done. Yeah, I know, I even had pictures of many of them, but I just couldn't get the mojo going with them.
So, I grabbed the ten remaining buildings that I had prepped to paint (last October/November), and got to it. A day and a half later, I finished those ten African buildings that had been holding me up for months. Here they are:

And below are the 11 buildings that I finished in the twelve months prior to the last two days:

Half of them still need some flock added to them; that'l come in a night or two. But now I can finally get on with my modern African campaign that has been on hold for a year and a half.
Its funny, I struggled so much with getting these done. They just didn't flow, then all of a sudden... Boom. Done.
I even managed to get 22 stands of 6mm Mugabian infantry finished at the same time, this weekend, I will likely be playing the next battle in my imagi-nation campaign, my first in 6mm.
Now I just need to figure out where i buried my folder with all of the info for the battles...
Subscribe to:
Posts (Atom)


