My sole gaming accomplishment in the last two months has been to paint some Centurion Mk IIIs for Uwanda's Army.
These are the 20pdr armed Centurion Mk III models from QRF and are quite nice. The model comes in six pieces including the side skirts, which I opted not to use, as I expect to eventually have later 105mm armed Mk V, and want to readily distinguish between the two versions.
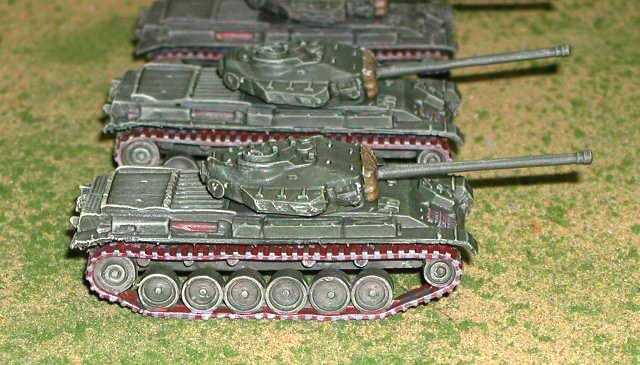
Though not the most modern tank in Uwanda Army service, these Centurions make up the heart of the Uwanda's armored formations, and have proved to be more than a match for Mugabia's T34/85s. They will play an important part in upcoming battles between the two imagi-nations.
Above the Centurion is pictured with the other tanks in Uwandan service. The Sherman Firefly (left) from Gaming Models, and the Vickers Mk III (right) from QRF.
Showing posts with label QRF. Show all posts
Monday, June 27, 2016
Sunday, April 10, 2016
Fantastical Thoughts and Other Odds and Ends 4-10-16
Did a little bit of everything today; cleaning, sorting, painting and building (well, everything but gaming).
During my sorting and cleaning, I came across some Tom Meier elves that I bought some years ago to give me a break from using dwarves against my daughter' Orcs. As it turned out, she started to lose interest in gaming shortly after that, so I only ever painted a single elf. This was a test run for a color scheme.
These are really nice figs, with outstanding fine detail; I didn't do it any justice. He stands about 31mm tall from bottom of foot to top of the white portion of the helmet. At the time, there were three basic styles, with variations in helmet, and armor, and each came as spearmen on foot, mounted, and bowmen. Looking at the site now, it doesn't look like all of these are currently available, though some of the figs are, as well as other wonderful sculpts from Mr. Meier at Thunderbolt Mountain Miniatures .
Some of my earliest miniature gaming took place as an off-shoot of D&D with fantasy miniatures. I largely drifted away from fantasy in the 1980s, despite buying a bunch of dwarves for an abandoned consideration of Warhammer by my old gaming group in the 1990s. And even with revisiting it during my daughter's brief interest, I haven't seriously gamed fantasy miniatures in decades.
Over the last year, I have been resisting a draw to re-explore fantasy miniatures, and from time to time, have pulled out old plans for an elven village, dwarf fortress, and other models conceived for that Warhammer expedition.
A couple of days ago, I ventured to the local hobby shop, which has started carrying Ral Partha and Ironwind figs and army packs, and almost bought a bunch of 25mm orcs and goblins on the spot. Many are figures that I used in those D&D games, all those years ago. Today, when I stumbled onto the tray with the lone painted elf and his brethren, it seemed a fateful coincidence. A draw, slight at first, then more intoxicating as I considered the elves spread across the tray, seeing them as they might appear, with proper paint, defending their home from the forces of evil. I fear that it is only a matter of time before a new quest begins...
And in other news, I managed to get paint on a few things, finishing my modified 15mm Jeep TOWs in the process:
I also discovered that the few pots of GW paint that had bought over the years had all solidified. Their place on the painting table quickly taken by the Vallejo bottles that I found on close-out at Hobby Lobby yesterday for 39 cents each. WOO-HOO!
My other big success of the day was building a mate to my ZU23/T34 conversion for my African imagi-nation army. I originally started two of them, completing one, and losing the other in my basement flood a couple of years back. In an effort to use up a few pieces-parts sitting on my table, I built a second model for the Mugabian army. Here it is after construction:
Now lets see how many years it takes to get it painted.
During my sorting and cleaning, I came across some Tom Meier elves that I bought some years ago to give me a break from using dwarves against my daughter' Orcs. As it turned out, she started to lose interest in gaming shortly after that, so I only ever painted a single elf. This was a test run for a color scheme.
These are really nice figs, with outstanding fine detail; I didn't do it any justice. He stands about 31mm tall from bottom of foot to top of the white portion of the helmet. At the time, there were three basic styles, with variations in helmet, and armor, and each came as spearmen on foot, mounted, and bowmen. Looking at the site now, it doesn't look like all of these are currently available, though some of the figs are, as well as other wonderful sculpts from Mr. Meier at Thunderbolt Mountain Miniatures .
Some of my earliest miniature gaming took place as an off-shoot of D&D with fantasy miniatures. I largely drifted away from fantasy in the 1980s, despite buying a bunch of dwarves for an abandoned consideration of Warhammer by my old gaming group in the 1990s. And even with revisiting it during my daughter's brief interest, I haven't seriously gamed fantasy miniatures in decades.
Over the last year, I have been resisting a draw to re-explore fantasy miniatures, and from time to time, have pulled out old plans for an elven village, dwarf fortress, and other models conceived for that Warhammer expedition.
A couple of days ago, I ventured to the local hobby shop, which has started carrying Ral Partha and Ironwind figs and army packs, and almost bought a bunch of 25mm orcs and goblins on the spot. Many are figures that I used in those D&D games, all those years ago. Today, when I stumbled onto the tray with the lone painted elf and his brethren, it seemed a fateful coincidence. A draw, slight at first, then more intoxicating as I considered the elves spread across the tray, seeing them as they might appear, with proper paint, defending their home from the forces of evil. I fear that it is only a matter of time before a new quest begins...
And in other news, I managed to get paint on a few things, finishing my modified 15mm Jeep TOWs in the process:
I also discovered that the few pots of GW paint that had bought over the years had all solidified. Their place on the painting table quickly taken by the Vallejo bottles that I found on close-out at Hobby Lobby yesterday for 39 cents each. WOO-HOO!
My other big success of the day was building a mate to my ZU23/T34 conversion for my African imagi-nation army. I originally started two of them, completing one, and losing the other in my basement flood a couple of years back. In an effort to use up a few pieces-parts sitting on my table, I built a second model for the Mugabian army. Here it is after construction:
Now lets see how many years it takes to get it painted.
Labels:
15mm Africa,
25mm Fantasy,
elf,
elves,
Imagi-nation,
Ironwind,
QRF,
Ral Partha,
Thunderbolt Mountain,
Tom Meier
Sunday, March 20, 2016
Clearing Off the Paint Table a Little
It has been about eight weeks since I last had a day of hobby time. So I did a little cleaning in the basement, putting away some of the clutter that had accumulated, and managed to finish up a few odds and ends on the paint table.
First item done is one of ArmiesArmy's ASU 85s, making three thus far for my forces:
This is probably may all-time favorite 15mm modern casting. They are just so clean and nicely detailed. Can't wait to get some of their British stuff.
Next was to finish off the bases on some AT3 Sagger teams for my Mugabian forces. Yes, ATGMs are coming to imagi-Africa:
These are QRF figs that came in a recent order from ScaleCreep which consistently offers some of the best service in the hobby.
Uwanda will get Milans:
These are QRF German Milan teams painted in Uwanda's colors. Nice figs that have me wanting to build West Germans for the Cold War. (By the way, QRF is expanding their range of Leopard 1s, if you haven't heard already)
While going through an old model kit box recently, I found a long lost old Imperial Guard figure, so decided to paint him up:
I love these old figs, and will replace one of my plastic IG figs with this one. It was kind of cool to find him after being lost for about 26 years.
I recently stumbled into my second 1/100 Fouga Magister kit:
An old Starfix kit made in Israel. It builds up into a nice little model. Here is a pic of my other one in Uwanda Air Force markings.
Took about two years to find this one, and two more years to locate the second.
Last of my day's accomplishments was to add some detail to a pair of Jeeps with TOW atgm. The original models are metal castings from QRF. While looking at photos, I realized that there were a bunch of different configurations of this vehicle, so I decided to spruce mine up and make them a little different.
And primed, but not yet painted:
These will be painted to use with my late 1970s/early 1980s US cold war forces.
May not seem like much, but I got 14 models off of my table (and a bunch of clutter), and two piles of pieces ready for paint. I'm one step closer to space for work on my post-apoc vehicles, and the hospital for an upcoming Uwanda-Mugabia war scenario.
First item done is one of ArmiesArmy's ASU 85s, making three thus far for my forces:
This is probably may all-time favorite 15mm modern casting. They are just so clean and nicely detailed. Can't wait to get some of their British stuff.
Next was to finish off the bases on some AT3 Sagger teams for my Mugabian forces. Yes, ATGMs are coming to imagi-Africa:
These are QRF figs that came in a recent order from ScaleCreep which consistently offers some of the best service in the hobby.
Uwanda will get Milans:
These are QRF German Milan teams painted in Uwanda's colors. Nice figs that have me wanting to build West Germans for the Cold War. (By the way, QRF is expanding their range of Leopard 1s, if you haven't heard already)
While going through an old model kit box recently, I found a long lost old Imperial Guard figure, so decided to paint him up:
I love these old figs, and will replace one of my plastic IG figs with this one. It was kind of cool to find him after being lost for about 26 years.
I recently stumbled into my second 1/100 Fouga Magister kit:
An old Starfix kit made in Israel. It builds up into a nice little model. Here is a pic of my other one in Uwanda Air Force markings.
Took about two years to find this one, and two more years to locate the second.
Last of my day's accomplishments was to add some detail to a pair of Jeeps with TOW atgm. The original models are metal castings from QRF. While looking at photos, I realized that there were a bunch of different configurations of this vehicle, so I decided to spruce mine up and make them a little different.
And primed, but not yet painted:
These will be painted to use with my late 1970s/early 1980s US cold war forces.
May not seem like much, but I got 14 models off of my table (and a bunch of clutter), and two piles of pieces ready for paint. I'm one step closer to space for work on my post-apoc vehicles, and the hospital for an upcoming Uwanda-Mugabia war scenario.
Labels:
1/100,
15mm,
Armies Army,
ASU85,
Imperial Guard,
Jeep Tow,
JeepTow,
Magister,
QRF,
Scale Creep
Monday, January 18, 2016
The Uwanda/Mugabia War: A Turn for the Worst
This weekend I spent some time thinking about the war between Uwanda and Mugabia, rolled some dice, and thought a bit about things some more. I also caught all of the lists and records up to date and began preparing for the future. So here is a window looking into the direction of the war between the nations of Uwanda and Mugabia.
______________________
The Mugabian President stood in the conference room and frowned at his generals.
"What do you mean, Mugabia's greatest war hero is an a Uwandan hospital? Uwanda's troops stand on Mugabian soil; our hero lies in their hospital, and you have nothing to say? Tell me, do you enjoy breathing?"
As always, the President found just the right words to motivate his officers. A plan was quickly offered to remove the Uwandan troops from Mugabia, and shortly afterward, a second plan put forth for the liberation of Mugabia's greatest hero.
______________________
Uwanda's chief of staff looked across the table, meeting the eyes of each of the generals seated there. He began, "Well gentlemen, what do we do now? I am open to suggestions."
The attack at B15 did not lead to the string of anticipated successes, largely due to the leadership of a man now recovering from his wounds in a Uwandan hospital.
The Uwandan chiefs considered a number of options, and in time a consensus was reached. It was finally time to go to war. To this point, even the action at B15 had been conducted with a minimum commitment. Every effort had been made to avoid escalating the scope of the conflict. But a year had passed, as had the appeals by Uwanda to find a peaceful solution. Mugabia's occupation of Uwanda's territory could no longer be tolerated, and the ULF's absurd demands simply could not be met.
Uwanda would mobilize. Requests to allies for help achieving a peaceful solution would be replaced by orders for war materials. Uwanda would aggressively protect its sovereignty. A large scale offensive would be launched with the aim of regaining lost territory, destroying Mugabia's ability to make war, and to capture or kill the Mugabian president. Preparations were under way...
Note: Vehicles and Mugabian Presidential Guard (Soviet naval infantry) by QRF, the president and officer figures by Peter Pig.
______________________
The Mugabian President stood in the conference room and frowned at his generals.
"What do you mean, Mugabia's greatest war hero is an a Uwandan hospital? Uwanda's troops stand on Mugabian soil; our hero lies in their hospital, and you have nothing to say? Tell me, do you enjoy breathing?"
As always, the President found just the right words to motivate his officers. A plan was quickly offered to remove the Uwandan troops from Mugabia, and shortly afterward, a second plan put forth for the liberation of Mugabia's greatest hero.
Mugabia's President Upepo-mfuko reviews the elite Presidential Guard.
______________________
Uwanda's chief of staff looked across the table, meeting the eyes of each of the generals seated there. He began, "Well gentlemen, what do we do now? I am open to suggestions."
The attack at B15 did not lead to the string of anticipated successes, largely due to the leadership of a man now recovering from his wounds in a Uwandan hospital.
The Uwandan chiefs considered a number of options, and in time a consensus was reached. It was finally time to go to war. To this point, even the action at B15 had been conducted with a minimum commitment. Every effort had been made to avoid escalating the scope of the conflict. But a year had passed, as had the appeals by Uwanda to find a peaceful solution. Mugabia's occupation of Uwanda's territory could no longer be tolerated, and the ULF's absurd demands simply could not be met.
Uwanda would mobilize. Requests to allies for help achieving a peaceful solution would be replaced by orders for war materials. Uwanda would aggressively protect its sovereignty. A large scale offensive would be launched with the aim of regaining lost territory, destroying Mugabia's ability to make war, and to capture or kill the Mugabian president. Preparations were under way...
Vickers Mk.III main battle tanks of the Uwandan army on maneuvers.
Note: Vehicles and Mugabian Presidential Guard (Soviet naval infantry) by QRF, the president and officer figures by Peter Pig.
Labels:
15mm Modern,
African Imagi-Nations,
Peter Pig,
QRF
Friday, September 25, 2015
QRF Comes Through BigTime!
It has been the worst day of a rough week in a month of rough weeks. A day of sleeplessness, physical pain, ridiculous stress, and getting home with realization that work may have been the easiest part of the day.
And then something strange happened.
Earlier this summer, I mentioned having problems with an order from QRF. I contacted QRF, and they said that they would fix the problems. And I waited a bit, and nothing happened. And I got impatient, as I sometimes do. And a little more time passed. And then I got home from work today, and there was an unexpected package in the mail.
As I opened the package, rays of sunshine burst forth, slicing through the gloom, and I'm sure that I heard angel's sing (either that or my neighbor's stereo was too high again), and inside were all sorts of 15mm modern goodness. They fixed the problems and much more.
Seriously, QRF went above and beyond, correcting the error and making things well beyond right. My thanks to QRF, Chas, Geoff, and to anyone there that I am missing. Absolutely first class. It couldn't have come at a better time. Again, thank you very, very much.
And, the newly re-molded Saracen is really nice. Crisp, clean, and regal in all its Cold War glory (for those who might be considering them).
And then something strange happened.
Earlier this summer, I mentioned having problems with an order from QRF. I contacted QRF, and they said that they would fix the problems. And I waited a bit, and nothing happened. And I got impatient, as I sometimes do. And a little more time passed. And then I got home from work today, and there was an unexpected package in the mail.
As I opened the package, rays of sunshine burst forth, slicing through the gloom, and I'm sure that I heard angel's sing (either that or my neighbor's stereo was too high again), and inside were all sorts of 15mm modern goodness. They fixed the problems and much more.
Seriously, QRF went above and beyond, correcting the error and making things well beyond right. My thanks to QRF, Chas, Geoff, and to anyone there that I am missing. Absolutely first class. It couldn't have come at a better time. Again, thank you very, very much.
And, the newly re-molded Saracen is really nice. Crisp, clean, and regal in all its Cold War glory (for those who might be considering them).
Labels:
15mm,
modern figures,
modern miniatures,
QRF,
WWII figures
Tuesday, July 23, 2013
New Wings for a Hawker Hunter
Several years ago, I bought a bunch of 15mm QRF moderns and aircraft from a shop that was closing out the line. Among the many items I picked up that day was a Hawker Hunter, which I went to work on, shortly after getting home with the goodies.
I didn't notice prior to purchasing (not that it would have stopped me from buying it), but the Hunter looked to have been damaged, repaired and re-bagged. Maybe it was a return to the shop, not sure. Anyway, it needed more attention than I was willing to give it at the time, and ended up setting on my work table for the last few years in the early stages of repair.
During my recent cleaning binge, I decided to put it together, rather than just throw the lose parts into a box with countless other odds and ends. Like the QRF Strikemasters that I have (another really cool plane from QRF), the Hunter has a resin fuselage and metal wings. On the Strikemaster, the main wings are a single piece that glues firmly and securely into the bottom of the fuselage, but the Hunter's different geometry does not permit that arrangement. It's wings are each separate pieces that attach to the wing roots/jet intakes mid fuselage with a small metal tab.
Since the Hunter is somewhat larger and the wings heavier and less secure when mounted, I had reservations about the durability of the model when completed. Not so much a complaint about the casting, as commentary about how brutal I can be with my miniatures.
After brief consideration, I decided to replace the metal wings with styrene plastic wings. As it turned out, a relatively quick and simple job. The job required a few basic tools; a hobby knife, Squadron Flex-file sanding stick, a small ruler/metal cutting edge, a Tuff-Grit metal filing/sanding stick, and a pair of flush-cut nippers.
I started out by completing the repair to the fuselage that I started years ago with some putty (the fuselage had been cracked and badly repaired with some sort of glue). In this case, as in most, I use automotive glazing compound. It is an inexpensive, soft, fast drying, red/orange putty that comes in a squeeze tube, and can be found at automotive parts suppliers such as Advance Auto Parts or NAPA. Dynatron and Duraglass are two manufacturers of the product.
In addition to the repair, I touched up some blemishes in the fuselage casting. Then I used the metal wings as patterns and traced replacement wings onto a sheet of .08 inch thick styrene. Below you can also see the landing gear that come with the kit to the right and below the fuselage.
I cut out the basic wing shape by scribing and snapping the styrene, using the metal straight-edge and hobby knife. The shape was refined with the nippers and by filing/sanding the edges and roughing the cross-section of the wings with the Tuff-Grit file. The wings were then cleaned up with the Squadron Flex-File sanding stick and puttied with the glazing compound as seen below.
The Tuff-Grit file will leave some divots in the plastic, but these are quickly filled with the putty. By the time I finished puttying the tail section, the first wing was just about ready to sand. Drying time was in the area of seven minutes. The replacement wings are shown below with the original metal wings.
I replicated the panel lines from the original wings by scribing them with the back side of the hobby knife blade, and attached the plastic wings to the resin fuselage with super-glue. Once the glue was dry, the joints and slot for the wing tab on the underside of the model were filled with the glazing putty and sanded. It took two applications of putty to fill the tab slots.
The entire investment of time to replace the wings and assemble the model was less than an hour. The model was then primed and painted with acrylic hobby paints.
This model is going to be used by the as yet, un-named, third country in my African Imagination campaign. I ended up choosing a camouflage pattern inspired by one used by the Indonesian Air Force, but can't put the national markings on, as they haven't been designed yet either.
The completed model weighs significantly less than it would have with the original wings. mounts more easily on my aircraft stands, and is less likely to break, when I do eventually drop it. And, I now have one less item setting on my table, holding up space bubble progress.
I didn't notice prior to purchasing (not that it would have stopped me from buying it), but the Hunter looked to have been damaged, repaired and re-bagged. Maybe it was a return to the shop, not sure. Anyway, it needed more attention than I was willing to give it at the time, and ended up setting on my work table for the last few years in the early stages of repair.
During my recent cleaning binge, I decided to put it together, rather than just throw the lose parts into a box with countless other odds and ends. Like the QRF Strikemasters that I have (another really cool plane from QRF), the Hunter has a resin fuselage and metal wings. On the Strikemaster, the main wings are a single piece that glues firmly and securely into the bottom of the fuselage, but the Hunter's different geometry does not permit that arrangement. It's wings are each separate pieces that attach to the wing roots/jet intakes mid fuselage with a small metal tab.
Since the Hunter is somewhat larger and the wings heavier and less secure when mounted, I had reservations about the durability of the model when completed. Not so much a complaint about the casting, as commentary about how brutal I can be with my miniatures.
After brief consideration, I decided to replace the metal wings with styrene plastic wings. As it turned out, a relatively quick and simple job. The job required a few basic tools; a hobby knife, Squadron Flex-file sanding stick, a small ruler/metal cutting edge, a Tuff-Grit metal filing/sanding stick, and a pair of flush-cut nippers.
I started out by completing the repair to the fuselage that I started years ago with some putty (the fuselage had been cracked and badly repaired with some sort of glue). In this case, as in most, I use automotive glazing compound. It is an inexpensive, soft, fast drying, red/orange putty that comes in a squeeze tube, and can be found at automotive parts suppliers such as Advance Auto Parts or NAPA. Dynatron and Duraglass are two manufacturers of the product.
In addition to the repair, I touched up some blemishes in the fuselage casting. Then I used the metal wings as patterns and traced replacement wings onto a sheet of .08 inch thick styrene. Below you can also see the landing gear that come with the kit to the right and below the fuselage.
I cut out the basic wing shape by scribing and snapping the styrene, using the metal straight-edge and hobby knife. The shape was refined with the nippers and by filing/sanding the edges and roughing the cross-section of the wings with the Tuff-Grit file. The wings were then cleaned up with the Squadron Flex-File sanding stick and puttied with the glazing compound as seen below.
The Tuff-Grit file will leave some divots in the plastic, but these are quickly filled with the putty. By the time I finished puttying the tail section, the first wing was just about ready to sand. Drying time was in the area of seven minutes. The replacement wings are shown below with the original metal wings.
I replicated the panel lines from the original wings by scribing them with the back side of the hobby knife blade, and attached the plastic wings to the resin fuselage with super-glue. Once the glue was dry, the joints and slot for the wing tab on the underside of the model were filled with the glazing putty and sanded. It took two applications of putty to fill the tab slots.
The entire investment of time to replace the wings and assemble the model was less than an hour. The model was then primed and painted with acrylic hobby paints.
This model is going to be used by the as yet, un-named, third country in my African Imagination campaign. I ended up choosing a camouflage pattern inspired by one used by the Indonesian Air Force, but can't put the national markings on, as they haven't been designed yet either.
The completed model weighs significantly less than it would have with the original wings. mounts more easily on my aircraft stands, and is less likely to break, when I do eventually drop it. And, I now have one less item setting on my table, holding up space bubble progress.
Thursday, July 5, 2012
A Few Soviets for the Cold War
July 4th turned out to be a pretty open day for me, so I hid from the summer heat and got some work done in the basement. I decided to try to clear some of the half finished stuff off of my various work spaces and did a bunch of painting, including a few vehicles for my Cold war Soviets. Paint jobs are basic, but I figured that I'd share some pics as a lot of these aren't shown on the manufacturer's (particularly Old Glory's) website.
Here are three shiny new T-72s ready to protect the USSR from NATO aggression. These are from Old Glory pack number PW-706.
The T-72s consisted of pretty clean castings and went together with out too much fuss. A little filling was needed around the gun mount, and the commanders hatch was just a touch fiddly. The hatch can be attached open or closed and mounted crew figures are included.
Next are some BRDM2 with AT5 anti tanks missiles, also made by Old Glory from pack number PW-732B.
These consisted of very clean castings and take minimal assembly work. The tires are cast in place, and the missile launcher only adds two pieces.
Last of the independence day batch was a lone BTR60PB (item no. MSVI04) and a few Soviet troops (item no. MSI01 Motor Rifle Infantry) from QRF.
The BTR60PB came in five pieces. Assembly was quite simple with minimal clean-up of light flash on the hull.
Here are a couple more Old Glory models that I had done earlier this year. BRDM with SA9 anti-aircraft missiles (PW-732C)
The BRDM/SA9 was similar to the AT5 variant with minimal clean-up and assembly. A very nice model, though I need to give mine a little more painting attention.
And, the PT-76 light tank (PW-735).
The PT76s required a little filling of recesses in what should be flat hull sides, but otherwise were easy to assemble and make for nice looking models.
Next up will be my US Army Cold Warriors, as my Soviets currently have nobody to spar with.
Here are three shiny new T-72s ready to protect the USSR from NATO aggression. These are from Old Glory pack number PW-706.
The T-72s consisted of pretty clean castings and went together with out too much fuss. A little filling was needed around the gun mount, and the commanders hatch was just a touch fiddly. The hatch can be attached open or closed and mounted crew figures are included.
Next are some BRDM2 with AT5 anti tanks missiles, also made by Old Glory from pack number PW-732B.
These consisted of very clean castings and take minimal assembly work. The tires are cast in place, and the missile launcher only adds two pieces.
Last of the independence day batch was a lone BTR60PB (item no. MSVI04) and a few Soviet troops (item no. MSI01 Motor Rifle Infantry) from QRF.
The BTR60PB came in five pieces. Assembly was quite simple with minimal clean-up of light flash on the hull.
Here are a couple more Old Glory models that I had done earlier this year. BRDM with SA9 anti-aircraft missiles (PW-732C)
The BRDM/SA9 was similar to the AT5 variant with minimal clean-up and assembly. A very nice model, though I need to give mine a little more painting attention.
And, the PT-76 light tank (PW-735).
The PT76s required a little filling of recesses in what should be flat hull sides, but otherwise were easy to assemble and make for nice looking models.
Next up will be my US Army Cold Warriors, as my Soviets currently have nobody to spar with.
Subscribe to:
Posts (Atom)


