This post addresses the addition of of stream, river, and some hill terrain modules for my 1950s Cold War Germany terrain project. The modular terrain design concept was presented in part 1, and the general construction and finish methods are addressed in part 2 of this series of posts. This post will mostly address design of the moduler waterways, basic hill modules, and few special pieces.
Streams
First I'll tackle the streams streams. I've long used a rather narrow 5/16" wide stream system with my terrain, which works universally with 6mm to 15mm scale figures, though is a bit narrow for larger scales. The stream is routed 3/8" deep into the foam with a Dremel and router attachment, and is centered at three inches inset from the near end of the tile.
The centerline of the stream is located on the tile, the edges or banks of the streambed located, and a loose path of the stream drawn on the tile, before routing the actual stream path. The path can be widened between the ends of the tiles, but always maintains the same location and profile on the edges of the tile.

The stream system layout is much like that of the road design, except that the stream path between the edges of the tile is more irregular. The basic tiles types are straight, diagonal, and bends. Note that there are three types of bends, a broad, tight, and combined bend.


Once the path is routed into the the tile, the banks of the edges are sanded to a 45 degree angle, and are cut about 3/16" deep into the the foam, leaving a vertical walled 3/16" channel for the stream bed. In between the edges, all sorts of sanding and shaping can be done, including small islands in the stream, lower areas representing little floodplains, boggy areas, etc.


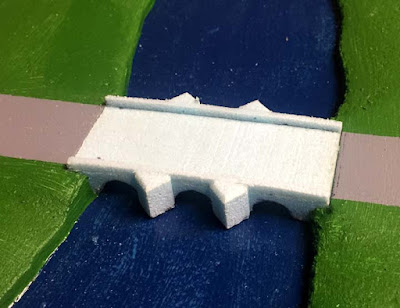
The bridges over the strams were made by simply cutting a slot with a hobby knife and sliding a retaining wall into place made from a piece of 1/8" wide foam. Two bridges are smooth and painted to be of concrete, and two had a stone pattern etched in with a ball point pen.


If the terrain is intended for a single or narrow range of scales, you can add rocks and whanot to the streams, though I avoid this, as rocks that look fine in 15 to 28mm, don't always look right at 6mm. Additionally they can interfer with the "stackability" of the foam tiles, which may or may not be a consideration.
Rivers
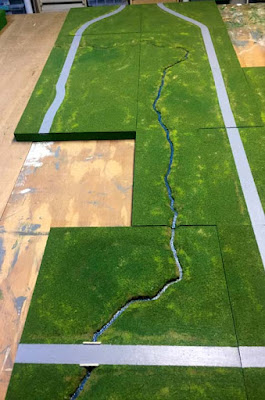
River tiles are similar to the streams, except that in this instance, the waterway will be three inches wide, the tiles with roads will be dedicated to 6mm, but roadless river tiles will work in any scale. The three inch water obstacle may not seem very wide, but given the game scales that I use in 6mm, it will represent a 30 to 150 meter wide waterway.

The rivers are cut with the dremel/router, as per the streams, with the river bed 3/8 inch deep and 3 inches wide. The terrain is shaped and sanded in the same way as previous tiles, with the bank edge profile cut 3/16 inch deep into the routed bank, and extents on a gradule rise to a point 1 inch from the edge of the router cut. Both the streams and rivers are painted after the rest of the tile, and coated with two coats of artist's acrylic gloss medium, prior to flocking the tile.


Road/Slope Tiles
To make the new 6mm roads compatible with my existing hill/slope tiles, I needed to add a few basic road/slope tiles. These use a 1" rise over 6" run on "straight slope" tiles with a road running up them.


Towns
I made two small town tiles in this batch of tiles, each based on towns that will be on the first tabletop in upcoming battles. The towns are shown below, mated together, such that they could represent a larger town.

I started off by drawing a three inch grid on the tiles, then transferring the primary town roads from a 1:25,000 German army map from the 1950s. The primary roads were drawn onto the tile in 1" width, and then secondary roads were added. The tiles were lightly sanded, coated with acrylic paste, then painted, and flocked.
Odd Sized Tiles
I also made some odd sized tiles for filling in spaces created by some of the diagonal road tiles. Half and quarter tiles, measuring 12"x6" and 6"square.


Completed Terrain Tiles
The views below show completed tiles from this batch, demonstrating how the roads fit together with the odd sized tiles.


Well, these tiles are terrific!
ReplyDeleteHappy New Year!
Those look really great- the river tiles especially.
ReplyDeleteCheers,
Pete.
Excellent results with that router. Great idea!
ReplyDeleteGreat looking terrain boards, thou you have now been Tango,ed.
ReplyDelete