Several people have contacted me and asked why I haven't posted that my 15mm modern vehicles are available again. Well, mostly because I want my blog to focus on my passion for the hobby and not be about selling stuff.
Anyway, this post is an exception to the rule. I do again have a website offering my small selection of 15mm vehicles, the M1114 armored Humvees being the most popular. The site is located here.
https://sites.google.com/site/irishserbsminiatures/
They are resin castings of things that I've made for my own use, are in 1/100th scale; and come as unpainted, unassembled kits, typically with about 7 to 10 pieces. I do not use a mold release, so you shouldn't have issues with cleaning and paint not sticking to the resin. I use a couple of different types of resin for various sized parts, so color of the parts will vary, but all of the resins have very similar properties.
Super glue is my preference for assembly of the miniatures, and using an accelerator for the glue will make things much easier. Some of the parts will be quite fiddly, such as the weapons for the humvees, and machineguns and rings for the VBLs. Ideally, I put a very small dab of glue on the bottom of the humvee weapon and hold it in place for maybe ten seconds will usually get it to hold in place. If that doesn't get it, give the receiving piece a light spray of accerator and then touch the weapon to the mounting location. The weapon should immediated stick in place.
I've usued a variety of primers on the resins over the years, including Armory primers, Krylon, and various autmotive primers from the department store. Typically I go for a medium to dark grey primer, but black or white should work just as well. I've used just about every hobby paint known at one time or another, using Vallejo, Polley Scale, and Testor's ModelMaster enamels currently. I've never had any sort of problem with a paint reacting to the resin in any way. Typically I seal the paint with a matte spray from Rustoleum or Krylon (which will tend to have a little shine to it when dry), and once dry, spray again with very flat Dullcoat from Testor's.
If you have any problems with the miniatures or resin, don't hesitate to contact me.
Wednesday, October 6, 2010


Sunday, September 26, 2010
15mm AAV7A1 WIPS
While my Bradley sets in the middle of the mold making process, before setting up to cast, I decided to try to make a little headway on my other "forever" project, my AAV7A1.
I think that I started this prior to the Bradley, but it got misplaced for quite some time, and once found, bumped for other projects, home repairs, family stuff, etc., etc. When I started it, I was planning to order some of the Peter Pig U.S. Marines, but the economy stalled, and so did my project. Hopefully, I'll have reason to order those Marines soon.
 As you can see, it is still some ways from being done, but a late October/early November target shouldn't be pushing it.
 Here is a size comparison shot with one of my Humvees. It will ride about 10 percent higher when the track is added and spaced properly from the hull.
 Again next to my Humvee, it is a beast.
 And lastly, next to a QRF BMP-1, and an Old Glory T-55.
I think that I started this prior to the Bradley, but it got misplaced for quite some time, and once found, bumped for other projects, home repairs, family stuff, etc., etc. When I started it, I was planning to order some of the Peter Pig U.S. Marines, but the economy stalled, and so did my project. Hopefully, I'll have reason to order those Marines soon.
As you can see, it is still some ways from being done, but a late October/early November target shouldn't be pushing it.Here is a size comparison shot with one of my Humvees. It will ride about 10 percent higher when the track is added and spaced properly from the hull.Again next to my Humvee, it is a beast.And lastly, next to a QRF BMP-1, and an Old Glory T-55.Saturday, September 18, 2010
15mm (1/100) M2A2 Bradley Master
I thought I'd post some photos of my reworked 15mm M2A2 Bradley master. Though my Vietnam terrain has been screaming at me for a month to get it done, I have been focussing what little free time I have on my Bradley master.
I started this thing almost two years ago, and have gone through three stages of altering, updating, and redesigning. It has been waiting for quite some time for me to finish some track and hull detail after changing the skirt and track assembly for ease of casting. I still need to add some of the fasteners for the applique armor, but I expect to finish that tonight.


Above is a size comparison shot with one of my 15mm Humvees.

And a size comparison shot with my Humvee and 15mm infantry figs as follows; Peter Pig FFL, Old Glory Modern US, OG Afghan, and I believe a QRF Soviet (could be a JR Soviet though).
 And what is it about work benches? I cleaned this up a couple of weeks back, work on a project for an hour, and am left with an area about the size of my hand to work on the project.
I started this thing almost two years ago, and have gone through three stages of altering, updating, and redesigning. It has been waiting for quite some time for me to finish some track and hull detail after changing the skirt and track assembly for ease of casting. I still need to add some of the fasteners for the applique armor, but I expect to finish that tonight.
Above is a size comparison shot with one of my 15mm Humvees.
And a size comparison shot with my Humvee and 15mm infantry figs as follows; Peter Pig FFL, Old Glory Modern US, OG Afghan, and I believe a QRF Soviet (could be a JR Soviet though).
And what is it about work benches? I cleaned this up a couple of weeks back, work on a project for an hour, and am left with an area about the size of my hand to work on the project.Sunday, August 8, 2010
20mm Vietnam Riverine Terrain - Part 2 of 3
Part 2 of this project involves a major step forward, sanding and texturing the terrain, but does not display dynamic changes in the photos.
 Okay, enough about sanders. Shaping the foam with the surform tool, as mentioned in my previous blog entry, leaves the foam a little rough. I sand it down to a smoother texture, that leaves some divits and pits from the surform tool as shown in the photo below. The tile to the left shows the surform texture, those to the right have been sanded.

 I spend some time searching for photos from various sources and comparing river bank textures in Vietnam. The most common texture that I found involved a cracked mud upper bank, with a less dried vertically striated lower portion of the bank.
 This does not create as fine a texture as the pen or stylus, but is much faster, and does not tear the foam. It is particularly faster and easier on the irregular surface on the river bank. The pen and stylus would be much more tedious to use in this application, and prone to tearing the still slightly rough and irregularly contoured surface of the foam.
The next step in the process was to sand the terrain. You may want to wear a dust mask, and/or arrange for favorable ventilation, as this step creates very fine dust.
I use an older orbital mini-sander marketed by Black & Decker in the 1980's. The sanding pad is roughly 2"x3" and lends itself very nicely to working with foam. The AC/DC converter pictured below is the original B&D product, while the sander is identical to the B&D version except for that it is labeled as Minicraft from the UK. These models have since been replaced by newer models, including a smaller transformer, and a slightly different sander that used velcro sanding pads. I prefer the older style sander, as the corners of the sanding pads sometimes gouge the foam, a less frequent problem with the older model that has sandpaper wrapped up and over the ends of the sanding pad. Proxxon also makes a similar sander that works well:
I like ths sander almost as much as the original B&D, except that the sanding head is a hard plastic, while the older B&D/Minicraft have a foam pad. Again, there is a tendancy to gouge the foam, so I bought a small piece of rubber from Grainger ( http://www.grainger.com/Grainger/Rubber-Sheet-1MUN8?Pid=search ), attached it with 3M Super 90 spray adhesive (from Lowes, Home Depot, etc), and the sander worked great.
The older B&D/Minicraft model is shown below.
Okay, enough about sanders. Shaping the foam with the surform tool, as mentioned in my previous blog entry, leaves the foam a little rough. I sand it down to a smoother texture, that leaves some divits and pits from the surform tool as shown in the photo below. The tile to the left shows the surform texture, those to the right have been sanded.Once the foam has been sanded, brush off the foam and clean up the dust. Otherwise, the dust will drive you crazy and create clumps during the painting process. The sanded river terrain is shown below (I know, doesn't look any different than when we started).
I spend some time searching for photos from various sources and comparing river bank textures in Vietnam. The most common texture that I found involved a cracked mud upper bank, with a less dried vertically striated lower portion of the bank. I had two options for creating the texture. The first was to 'draw" it on and in with a pen or embossing stylus, the second was to use a hotwire type engraver or "pen".
I often texture block and stone patterns into foam by simply drawing it onto and into the foam with a black (usually Papermate because the ink bleeds less than Bic) pen. This leaves an embossed pattern with a light coat of ink. The pen works well as the roller in the tip avoids tearing the foam. The problem is that the ink will bleed into most primers and paints. This can be controlled by sealing the ink with a coat of Testor's Dullcoat before and after priming, though sometimes an extra step of priming the surface with a coat of paint is also needed to cmpletely hide the ink. It is not really a big problem, but adds drying time. And since time is my biggest enemy these days, I opted not to use a pen.
In place a of a pen, you can use an embossing stylus. These are simpy pen-like devices that have a small steel ball (as small as .002") on the end, You simply press the desired pattern into the foam. they are readily available at craft and scrapbooking stores. They allow the greatest and finest control, but are slightly more prone to tear the foam, as the ball does not roll as in the pen. The process is slightly slower with the stylus than the pen, but gives a very nice result.
I opted for the second method, of burning or melting the pattern into the foam with a hot engraving tool. In my case this was an older model from Hotwire Foam Factory:
This does not create as fine a texture as the pen or stylus, but is much faster, and does not tear the foam. It is particularly faster and easier on the irregular surface on the river bank. The pen and stylus would be much more tedious to use in this application, and prone to tearing the still slightly rough and irregularly contoured surface of the foam.While the actual cracking pattern is much finer than what I produced, I think the modeled terrain gives a reasonable representation of the intended texture.
 Most of the work in part 2 of the construction process is now complete. The terrain appears as shown below, not really showing much sign of progress.
 The last step is to fill any overly deep pits in the foam with putty, before the finishing process. I like to use light-weight or one-step spackle. It dries a little slower than I like, but will sand evenly with the foam, and is less prone to breaking than conventional spackle. It also readily accepts the artist's acrylic paints that I use, something that regular spackle does not do. The paint will lay on the heavier spackle and dry fine, but will readily tear away from the spackle if scraped or scratched, it does not do this on the light weight spackle forming a much spronger bond.
 I simply apply the spackle with my finger (wearing a disposable glove) and wipe it with a damp cloth if needed to smooth it. No sanding is required. The spackle does need to be perfectly smooth with the surrounding foam, it will look fine being a little rough when painted.
Most of the work in part 2 of the construction process is now complete. The terrain appears as shown below, not really showing much sign of progress.The last step is to fill any overly deep pits in the foam with putty, before the finishing process. I like to use light-weight or one-step spackle. It dries a little slower than I like, but will sand evenly with the foam, and is less prone to breaking than conventional spackle. It also readily accepts the artist's acrylic paints that I use, something that regular spackle does not do. The paint will lay on the heavier spackle and dry fine, but will readily tear away from the spackle if scraped or scratched, it does not do this on the light weight spackle forming a much spronger bond.I simply apply the spackle with my finger (wearing a disposable glove) and wipe it with a damp cloth if needed to smooth it. No sanding is required. The spackle does need to be perfectly smooth with the surrounding foam, it will look fine being a little rough when painted. The work discussed in this entry took about three more hours, preparing twenty-five and a half square feet of terrain.
The river terrain is now ready for part 3, priming, painting, and flocking. I should have part three up by next Sunday evening at the latest.
Sunday, August 1, 2010
20mm Vietnam Riverine Terrain - Part 1 of 3
Probably the most important part of my 20mm Vietnam project is the riverine terrain. After considering the design for some time, and sketching out some overly complex ideas, I settled on my old method of making modular terrain for my riverine system.
The modular terrain needs to be able to represent everything from large waterways such as the Mekong or Bassac rivers to smaller rivers and rivulettes that are barely passable for PBRs, and also the many canals feeding the rivers with commerce and Viet Cong. Features are to include islands, cutouts for "beaching" sampans, small beaches, streams, foot bridges, and small docks or piers.
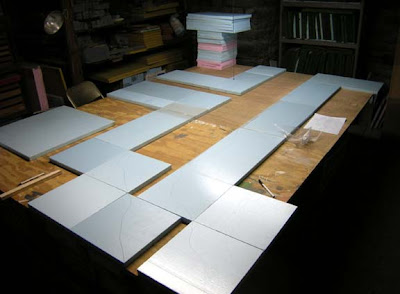
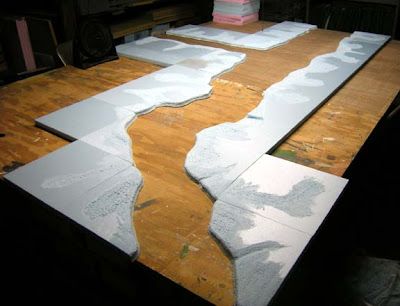
The terrain itself will be made from extruded polystyrene foam insulation board, in this case, blue Dow-Corning foam. The one inch thick foam was first cut into tiles measuring 1'x1', 1'x2', and 1'x6" to meet the needs of the design. I cut the foam on a table saw, but it can be cut with a hobby knife and straight-edge as well. The basic panels are set out on my table in the photo below.
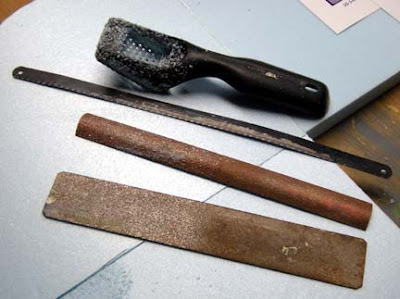 Tools needed to cut and shape the foam include two perma-Grit files, one flat and one curved, a hack-saw blade, and Surform tool. While I have hotwire cutters and other gizmos, I prefer these for most of the work. One last tool that was needed was a profile template for the river bank. This template will be used to trace a standard profile on all of the mating edges of the terrain pieces. I cut this template from a scrap piece of plywood, but usually use tempered hardboard.
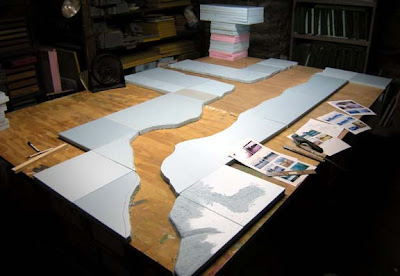 Once the tracing was done, the next step was to draw the actual edges of the bank onto the tops of the tiles, and cut off the excess with the hack-saw blade. Other features such as the beach and cutout for sampans are drawn on as well. With the excess cut away, the general lines of the river can be seen in the photo above.
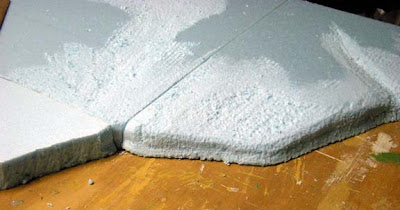 Next comes the shaping. Typically, I started at the traced profile edges and cut the edges with the hack-saw blade. I then used a combination of the curved Perma-Grit file and the surform tool to shape the river bank edge along the length of the tile. This is a tedious and messy step, but not really hard. The surform tool is then used the shape the top of the foam tiles and blend the contours into the river bank edges.
The modular terrain needs to be able to represent everything from large waterways such as the Mekong or Bassac rivers to smaller rivers and rivulettes that are barely passable for PBRs, and also the many canals feeding the rivers with commerce and Viet Cong. Features are to include islands, cutouts for "beaching" sampans, small beaches, streams, foot bridges, and small docks or piers.
The terrain itself will be made from extruded polystyrene foam insulation board, in this case, blue Dow-Corning foam. The one inch thick foam was first cut into tiles measuring 1'x1', 1'x2', and 1'x6" to meet the needs of the design. I cut the foam on a table saw, but it can be cut with a hobby knife and straight-edge as well. The basic panels are set out on my table in the photo below.
The foam only represents the shore line sections of river and a canal farther away and to the left in the photo. The river and canal width will be variable; the water will be separate sections of styrene plastic (not shown in the photo) that set under the edges of the terrain tiles.
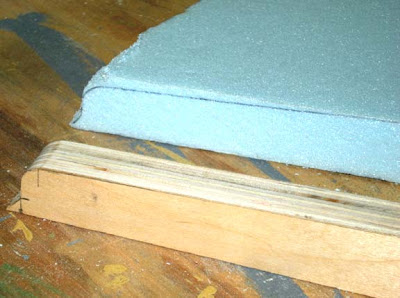
Tools needed to cut and shape the foam include two perma-Grit files, one flat and one curved, a hack-saw blade, and Surform tool. While I have hotwire cutters and other gizmos, I prefer these for most of the work. One last tool that was needed was a profile template for the river bank. This template will be used to trace a standard profile on all of the mating edges of the terrain pieces. I cut this template from a scrap piece of plywood, but usually use tempered hardboard.After studying a number of photos (flickr is your friend), I settled on a profile as shown in the photo above. The height of the bank to the top of the curve in the template is 7/8". The taper extends back to the center, or 6" point of the template. The bevel and curve each extend about a quarter inch into the template. I started work on the foam by tracing the profile onto all of the appropriate edges of the foam tiles.
Once the tracing was done, the next step was to draw the actual edges of the bank onto the tops of the tiles, and cut off the excess with the hack-saw blade. Other features such as the beach and cutout for sampans are drawn on as well. With the excess cut away, the general lines of the river can be seen in the photo above.Next comes the shaping. Typically, I started at the traced profile edges and cut the edges with the hack-saw blade. I then used a combination of the curved Perma-Grit file and the surform tool to shape the river bank edge along the length of the tile. This is a tedious and messy step, but not really hard. The surform tool is then used the shape the top of the foam tiles and blend the contours into the river bank edges. Once the tiles are shaped, the tiles appear as depicted above.
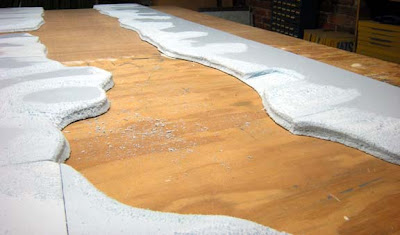
Another view showing the river bank a little better. A sampan cutout can be seen on the far bank toward the right center of the photo.
The work shown above took about three hours. The next part of the process (Part 2) will inolve smoothing and sanding the foam, adding more detailed texture to the river bank and prepping the foam for paint.
Saturday, July 31, 2010
Odds & Ends: 15mm Moderns
Throughout the year, I've slowly been working on additional 15mm vehicles for my Modern Africa project, a war between two fictional countries; Mugabia and Uwanda. So, I thought I'd share a few pics and a couple of thoughts.

I finally finished a couple of Peugeot P-4s. Unfortunately my French are quite neglected and mostly still have to walk around the planet.
Next up...
... are some civilian vehicles from HowardModels.com:
http://www.howardmodels.com/supplies/index.html
Howard Models is an architectural model company that offers a line of metal vehicles in several scales. Sometime back I picked up a set of their 1:96 scale models for use with 15mm (1/100ish) gaming.
 They consist of Dodge and/or Chrysler products and include (I think) a Neon, an Intrepid, a Durango SUV, a Pick-up truck, and Caravan minivan (not shown). The red pick-up in the photo is the Peter Pig pick-up from their Modern African/AK-47 line. The M114 Humvee and P-4 are my own models in 1/100, and are shown (along with the Peter Pig pick-up) to give some sense of scale.

The models are cleanly cast and nicely detailed, though some of the details don't stand out quite as distinctly as appears in the photo on the Howard Models site. The bed of pick-up is not really detailed, but otherwise I can't complain (and even that isn't really a complaint).
Lastly...
...is a comparison (mostly for scale) between Quality Castings/19th Century Miniatures/Battle Honours/OldGlory15s.com (that's all one company by many names) and QRF BTR60PBs.

Both models are nicely detailed, with the QRF model building up more easily, and the QC model being more cleanly cast. Both have detail variations from my drawings and photos, but I think some of that is due to actual Soviet production variations as much as anything else.
 The overhead view shows the scale difference between the two models, with the QRF (top) model clearly being larger. Both models look fine on the table top next to 15mm infantry figures, though I would generally not mix the same vehicle type from different manufacturers. Since the issue of QC scale comes up from time to time in various discussions, and I had both models, I thought that I'd offer the visual comparison.
I finally finished a couple of Peugeot P-4s. Unfortunately my French are quite neglected and mostly still have to walk around the planet.
Next up...
... are some civilian vehicles from HowardModels.com:
http://www.howardmodels.com/supplies/index.html
Howard Models is an architectural model company that offers a line of metal vehicles in several scales. Sometime back I picked up a set of their 1:96 scale models for use with 15mm (1/100ish) gaming.
They consist of Dodge and/or Chrysler products and include (I think) a Neon, an Intrepid, a Durango SUV, a Pick-up truck, and Caravan minivan (not shown). The red pick-up in the photo is the Peter Pig pick-up from their Modern African/AK-47 line. The M114 Humvee and P-4 are my own models in 1/100, and are shown (along with the Peter Pig pick-up) to give some sense of scale.The models are cleanly cast and nicely detailed, though some of the details don't stand out quite as distinctly as appears in the photo on the Howard Models site. The bed of pick-up is not really detailed, but otherwise I can't complain (and even that isn't really a complaint).
Lastly...
...is a comparison (mostly for scale) between Quality Castings/19th Century Miniatures/Battle Honours/OldGlory15s.com (that's all one company by many names) and QRF BTR60PBs.

The Quality Castings model is on the left in the photo above, the QRF model to the right. I originally bought the Quality Castings BTR-60PBs for my Soviet/Afghan War games a few years back, mostly because at that time they were a couple of dollars per vehicle cheaper than QRF, and I thought that it was a decent looking miniature. More recently, I purchased some QRF BTR-60s as the pricing situation has now reversed.
The old Quality Castings line is identified as 15mm, but was originally also identified as being 1/108 scale. As a result, QC miniatures tend to be a little smaller than some of the other 15mm lines, but also are not completely true to scale, often being a little larger than 1/108th (though still smaller than other brands).
A rear view with the QRF model on the left, and QC on the right. Both models are nicely detailed with the QC model details standing out a little more. The most noticeable differences between the models are the turret profile (QRF is shorter), the length of the hull nose (shorter on the QC model), and hull rear end (longer on the QC model). After comparing to technical drawings and measuring some angles, it turns out that the QRF turret and QC hull are the most accurately shaped.
Both models are nicely detailed, with the QRF model building up more easily, and the QC model being more cleanly cast. Both have detail variations from my drawings and photos, but I think some of that is due to actual Soviet production variations as much as anything else.
The overhead view shows the scale difference between the two models, with the QRF (top) model clearly being larger. Both models look fine on the table top next to 15mm infantry figures, though I would generally not mix the same vehicle type from different manufacturers. Since the issue of QC scale comes up from time to time in various discussions, and I had both models, I thought that I'd offer the visual comparison.Sunday, July 25, 2010
PBRs for the Bassac
Earlier this year I received two Britannia 20mm PBRs for my Vietnam project. The hull and canopy are cast in a tan resin that is very hard and quite brittle; the other parts and crew are cast in metal. The crew consists of a partial fig in the twin .50cal turret, and three standing figs; the boat commander, an M60 gunner, and the rear .50cal gunner. The castings are very clean, and the crew are quite nice.
The hull comes with a wake cast as an integral part of the hull, which looks nice. After some consideration, I decided to remove the wake with a Dremel, as I plan to scratch-build other riverine boats and craft, which will not have the wake cast into them. Unfortunately, I did not take a pic of the model before removing the wake, but a photo can be seen on Britannia's site showing a model with the wake.
One of the canopies was broken in shipping, so I decided to make a replacement out of sheet styrene. After roughing out the first one, I decided to make a second so that the two models would match. I used Bondo brand automotive glazing putty to smooth out the hulls and to add texture to the canopies. The putty is the orange stuff in the photo below.
 I then sanded and primed the models and located the crew positions on the model.
 At this point I noticed that the model was different from the boats depicted in my source materials. On the model, the rear .50cal is mounted on what appears to be an engine cover, and the there is no deck or armor for the M60 mounts.
The hull comes with a wake cast as an integral part of the hull, which looks nice. After some consideration, I decided to remove the wake with a Dremel, as I plan to scratch-build other riverine boats and craft, which will not have the wake cast into them. Unfortunately, I did not take a pic of the model before removing the wake, but a photo can be seen on Britannia's site showing a model with the wake.
One of the canopies was broken in shipping, so I decided to make a replacement out of sheet styrene. After roughing out the first one, I decided to make a second so that the two models would match. I used Bondo brand automotive glazing putty to smooth out the hulls and to add texture to the canopies. The putty is the orange stuff in the photo below.
I then sanded and primed the models and located the crew positions on the model.At this point I noticed that the model was different from the boats depicted in my source materials. On the model, the rear .50cal is mounted on what appears to be an engine cover, and the there is no deck or armor for the M60 mounts.The actual PBR Mk2 has a slightly raised deck with two armor plates and mounting points on each for an M60 GPMG, and the .50 cal is mounted on three legged tripod, there is no boxlike structure located in the rear of the boat.
So I Dremeled out the box under the .50, and built up a deck and armor for the M60 out of sheet styrene as shown below.
Rather than build the tripod, I simply used a piece of styrene tubing for the .50 cal mount, as there is little space int he back of the boat, and I wanted to be able to move the gunner freely to face the enemy. The legs of the tripod would have made this a little harder.
This was the last of my modifications, so I painted the boats, glued the boat commander in place in each boat, but left all of the gunners loose, so that they can be positioned to face the enemy during game play.


So I'm finally making some progress, my PBRS are ready for the river. Next, I have to finish my Seawolves (which are just about done), and then build some terrain.
I used a number of references including the old Squadron book "Riverine" by Jim Mesko, and photos and information from the following sites:
http://www.militaryfactory.com/imageviewer/shp/gallery-shp.asp?ship_id=PBR-Patrol-Boat-River
http://www.riverinesailor.com/PBRLinks.htm

Subscribe to:
Posts (Atom)


