Showing posts with label sci-fi. Show all posts

Monday, November 2, 2015

First Order from Moonraker Miniatures

I received my first order from Moonraker Miniatures a couple of days ago.  A mix of figs from their 28mm Spacelords and Future Skirmish lines.  After placing my order, I got a quick confirmation and the order was received in 8 working days.  The figs are all very cleanly cast with no flash, three came with slotted bases.

 
Most will be worked in with my old GW Imperial Guard troops, adding a sniper, a medic, and a couple command figs to the various HQ sections.  Most of the others will become vehicle crew (with a little conversion work), and one will be added to my post-apoc scavengers.

They scale pretty nicely with my old GW figs, and with the newer plastic Cadians.


So, a big thumbs up for Moonraker; great service, really cool figs, and a very reasonable price.

Saturday, July 18, 2015

On the Work Bench (7-15)

My plans for playing my African campaign game have been put off for a week (going to play a game at a friend's house tomorrow instead).  So I thought I'd babble briefly about things that I'm working on. 

This year, I've been bouncing between sci-fi/post-apoc and African imagi-nation projects, and right now my work table is mostly covered with sci-fi and post-apoc stuff. 

For Christmas, I got several Reaper figures, and despite being in the hobby for 30 plus years and having 15,000ish figs, these are my first Reaper figs.  Below are the first two that I've opened to paint.  At first, my thought was that the dude was too tall to work with my generally 28mm figs, but after posing them next to a couple older figs, while he is tall,  I think it was just that he is lean and so well sculpted that it created the illusion that he wouldn't fit. 


My wife isn't a gamer, so ordering figures is always a bit intimidating, but she said that Reaper was great to deal with, and that they shipped really fast at the peak of Xmas season, so I thought that I should share the good word, if a little late.
_______

Next up, I solved a minor problem for my old Imperial Guard vehicles.  I hate sculpting/modeling/creating tires.  Just kind of boring and tedious, so I have been putting off making the tires for my IG scout cars.  While cleaning up, I found two old Humvee kits that were in the box for the last couple of decades, and decided that the wheels would work for the scout cars.  They are just slightly smaller than what I was going to make, but I have the right number of them, and they will save be about four days of building, mold making, casting and cleaning, which translates into like two months of irishserb hobby time.  Here's a pic of the wheels positioned next to one of the cars.

 
I think that they will work out well.  I just need to build the suspensions now.
______

Years ago, I painted up a couple of Kryomek Talos figs.  Originally, I saw them as an addition to my old IG figs, then painted them to be part of a sci-fi corporate army, and will probably end up just using them as alien critters of some sort.  I liked the figs, but wasn't crazy about the weapons, so I did some simple conversion work on the weapons. 


Anyway, a couple of years after painting the first two, I picked up a couple of more packs at a convention, but never did anything with them.  I recently came across them  after maybe 10 years on the shelf, and they have finally made it to my work table.  I'll probably modify the weapons similarly, and then try to figure out which gang/faction/army/race they belong to.  Ooh, have an idea, maybe they will fight for my old guard figs after all.
_______

This is a hover-bot that I made a gazillion years ago.  It made it with the idea of using it as a security bot and maybe a sort of probe drone, but stopped working on it after becoming disenchanted with the base coat of paint. 
 

I still like the concept, but it wasn't well executed at the time.  I think I'm going to strip this down, update it and give it another try.  If it turns out, maybe update the master parts a little, make new molds and give another it another go.

Tuesday, February 24, 2015

A Little Progress on my Rides (28mm Sc-fi Recce Cars)

Haven't had much free time lately, so I haven't been able to do much, but did manage to work on the second turret for my 28mm sci-fi recce cars.


As I suggested previously, they will simply be Mk1 and Mk2 versions of the car with different turret configuration and a couple of slight differences in the hull. Unfortunately, that is all I have to share for now.

Sunday, February 8, 2015

Rides Update: 28mm Sci-fi Recce Cars and Other Progress

The second vehicle type for my old imperial guard figs is the Recce car.  I went back and forth during the design between something more similar to the French VBL and something  closer to a WWII armored car.  I ended up opting for the  more WWIIish  design.

The vehicle has a three man crew with seating for 5-6 in a pinch.  The small turret carries a light auto cannon and  a drone for detecting the bad guys is carried on the rear deck.  Here are a couple of pics of the current progress:


I've also made some progress on the wheeled APC, particularly on the hull front and sides, and a little on the smaller turret:


And the last photo with all three of my sci-fi vehicle types, including the larger tracked APC from awhile back, to give a size comparison. 


I think the second recce car may get a different turret.  The first one is mostly done and came out okay, but I liked the look of it better on the drawing.  The other version that I sketched out looks a bit more like the turret of the BTR-80A.  I figure the cars can be a Mk I and a Mk II.  We'll see.

Saturday, June 15, 2013

The Job Pod, Not Quite a Spaceship in 28mm

Told ya' I wasn't dead yet.  Six weeks ago, I thought the crazy at work had stopped, but then had a relapse of 14 hour days.  In a way, it was a good thing, as my first hobby project of the year was inspired by a project at work.

Among my interests are near-future, sci-fi, and post-apoc games, subjects that I haven't done much with in the last two years.  One of my gamers block victims has been creating a spaceship for the Alpha Forge Asteroid Miners that I purchased several years ago.  I had pictured them as being what hopped out of the flying saucer near that small "out west" town for my locals vs. the alien invaders scenarios.  I had also planned to use them as part of my post-apoc  silliness.  But I could not come up with the right delivery vehicle to transport them from their storage box to my game table.

Well, about three weeks ago, while reviewing about a million  photos at work, I receive a message from the gaming gods.  Inspiration came in the way of a SEM photograph of a spark.  You know, a little piece of metal that was sheared off of something, glowed for a second, and then ended its life as a piece of dust.  I glanced at the photo, and immediately I saw it for what it was.  Before me was a means of inter-stellar transport.  Well, sort of. 

What I saw was basically a steel bubble that had burst on impact with the floor.  A magnificent little thing, with a pebbled exterior, cris-crossed with shallow valleys, splayed open and exposing a cratered moonscape interior.  I also saw it setting in an impact crater , smoking, with a ship of sorts contained on the inside, and asteroid miners exiting their transport cells.  This is what too many long hours will do to you.

I realized that I suddenly had my "spaceship", and that I could now continue with the end of the world.  So, I managed through three more weeks of 14 hour workdays, and have finally begun my alien "spaceship".

I worked up some very basic sketches, along with some background story for my games.  The ship quickly morphed into a more of a time machine/alternate universe portal type thingy, consisting of a shallow impact crater, an exploded bubble of rocky looking material, and a containment vessel for the critters inside.  Here are a few of the sketches (sorry they aren't better quality, but I was in a bit of a hurry):

Above is the initial concept, the burst "bubble" setting in the impact crater.
 
 
In the bubble is the "shipping container" for the "work crew" of asteroid miners.  A series of small chambers and equipment "cells" linked together through a series of beams, tubes, and cables, suspended within the bubble by a series of stabilizing arms.
 
The individual chambers will be eight sided cells, about 2-3 inches across.
 
Upon getting a free evening, I quickly cut up some foam, and began work on the crater. Below are materials and tools needed for this phase of the project. 
 
The foam is from Lowes, 3M Styrofoam spray adhesive, a surform tool, and a hack saw blade.


First, I roughed out the basic pieces of the crater with the hack saw blade, mounted the pieces with spray adhesive, shaped it a little more with the hack saw blade, and then shaped it with the surform.  The rough crater measures about 26 inches across and three inches high.


A 28mm Copplestone scavenger stands in the middle of the crater to give a sense of scale.
 
Next I need to rough out the bubble. Once I have the basic bubble shape completed, I will refine the crater so that the two pieces fit properly, and finish detailing the shape of the crater. 
 
I've got to head back in to work now, but expect to work on the bubble tonight and tomorrow.  Hopefully I will have another post up before the weekend is out.  Once I get this together, I will post some of the background story trying to justify this silliness.


Tuesday, March 13, 2012

28mm Sci-Fi Bunker Complex Revisited (Photo heavy)

This is a re-post of the pics from my 28mm sci-fi bunker complex from my old website.   Over the last couple of weeks, I've been toying with design ideas for my post-apoc terrain, and got some of my bunker bits out, while considering how I might fit them into my PA world.  'veI had a few requests to re-post some of the pics. including one this past week, and figured since I can't do much else right now, that I might as well do so.


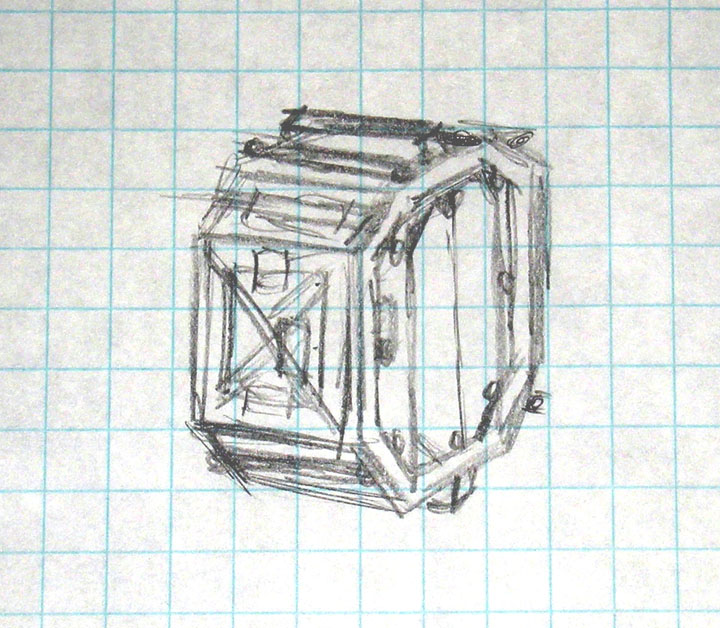
The first stage of the bunker complex was built over the Thanksgiving holiday about five years back.  It was originally an objective for my daughter's space orks, with visions of expanding it for all sorts of sci-fi and PA gaming.  The most important aspect was the modular design that would permit adaptation to the needs of various games and settings. 


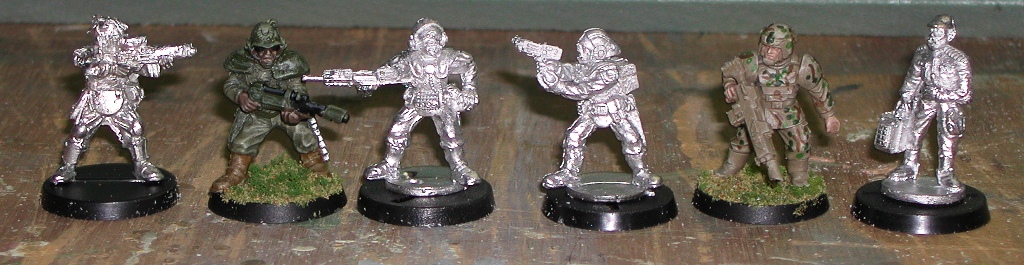
The basic layout was drawn onto sheet styrene, which would act of the floor for some of the modules, and a base for the foam construction otherwise.  The figures are 28mm Imperial Guard to give a sense of scale.


The walls and roof sections were constructed from blue polystyrene insulation board, with the various strips and sheets of the foam cut on a bandsaw.  The foam shapes were cut to size, glued with artists matte medium, and pinned until dry with straight-pins.


This view shows some of the pins still in place, holding layers on foam strips on the front of one of the smaller gatling laser turrets.


This is a view with foam construction complete, and after a coat of acrylic paste has been painted on to protect the foam a little.


A view of the overall base painted with artist's acrylics.  Below is another shot of the painted base.


Next step was to build the weapons for the turrets and rooftop.


The last four pics are views of the air defense mount for the rooftop.  The gun was scratch-built from styrene sheet, strips, and shapes from Plastruct and Evergreen Plastics.


Above are four views of the gatling lasers for the smaller turrets.  The gun shield was made from a piece of acrylic tube.


Above is a view of one of the main guns for the two double turrets early in the construction.  Unfortunately, I can't find any other pics of these guns after more work was completed.


An overall view with the guns still in process.  In this configuration the model measures roughly 4'x5'.


I also made some obstacles to place around the complex.  Dragons teeth for tracked and wheeled vehicles and the structural thingies to annoy skimmers, grav and hovering vehicles.


The last two shots are of the first stage of construction more or less complete.  The last photo shows the business end of one of the primary double turrets.

A little over a year later, I added the second stage of the bunker complex, which consisted of 29 new pieces.  These included more tunnel sections, entrances,  intersections for the tunnels, and open  fighting positions for the infantry.


The two photos above show second stage construction incorporated with first stage turrets, and a communications tower that I made a year or so prior to the first stage of the bunker complex.


I also added a bunch more obstacles, including some to represent battle damaged obstacles.


All of the new sections from the second stage of construction are shown above.  I also made a few sections with battle damage.  The new modules measure about seven feet in length, when arranged as in the photo above.


The view above shows some the construction detail in the new modules.  Just beyond the two open fighting positions in the foreground is a four-way tunnel intersection.  Covering the front entrance is a free standing bulkhead.  I made a number of these bulkheads to cap unused doorways, and to place in front of entrances to protect them from direct assault.  The fighting position on top of the 4-way module is also a free standing piece.


A view of the battle damaged sections.   There are two types of open position modules, one has a doorway/walkway to the rear, shown in the nearest unit, and the other has a solid wall in back.  I also had to make end caps for the fighting positions.


The last three shots are of the battle damaged sections.  I made bunch of broken concrete debris, but never could settle on how to attach or place them, so they remain loose chunks that my cats just love to bat around.

Even before the second stage was complete, I had already design pieces for the third stage, including corner bastions for the open positions, checkpoints, small blockhouses to cap tunnel sections, smaller watchtowers, and various clutter for the rooftops, including equipment, antennae, smaller air defence guns and missiles,etc.

A fourth stage was to include about a dozen more damaged sections including one of each style of turret, but after I completed the second stage, my daughter's interest in spaceorks started to fade.  So for now, the last two stages exist only as a dozen pages of notes and plans.  Hopefully, as I explore the role that the bunker might play in my post-apoc games, I will find need to complete some portion of the last two stages.

Hope the pics are of some interest or inspiration, if nothing else, I had a lot of fun building it.