
Thursday, April 26, 2018
A Lyran Fleet for Star Fleet Battles
I recently completed the core of a Lyran fleet for Star Fleet Battles. This is a mix of newer castings combined with a few models that painted 34 years ago. I experimented with one model, giving it a much more realistic, weathered treatment, and though it looked much more realistic, it didn't go well with my old models from the 1980s. And since this project is a bit of a nostalgia trip for me, I decided to just give the models the more simple paint jobs, matching my 1980s models. Here is the fleet at the moment:

I still need to add decals which I failed to order in time for my painting frenzy. Once I remembered to order them, Jupiter IV shipped them quickly and in good order, and I hope to apply them while adding a few conversions to my Lyrans in the near future.
Monday, April 16, 2018
An Airplane Too Many
Ever since I started on my 15mm third-world imagi-nation campaign, I've been slowly acquiring 1/100 scale aircraft models for my campaign and other post WWII games.
It started with two pair of Tamiya kits, two Mig 21s and a couple of G91s. Since then, the heap has been growing steadily with more aircraft for Africa, and others for NATO-WarPac and Soviet Afghan games.
Over the years, I had built-up 24 aircraft, while shelving far more for future use. For the longest time, I kept track of it all in my head, but over the last year, it started to get a little fuzzy. Then, a couple of weeks ago, I was surprised to find an Alpha Jet in the heap, and realized that the limits of my memory had been exceeded. So, I decided that it was time to take inventory.

I now have a list of all of the kits in my heap, and it was nice to discover an extra Super Mystere and A4E Skyhawk. Currently, the heap totals 101 plastic and resin kits, with the newest additions being a French Puma, and a couple of QRF's new Mig 17s.
Guess I'd better get to work.
Wednesday, April 11, 2018
An Evening of Casting
So, I needed some stands to make any headway on my starships for Star Fleet Battles, But, I only have one set of molds for the bases, and it takes 20-25 minutes per casting pass. So I pulled out a bunch of my old WWII vehicle molds, and figured that I'd finish some of those WWII vehicles than I've been meaning to make for 30 years.
Four hours later, I had eight starship stands, 20 new 15mm WWII vehicles, and parts towards a bunch more.

 I got out my parts boxes and matched parts for an additional 44 vehicles.

 The parts are now all cleaned and assembly will take place over the next couple of evenings. Hopefully I'll be back to starships by this weekend, and I have a year's supply of WWII vehicle to paint.
Four hours later, I had eight starship stands, 20 new 15mm WWII vehicles, and parts towards a bunch more.

One evening's casting.

The hex base stands for the starships.
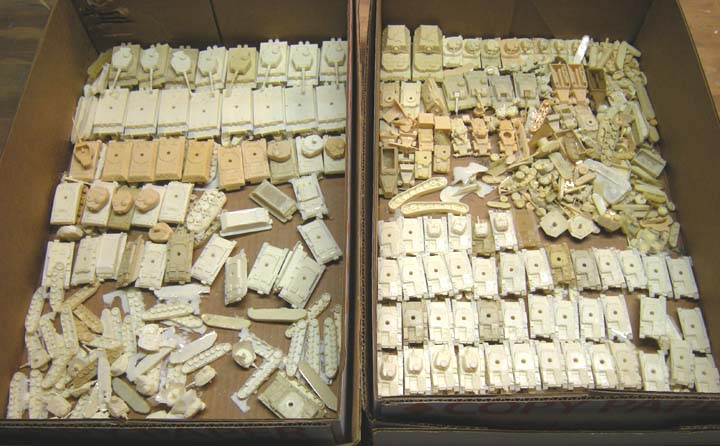
Parts boxes of previously cast bits.

My new hex bases and 64 new WWII vehicles awaiting assembly.
Monday, April 2, 2018
Fortifications for a Scavenger Village
Over the last month, l've been working on fortifications for a 28mm post apocalyptic scavenger village. The main feature is a set of modular walls to enclose the village. Additionally, there will be some fighting positions, a couple of towers, and some interior dwellings and buildings, when it is all done.
When I started working on this, I didn't appreciate how time intensive this project was going to be, so I've broken it down into a group of smaller projects to facilitate making some progress on some other projects as well.
The idea was to build two sheet metal walls utilizing posts made from steel structure, planted in the earth, and filling the space between the sheet metal with rock, gravel, and soil, as a barrier against gunfire and lesser missiles. These could be defended from a few raised fighting positions, made of steel, and some other makeshift positions, consisting of boxes, barrels, and other clutter.
Other interior structures include a couple of observation towers, a workshop, stores, and a couple of dwellings. These structures will be the subject of further posts.
Construction is mostly of styrene plastic steel shapes and patterned plastic sheet. The fill was made of foam, topped with a mix of model RR ballast. Here are photos of the work:


 After some discussion on the Post Apoc Wargames Forum ( a fantastic gaming forum by the way), I decided to add the fighting positions and started on the observation towers as well.


Almost done, the rock fill is painted and a layer of rust and dust has been partially added.
And finally, Rust, dust and flock, added, I'm calling the walls done below.


In addition to all of the work, I was slowed by a bottle of super glue that never set up (even when sprayed with accelerator); running out of my favorite solvent, and discovering the replacement had a filler in it, that clogged my syringe with the application of each drop; and a cat that enjoyed scattering all of the little cut bits, before the assembly was done. I'm really glad to have the walls done.
The towers are on my painting table, but need some additional bits added on, before painting can resume. The inner buildings are sketched out, and some of the plastic has been cut, but guessing that I have a month's work to do, before getting to their construction. And with any luck, I hope to get a couple of games on the table in the next couple of weeks.
When I started working on this, I didn't appreciate how time intensive this project was going to be, so I've broken it down into a group of smaller projects to facilitate making some progress on some other projects as well.
The idea was to build two sheet metal walls utilizing posts made from steel structure, planted in the earth, and filling the space between the sheet metal with rock, gravel, and soil, as a barrier against gunfire and lesser missiles. These could be defended from a few raised fighting positions, made of steel, and some other makeshift positions, consisting of boxes, barrels, and other clutter.
Other interior structures include a couple of observation towers, a workshop, stores, and a couple of dwellings. These structures will be the subject of further posts.
Construction is mostly of styrene plastic steel shapes and patterned plastic sheet. The fill was made of foam, topped with a mix of model RR ballast. Here are photos of the work:

I started with lengths of steel shapes (little piles in top of photo) cut to lengths around 2 inches, pattern sheet scraps cut to about 1.3 inches width, and made bases for the main wall sections measuring 1.25 x 4 x .06 inches. Other base sections were added as needed for the gates, corners, etc.

The photo above shows construction of the sheet metal walls mostly complete.

A view after adding in the rock fill. This was done by gluing in blocks of EPS foam between the steel walls, and gluing a layer of various sizes of ballast on top.


Above with most of the painting done on the walls, a seemingly endless task that tied up most of my free time for about two weeks.
By this time the project was taking notably longer than I had expected ( I had allowed about 17 days and was into four weeks and not done yet), was tying up my game table, and holding up other projects and games. So, I decided to finish the towers and inner buildings later. Gates will probably come in time as well.

Almost done, the rock fill is painted and a layer of rust and dust has been partially added.
And finally, Rust, dust and flock, added, I'm calling the walls done below.


The last photo shows the basic wall sections; corners, 4" walls, the rear gate, a 2" end cap, and the front gateway to the rear of the group. The parts are modular, such the geometry can be changed to meet the need.In addition to all of the work, I was slowed by a bottle of super glue that never set up (even when sprayed with accelerator); running out of my favorite solvent, and discovering the replacement had a filler in it, that clogged my syringe with the application of each drop; and a cat that enjoyed scattering all of the little cut bits, before the assembly was done. I'm really glad to have the walls done.
The towers are on my painting table, but need some additional bits added on, before painting can resume. The inner buildings are sketched out, and some of the plastic has been cut, but guessing that I have a month's work to do, before getting to their construction. And with any luck, I hope to get a couple of games on the table in the next couple of weeks.
Subscribe to:
Posts (Atom)


