Saturday, January 1, 2022

The Old Year Ends and a New One Begins

2021

In general, despite the struggles of 2021, my family and I were very lucky through the year, and I am thankful for it.  In my case, a lot of focus on my hobby helped to ease the experience.

2021 was the most productive hobby year of my life.  I keep a running list of ongoing projects, and on a really good year, I might finish 35 of them.  In 2021 I finished 97, reducing my list from a peak 321 to 224.  Basically, I got three solid years of work done in 2021.

A lot of the work was on the research side of things, completing TO&Es, stat and unit cards for rules, campaign information, etc.  It also involved a lot of terrain for 6mm CW gaming, 15mm WWII miniatures, and 20mm Vietnam terrain, as well as painting 1258 miniatures.

Other periods that saw some progress were 28 mm post apoc , 28mm near future, 6mm WWII, 15mm CW.  Probably the most surprising was 20mm Vietnam getting some attention, after years of neglect.

Ironically, the year ended with a little bit of a fizzle, as I have about 10 projects that are very nearly done, but couldn't squeeze out the time to complete any of them, despite having time off over the holidays.  

Actual gaming didn't make the big comeback that I expected it would, playing only 7 games in 2021, better than 2020 though.  This was really a big surprise, as I had expected 2021 to be a big gaming year.  My Cold War campaign got put off for the entire year due to a recurring problem regarding available space (which I am now going to work around).  

I'm not sure why I got so motivated to wrap us loose ends in 2021; it ended up being a very odd year on the hobby front.  But I had a total blast in 2021, and amazingly enough, I'm going to miss it.


2022

I can't help but believe that 2022 will be "the big gaming year". I have so many campaigns active or on the brink, that some games must materialize.

In one form or another, the Cold War will go hot (1958 style) during 2022. I've worked out a sort of mini-campaign system that I can manage with my Cold War "map room" still largely occupied with my daughter's college (and other) stuff (now), instead of doing the whole war at once.  The Soviet problems in Mugabia are likely to develop somewhat, as a scenario that opens a whole new chapter of gaming, has been setting on the hot plate for some months now.  The Germans are bound to invade 1940 France any minute now.  And with any luck, our Star Fleet Battles campaign will pick up again (Omicron has been shaking its head "no", most recently).

2022 will start off in stride with 2021 with the completion of projects.  My Cold War terrain project will be wrapped up today, and I expect several painting projects to be completed in the next week.  Beyond that, I am going to take the plans-free approach again in 2022, since it worked out so well last year.

River and stream "bridge" tiles awaiting completion for 
Cold War Germany, awaiting completion later today.


I still have 224 items on my "to do" list, and they include items for 18 periods and settings.  Most likely to see attention at this point are, 28mm post apocalypse, 6mm Barbarossa and Kursk, and 1960s-1980s 6mm Cold War hot, but who knows where a stray whim might take me.

Kursk research awaiting attention, 
both are fantastic books by the way.


Happy 2022 everyone!  Hope you have the best year ever!

Saturday, December 18, 2021

Building the Road to War: 6mm Modular Terrain Boards - Part 2

NOTE: The discussion below addresses the use of a variety of power and hand tools.  Please be aware of, and be sure to follow all safety instructions and practices while using any of these tools. Proper methods, safety guards and equipment, and ventilation should be incorporated at all times to avoid injury.

__________

I cut my foam terrain tiles on a table saw primarily, but over the years have also used a band saw, panel saw, hot wire foam cutter, and a straight edge and hobby knife. I've found the hot wire to be the most tedious, generally being the slowest method, and offering the least consistent edges.

Cutting it with a hobby knife actually works fine once you learn to hold the knife perpendicular to the face of the foam.  You can cut or sand a slight inward bevel from top to bottom that will eliminate any problems caused by the angle of the knife going out of perpendicular during cutting.  This may be most easily done by making an "L" shaped sanding block with a very slight, maybe 1 degree angle, and sanding the edges of the cut foam.

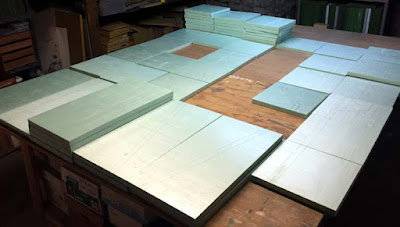
The tiles are cut from 4'x8' sheets of 1 inch thick polystyrene insulation board.  These are the greenish foam from Lowes, though I prefer the blue Dow Corning, as I find the green board tends to vary much more in thickness, both across a single sheet and from one batch to the next.

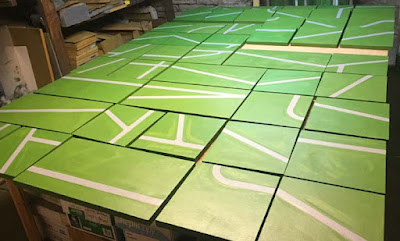
The cut tiles arranged relative to the road design that they 
will receive.

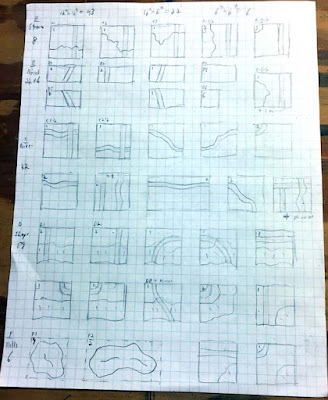
My design notes for the most of the new terrain tiles.

Once the foam tiles were cut, I created a road edge locator template with the first tile, marking the road location with the center-line inset three inches in from both ends on two opposing ends, as if I was going to have two parallel roads on the tile.  This acted as a template to locate road edges on all of the other road tiles.

Note the four black tick marks along the near and far edges, indicating 
the edge of pavement locations for the 1" wide roadway.

The road edges were located on the end of each tile, then the pavement edges were lightly drawn across the tile with a black Papermate ball point pen.  Don't use gell ink, use an old school ball point, and I find that the Papermate ink doesn't bleed as bad as most other brands.  

After marking all of the roads on the tiles, I sanded the surface of each removing the gloss or "glazed" finish from the face of the tile, and sand in any features, such as ditches along the pavement edges or depressions in the tile.  For deeper depressions, I rasp out a little foam with a Surform tool.  


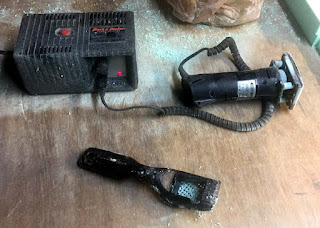
The sanding is done with an ancient Black & Decker/Minicraft hobby sander.  Proxxon also used to make a similar sander, and Micro-Mark currently sells this version.  Proxxon offers this model, which may work in this application.  Be careful not to gouge the foam with the edge of the sanding pad.  The older sanders with a rubber sanding foot and with mechanical clamps were actually favorable to newer versions with a plastic foot and velcro type sanding pads.  Unfortunately, this appears to be another instance of progress and technology maybe moving in the wrong direction.

Other small orbital sanders, such as the "Mouse" type will work, but are less forgiving and all require a "sense of touch" when working with the foam.  Additionally, a combination of orbital sanders and sponge foam sanding blocks will work.

Some hot wire cutters can be configured to cut depressions, but I find these less favorable and more time consuming than Surform and sander.  The hotwire creates fumes, and the sanding creates dust, so both come with their own "baggage".

After the sanding is completed, any blemishes, gouges, or defects can be filled with one-step or light weight spackle.  I apply it with a small flexible putty knife and by hand, while wearing disposable gloves.  It should be applied to as close as a finished state as possible, taking care to create smooth transitions from foam to spackle and back to foam again.  The spackle will dry harder the than the foam, so sanding must be done with care so as to avoid creating a "step" at the transition point of foam to spackle.

Instead of sanding, you may be able to smooth and wipe off excess spackle with a smooth damp cloth at the time of application.  This is a technique that may require learning some sense of touch, but will eliminate most of the need to sand after drying. 

I avoid conventional spackle, despite it sanding more favorably with the foam, because artist's acrylic paints and at least some some craft acrylics do not stick well to it.  They will form a skin that can easily and accidentally be scraped and peeled off of the spackle with a relatively light touch.

The next step is to apply a coat of acrylic modeling paste to the foam. This will help protect the foam from puncture or gouges, and will add an elastic, rather the brittle skin to the foam.  White glue concoctions will also work, generally creating a more rigid surface, but my experience is that in time, the rigid surface receives damage more readily, than the elastic/paste surface, and is rigid skin can be more burdensome to repair.

I've used a mix of brands of acrylic paste over the years; Grumbacher, Liquitex, Royal, Golden, Blick, etc.  They all seem to work fine.  Some are softer/thinner than others and apply more readily, but offer maybe a little less protection than thicker pastes.

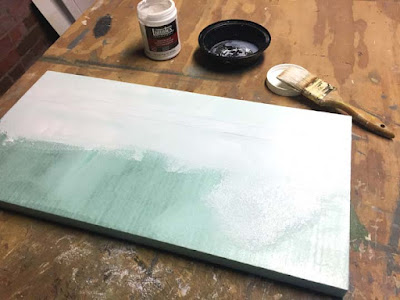
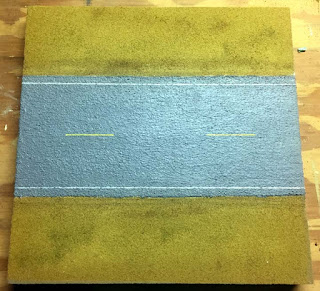
Applying artist's acrylic paste. The road edges can barely 
be seen, roughly centered in the white paste area on this tile.

Once the paste is dry, you may notice that the black ink of the roadway edge lines has bled through the paste and is maybe more distinct than it appeared after sanding.  I usually give just a light spray of Testor's Dull Coat of other matte spray coat to seal the ink.  Otherwise the ink may continue to bleed through the paint and even the flock to some degree.  Usually the Papermate ink doesn't do this, but most others will in my experience.  The application of the spray need only be over the inked portion of the foam and can be very light, a single quick pass of spray should do.  I sprayed all 69 square feet of terrain and didn't finish off a partial can of spray.

Next comes the painting.  I use artist's acrylic paints; in this case, a mix of Dick Blick, Royal and Liquitex.  I generally use a thinner bottle of economy artist's paint for the primary color and then mix in whatever else I have, as needed for the desired shade.  In my case, I use an undercoat of the same basic color as the flock to be applied, so green grassy areas get green paint, blown get brown, etc. 

Different methods of painting can be used, particularly in association with how you will finish the tiles with flock.  In my case I flock dirt roads, there is no exposed paint, except for the paved roads and waterways, and I usually give those surfaces an extra coat of acrylic paste. 

If you plan to leave dirt areas as exposed painted surfaces, you can apply texture to the acrylic paste such a ruts from wheels, or footprints, or you can apply a fine texture material, such a sand or gravel to be painted to a final finish.

While painting, I tend to highlight rises yellower or lighter, and depressions darker, as this helps with the application of the flock in the next step.  Otherwise, the shallow rises and depressions in 6mm are not always readily obvious when hurriedly applying the flock.  Once the base coat of paint is dry, the road is applied.  In 6mm, this is just painted onto the foam, in larger scales I would apply a textured layer, typically a fine sand or ballast.  Paved surfaces would typically get an application or two of acrylic paste over the sand/ballast.  Or, may be painted or left natural color if representing gravel and or dirt roads. 

To mask the edge lines of the roadway, I use an artist's white 3/4" masking tape, which has a favorable tack, that doesn't damage to the acrylic paste and paint.  It is available from most artist supply stores in my experience.  This is a paper tape, that isn't ideal for masking curved roads, so I simply free-hand those.


The ballast can be added before the initial paste application, or later, resulting in a quite durable road surface.  I apply the ballast/sand using artist's matte medium as a glue.  For the paved surface, I will apply a layer of white artists tape along the edges of the road, paint on a coat of the matte medium, making sure to apply a solid, even coat, and while it is still wet, apply a generous coat of ballast/sand.  Remove the mask after applying ballast, as he matte medium can stick the tape, resulting in flaws if the tape is removed after the ballast is dry.

Let dry (drying time varies considerably with ambient humidity (20 minutes to several hours)), and recover the unused portion of ballast (probably 75-90 percent of the applied volume ).  If you find that you have unwanted "potholes" in the road surface, where ballast did not stick,  you can apply matte medium to those ares with a fine brush, and reapply ballast over those spots.  If you have unwanted lumps of ballast/sand, you can sand those off after the they dry.

Whether I use ballast or not, I tape off the roadway along the edge-lines before painting, then paint the road surfaces accordingly.  Roadway markings can be added before or after flocking, though in small scale, I would suggest adding them before the flocking process.  They can be added with color pencil, paint pen, or by masking and painting.  I typical give the roads a light coat of matte spray after adding road lines.  

I'll be adding some city panels later, which will get some roadway markings, but from the photographic evidence that I've found, it looks like many of roads of this type, did not have much in the way of markings in 1950s Germany, so for now, I'm not adding markings to the road surfaces.

Example of 28mm desert road with ballast surface and 
edge-lines painted added with fine point paint pen.

The last major step is adding the flock.  I use the Woodland Scenics grass and earth blends primarily, and have mixes of lighter and darker shades using about 9 parts other color, and 1 part of the grass or earth blend, depending on whether the base color is green or brown/yellow.  

I mask off the road area and apply a solid coat of artist's acrylic matte medium, then highlight lighter, raised areas, with a a lighter green, depressed areas with a darker green, add a little darker brown to the bottoms of ditches, and lighter brown yellow along road edges and whatnot, and then give a solid covering of the grass blend.  The process is sort of like painting with flock.  I use a large brush 2-4 inch for application of the matte medium, applying a liberal coat, and keep reapplying if it starts to dry out.  

On small terrain tiles, the matte medium drying out tends not to be a problem.  But if applying to a large area, I start at one end, apply matte medium to maybe a 12 inch wide area across the entire width of the tile, apply flock to the trailing 6 inches of medium.  Re-wet the exposed medium and apply medium to the next six inches, and repeat the process until done.  You always maintain a wet leading edge of medium across the entire piece, until the application is complete.  This avoids medium drying out, and avoid seams/ridges/textures in the application of flock.  I also try to maintain an irregular leading edge of wet medium, rather than a uniform straight line, as this helps to minimize any sort of pattern or "striping" effect with the flock.

Again, let dry, with drying time ranging from 20 minutes to a few hours, dependent on humidity.  I usually locate a fan in the area, but not blowing directly on the surface of the loose flock, so as to avoid blowing the stuff off of the model and across the room.  Once the matte medium has dried, brush off and recover the excess flock.  You can touch up any blemishes, applying matte medium with a fine brush and adding flock as needed.

I apply a light spray of matt finish, such as Dull Coat, or Windsor and Newton matte spray to the final product, particularly over the road area to reduce the sheen of the paint.  This can be done prior to the application of the flock, if preferred, to avoid getting stray bits of the flock stuck to the road surface.

Some of the finished tiles from the first batch.

I would normally apply some weathering to the road before applying the flock, but in this instance I'll probably wait until all of the terrain is finished, and weather it all at once for consistency.

At some point, you've probably noticed that one thing is missing from this terrain; farm fields. I have focused on making a fairly flexible system of roads, waterways, and hills in coming up with this terrain system, but have not found a good way to incorporate farm fields into the tiles.  I've played around with a bunch of different ideas, but they either fail to meet my expectations, or add a lot more tiles and work.  So I've simply chosen to ignore them.  

Fields will be indicated by tree, foliage, and fence lines, and in some cases by separate terrain pieces that set on the basic tiles, though due to material thickness, in 6mm I tend to avoid stacking things that really shouldn't rise much above the grade elevation.  I try not to disrupt true line of site any more than I have to.

In most of my games, I use a WYSIWYG sighting system.  If figs can't see targets, they generally can't shoot at them.  This means, that using a mat with roads, waterways, etc.set on top, and that rise up above the basic elevation of the terrain, block line of sight, particularly at small scale, and disrupt the games that I play.  This is one of the reasons for building all of this terrain. This style of terrain also allows for shallow meandering depressions that are often lost in miniature gaming, is more stable than cloth spread over terrain forms, and accommodates more realistic sharp changes in topography, particularly depressions, than other types of terrain systems. The trade-off is that you have a grid on the table, which offends some eyes, and may play into rules that require players to estimate ranges or movement.

Regarding tile sizes, thinner 1/2 inch foam could be used, or thicker, such as 2" foam for that matter (which I sometimes use for specific terrain modules). But, I find that 1 inch best meets my needs.  The 12 inch square basic tile is arbitrary, but allows for a fairly rapid set up, while still being relatively adaptable and flexible in copying actual terrain and maps.  A friend uses a similar system, but chose to use 11" squares as his base tile, as he gets more tiles out of a sheet of foam.  I'm aware of gamers who use other sizes for a variety of reasons relating to games scales, and other needs.

The next "Road to War" terrain post will present stream, river, and slope/hill tiles, as well as a couple other odds & ends.  I've already started working on the tiles, and hope to have the post up before the new year.

Hope you have a great holiday season.

Saturday, December 4, 2021

The Road to War: An Interuption of Progress During the Golden Age of the Hobby (- or Part 1-1)

I woke up stupid early this morning full of child-like excitement and enthusiasm for my current big gaming project, the construction of terrain tiles for gaming in Cold War Germany.  So consumed with euphoric anticipation was I, that you'd have thought that I was about to receive a Red Ryder BB gun with a compass in the stock.

It only lasted for a moment, as I sat there in the early morning darkness, realizing that my excitement was wasted, and that I had woken up for nothing, as this would be day 6 of waiting for one minor product, of which I am out of stock, to be placed in the mail stream, such that it might begin its journey from Colorado to Ohio.

You see, last weekend I got to the point where I was ready to flock the terrain addressed in my previous post, Part 1 of this project, and discovered that I was out of light green flock.  I am sure that my previous stock of this came from Woodland scenics, probably about 1987, but at this point, either I am wrong about the source, or they stopped making it at some point.

As it turned out during my search, I found that fine light green flock is not a common color these days. But fear not, for in this "Goden Age" of our hobby, via the progress of digital technology, what I need is only a click away.  Well that and the days or weeks it will take to receive the item, that I could readily have in hand after a 40 minute trip to the hobby shop in 1987.

Once again, I find that the golden age of gaming is filled with pyrite encrusted lead rot.  Or, as usual, something that I need and have used for decades in my hobby is no longer readily available.  In recent years, the demise of paint, glue, solvent, tools, and product lines  has made my hobby much more burdensome than it might otherwise be.

Additionally, despite the fact that I can get figures (that were already available in my preferred scale, and that I already had), in a multitude of other scales, and from several more manufacturers in my preferred scale.  I still can't get 15mm US Cold War era troops in their OG107 fatigues that they only wore for thirty years.  (I swear I just heard Sam Kinison's voice.)  Been waiting for those for about thirty years too.  Actually a bit longer.  I'm sorry, I would have envisioned a slightly different golden age in my hobby.

Okay, I know, in the big picture, it is a little thing really, teensie-tiny, but this happens so often these days, and steals so much joy from my hobby, that I just had to cry about it a a little.  Again.


Okay, so new plan going forward:

I'm moving on to the next stage of the project, making the second batch of terrain, which will end up being a second and third batch, as I want to work on slightly smaller numbers of tiles at a time, to give more room to work and keep progress moving.

The second batch of terrain tiles will include stream, small river, some sloped, and a few odd sized filler pieces of terrain, about 52 tiles in all.

The third batch (49 tiles at this point), which will probably wait until after the new year, will include an expansion of the pieces introduced in stage two; more river, hills, and a modular hill ridgeline/crest system.

Additionally, when putty, paste, and paint is drying on more terrain, I will be painting  new vehicles for the invasion of France 1940.  Thanks to Scotia, Heroics and Roa, and GHQ, I've built up quite a backlog over the last month.

Its okay, I'm not getting a Red Ryder BB Gun with a compass in the stock.  And besides, I always wanted a football.

Have a great day, and stay safe out there.

Wednesday, November 24, 2021

Building the Road to War: 6mm Modular Terrain Boards - Part 1

I've been working on 6mm modular terrain tiles made from 1 inch thick XPS foam insulation board, and thought that I'd share the process. 

It was around a year ago, when I realized that I didn't have enough paved road terrain tiles (for my modular terrain) for gaming in Cold War Germany.  I had forgotten that some years back,  I had given a bunch of it to a friend to use in games run at his house.  

After taking stock of what I had left, I realized that I was probably better off to just start over.  My old highways (two-lane paved roadways) were patterned after US roads, and didn't look much like those of West Germany.

My first stop was Google Earth, studying both the North German Plain and the Fulda Gap, getting a feel for how the road network was laid out and the types of roads in modern Germany. I then compared those to my copies of 1950s army maps of Germany, noting the expansion and development over the decades since the Cold War was a teenager.

I remember reading decades ago, that in Germany..."you couldn't go 2000 meters in any direction without bumping into a town or village".  After studying the various maps, I have to say that I understand the implications of that much better now. 

Starting with terrain for the North German Plain, I was surprised to find how dense the road network was, and how little of it was laid out in a grid type fashion (biased by my experience here in Ohio).  There are a lot of intersections at odd angles, which is somewhat more interesting than what I had expected, but also harder to model on the tabletop.  

As I looked for places that the forces of 1st UK corps might wait for visitations from 3rd Shock Army, I was surprised to find that relatively open fields of fire were seldom more than 1200 meters, meaning that my table, measuring out to 5400 meters in game scale, could well be three to four battlefields in depth.  What this meant was that my road network would need to be much more dense than I had envisioned.

I searched the internet for photos of Germany in the 1950s, gaining some understanding of construction materials, roadway markings, and various other details, and collected dimensions from Google Earth.  Road widths varied somewhat, but there were commonly recurring widths, and I finally decided to go with a single standard road with of around 24 feet (approximately 1" wide in 1/285 scale), rather than creating multiple sets of terrain, with 18', 22', 30' widths, etc.  

I've long used a modular terrain system, incorporating 12 inch square foam terrain tiles, and many years ago, adopted a practice of locating road and waterway centerlines  3 inches from the near edge of the tiles, rather than centered on the tile, as might seem more obvious.  I found that the offset of roads and waterways offered a number of advantages in design and construction of the tiles.   Realizing that my description here is about as clear as mud, the following diagram will hopefully make a little more sense of this.

This offset centerline method proved favorable in building diagonal roads, made winding roads easier to model, and permitted me to get combinations of water, rail and roadways onto the same tile in parallel without using different conventions for each. 

As long as the centerlines and widths match at the edges, all manner of paths can be following in between.  Intersections, towns, and when using a 2'x1' tiles a second type of diagonal road can be added.  Waterways are cut into the tile with a Dremel with router attachment, typically at 3/8th inch depth, with a slightly rounded bank on the edges.  Here are some examples of other tile configurations:

The longer 1'x2' or even 2'x2' tiles can be used to create larger constructs, or topographical features.  This offset centerline method works fine for my 15mm and 6mm gaming (with different road withs), and though I haven't done it, the same should generally work for 25-28mm using 2'x2' panels.

I use both modular and freestanding hills, with modular tiles using the basic slope on the edges of 1" rise over 6" of run.  Generally, the "front" half of the tile involves slope, and the "back half" of the tile is more or less flat.  In between the edges, the tile can do whatever you want being as constant or irregular in profile as you'd like.  Modular hill tiles require three basic types of tile; "Straight slope", Inside corner" and "Outside Corner".  The diagram below shows top and edge views of the three basic slope tiles.


Over the years, I've used different edge profiles for a number of different sets of modular hills, cliffs, etc.  My 28mm cliff modules use the same concept, just with a very different profile.  Roads and waterways can be added to the hill sections, with roads being pretty easy, and waterways taking a little more effort, incorporating either gentle downhill streams or waterfalls.

For this project, I'll only be adding a couple of road/slope tiles, but will need to add more later for battles set in the Fulda Gap and other parts of Germany.

I'll post part 2 of this project, after getting a little more work (and photos) done, so that's all for now

Thursday, November 18, 2021

1940 Progress: German Infantry Done, French Planes get Paint

I've been slowly moving along on my France 1940 project over the last few weeks.  The German infantry are done.  Just waiting to be boxed:


And I've filled in most of the gaps with respect to 1940 aircraft.  All are primed, and the French are receiving paint.

On a side note, orders to the US from Scotia and H&R are taking about three weeks to arrive.  So shipping is a little slower these days, but really not too bad.

Sunday, October 10, 2021

6mm WWII French Infantry Done

 This past week, when I wasn't working on aircraft data, I was working on 6mm infantry.   Here are a couple pics of my WWII French, completed over this past week:

There are still a few stands, mostly gun crews to finish, 
when they arrive from H&R.

Figs are combination of GHQ with a few H&R; surprisingly,
 it is not easy to tell them apart from a distance of more 
than about a foot and a half.

Next up are the Germans... 

One of five trays of Germans, H&R.

... if I can ever remember to buy a can of primer.

Saturday, October 9, 2021

WWII Air Combat Rules Update

Last weekend, in support of my 1940 France miniature ground battles, I figured that I'd update and fill in blanks in the WWII portion of my air combat "rules".  They are not so much a set of game rules, as a stand-in to quickly resolve air combat elements permitting the play of the ground battles.

Originally conceived around 1985 for Cold War missile laden air combat, the system included aircraft from about the mid-1930s for WWII.  I had never really used it a lot for WWII, and as I started adding a bunch of 1940 aircraft, I realized the range of values in the system were too narrow to allow much variation between aircraft.  I mean, a Bf109E and a D.510 shouldn't quite be an equal match.

Anyway, it went from a couple hours of filling in the blanks, to 25 hours of pretty intense number crunching and partially reinventing the system.  Add in a couple hours per day through the week, mostly early morning before work and lunch breaks, and I got everything to a workable state.

Typical of the mess that I create, when working on stuff like this.

In the mean time, the first of several aircraft orders arrived from I-94 Enterprises, ordered Friday, shipped Saturday, and arriving Tuesday.  Amazing service.  Decals from Flight Deck Decals arrived a couple of days later, so plenty to do in the coming days.

New toys!