Showing posts with label 28mm. Show all posts

Wednesday, November 23, 2016

New Arivals (More Figs for the Unpainted Heap)

Haven't done much gaming-wise this month due to work and making 15mm masters, so thought I'd share some new arrivals, now waiting patiently on my painting table.

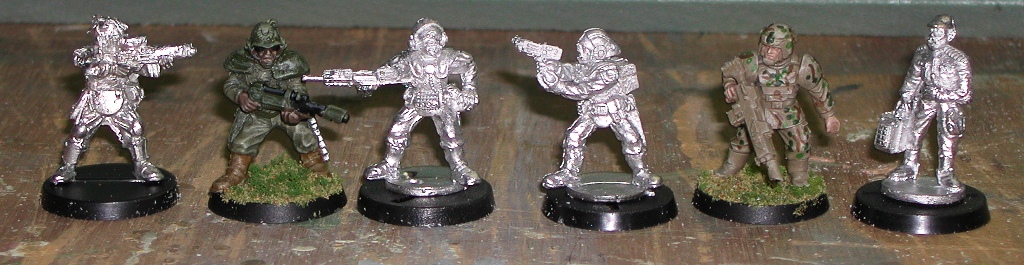
Zombiesmith Grey Aliens
First off, I received my Greys from Zombiesmith a few weeks ago... and they are awesome.  Wonderfully detailed little guys, about 22mm tall (plus of minus), with unique faces and expressions full of character.  They will be a very welcome addition (well, maybe not by humans and cattle) to a contemporary/near-future adventure that I'm working on.  And I have an idea for their transport, but that will be the subject of future posts. Here are some pics of the figs:

I measured the guy on bottom 4th from the left, but the pic was fuzzy;
he measured .87" in height, about 7/8 inch or 22mm.


Zombiesmith was great to deal with, good coms and order status updates.  Highly recommended.


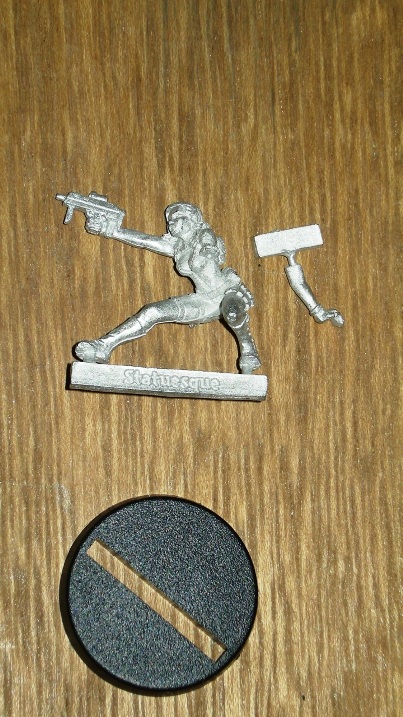
SOE Kill Team, Statuesque Miniatures
Next up are some items from Statuesque miniatures. I ordered a sprue of female heads for some sci-fi and post apoc conversions.  This is my first order with Statuesque, and I was impressed.  They have three sizes/scales that you can order in (you need to check out scales on their site), that seem to be scaled to range from roughly 25mm to 32mm figs (my interpretation).  I ordered mine in the "pulp" scale, and am quite happy with the size for use with my generally 28mm figs.

Above is pack SMA301 in "Pulp" scale next to a 28mm Bobby Jackson
 (Thugz) figure (left), and a Hasslefree fig (right) for scale reference.

Next is the S.O.E. kill Team, three outstanding figures that will be modified slightly for my post apoc games.  The figs are finely detailed, flawlessly cast, and  truly outstanding.  Another company that features great coms and order status updates.  Here is the Kill Team as received:


The last pic is show a 28mm Hasslefree fig and Bobby Jackson
fig for scale reference with the Statuesque fig in the center. 
The S.O.E. Kill Teams figs are also in the  Statuesques' "Pulp" scale.

Another thing that I like about the Statuesque figs, is that the weapons are reasonably scaled and also very finely detailed. Each figure arrives in its own bag, and you pick your preferred base size when ordering.
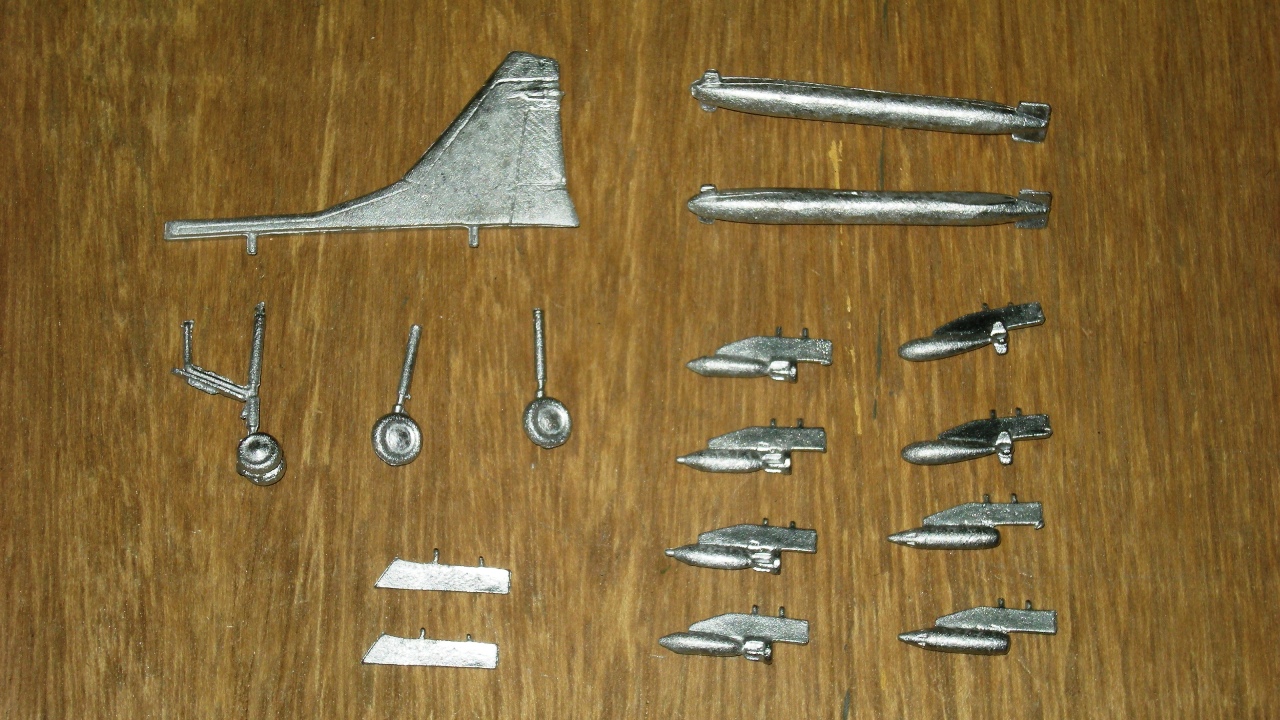


QRF Air Support
And lastly, I finally got around to ordering some air support form QRF.  I picked up two SU17s, two Sepecat Jaguars, and two Su25s.  QRF sent order status updates, with the order coming very quickly, taking about two weeks to get across the pond. Here is the SU17:


The fuselage in resin has good detail, but the resin is a little rough in spots.  This will clean up very easily with a little automotive glazing putty and a Squadron sanding stick.  There are a number of micro-bubbles in the resin, but again, they clean up very easily with the glazing putty.  The exhaust nozzle on both castings had a bigger bubble on the right side which got chipped a little more in shipping on one of the castings (see last photo).  This is still a relatively simple fix with a little bit of styrene and a touch of putty.  The wings and detail parts are white metal and very nicely detailed and cast.

The Jaguar is a lovely model and will require very little cleaning up.  Again with a resin fuselage and metal wings and details.  I haven't decided if I will finish them for my UK or French forces yet.


Again, this is a really nice model, with all of the castings of superior quality.  I look forward to ordering a couple more of these, to complete forces for whichever of my air forces doesn't get them first.

Lastly is the Su25, another very nice model, is mostly resin, including one piece fuselage and wings, with smaller detail parts in metal.  The resin casting is much cleaner than the SU17, but not quite as perfect as the Jaguar.  It will require a little cleanup, mostly along the trailing edge of the wings, but not much.  Again, as for the models above, the metal parts are quite nice, and I particularly like how the expendable munitions are cast directly on the hard-points.  It saves a glue joint and a weak spot when handling the model.


Given the current exchange rate, these aircraft from QRF are a bit of a bargain, so if you're going to get the them, and in the US like me, now is the time.

Saturday, April 30, 2016

28mm Scavengers of the Post Apocacalypse

I squeezed out a little time last Sunday and tonight and finished a couple of Reaper figs for my post-apoc scavengers.


Really nicely sculpted figs by Julie Guthrie, Evie and Hans of the Chronoscope line.

Here's the rest of the crew, mostly Copplestone figs that I painted sometime back.


They subsist, located in the old ruins, reluctant to relocate in any of the new or revived communities in the region.  They do trade with the nearest townspeople, and thus far, have fended off various gangs, and ruffians.  They are known for finding and trading highly sought after and rare items from before the cataclysm.

I still have about a another dozen figs to add to their numbers, that will give them scouts, a couple heavier weapons, and make them a little more diverse.

Monday, November 2, 2015

First Order from Moonraker Miniatures

I received my first order from Moonraker Miniatures a couple of days ago.  A mix of figs from their 28mm Spacelords and Future Skirmish lines.  After placing my order, I got a quick confirmation and the order was received in 8 working days.  The figs are all very cleanly cast with no flash, three came with slotted bases.

 
Most will be worked in with my old GW Imperial Guard troops, adding a sniper, a medic, and a couple command figs to the various HQ sections.  Most of the others will become vehicle crew (with a little conversion work), and one will be added to my post-apoc scavengers.

They scale pretty nicely with my old GW figs, and with the newer plastic Cadians.


So, a big thumbs up for Moonraker; great service, really cool figs, and a very reasonable price.

Saturday, July 18, 2015

On the Work Bench (7-15)

My plans for playing my African campaign game have been put off for a week (going to play a game at a friend's house tomorrow instead).  So I thought I'd babble briefly about things that I'm working on. 

This year, I've been bouncing between sci-fi/post-apoc and African imagi-nation projects, and right now my work table is mostly covered with sci-fi and post-apoc stuff. 

For Christmas, I got several Reaper figures, and despite being in the hobby for 30 plus years and having 15,000ish figs, these are my first Reaper figs.  Below are the first two that I've opened to paint.  At first, my thought was that the dude was too tall to work with my generally 28mm figs, but after posing them next to a couple older figs, while he is tall,  I think it was just that he is lean and so well sculpted that it created the illusion that he wouldn't fit. 


My wife isn't a gamer, so ordering figures is always a bit intimidating, but she said that Reaper was great to deal with, and that they shipped really fast at the peak of Xmas season, so I thought that I should share the good word, if a little late.
_______

Next up, I solved a minor problem for my old Imperial Guard vehicles.  I hate sculpting/modeling/creating tires.  Just kind of boring and tedious, so I have been putting off making the tires for my IG scout cars.  While cleaning up, I found two old Humvee kits that were in the box for the last couple of decades, and decided that the wheels would work for the scout cars.  They are just slightly smaller than what I was going to make, but I have the right number of them, and they will save be about four days of building, mold making, casting and cleaning, which translates into like two months of irishserb hobby time.  Here's a pic of the wheels positioned next to one of the cars.

 
I think that they will work out well.  I just need to build the suspensions now.
______

Years ago, I painted up a couple of Kryomek Talos figs.  Originally, I saw them as an addition to my old IG figs, then painted them to be part of a sci-fi corporate army, and will probably end up just using them as alien critters of some sort.  I liked the figs, but wasn't crazy about the weapons, so I did some simple conversion work on the weapons. 


Anyway, a couple of years after painting the first two, I picked up a couple of more packs at a convention, but never did anything with them.  I recently came across them  after maybe 10 years on the shelf, and they have finally made it to my work table.  I'll probably modify the weapons similarly, and then try to figure out which gang/faction/army/race they belong to.  Ooh, have an idea, maybe they will fight for my old guard figs after all.
_______

This is a hover-bot that I made a gazillion years ago.  It made it with the idea of using it as a security bot and maybe a sort of probe drone, but stopped working on it after becoming disenchanted with the base coat of paint. 
 

I still like the concept, but it wasn't well executed at the time.  I think I'm going to strip this down, update it and give it another try.  If it turns out, maybe update the master parts a little, make new molds and give another it another go.

Tuesday, February 24, 2015

A Little Progress on my Rides (28mm Sc-fi Recce Cars)

Haven't had much free time lately, so I haven't been able to do much, but did manage to work on the second turret for my 28mm sci-fi recce cars.


As I suggested previously, they will simply be Mk1 and Mk2 versions of the car with different turret configuration and a couple of slight differences in the hull. Unfortunately, that is all I have to share for now.

Sunday, February 8, 2015

Rides Update: 28mm Sci-fi Recce Cars and Other Progress

The second vehicle type for my old imperial guard figs is the Recce car.  I went back and forth during the design between something more similar to the French VBL and something  closer to a WWII armored car.  I ended up opting for the  more WWIIish  design.

The vehicle has a three man crew with seating for 5-6 in a pinch.  The small turret carries a light auto cannon and  a drone for detecting the bad guys is carried on the rear deck.  Here are a couple of pics of the current progress:


I've also made some progress on the wheeled APC, particularly on the hull front and sides, and a little on the smaller turret:


And the last photo with all three of my sci-fi vehicle types, including the larger tracked APC from awhile back, to give a size comparison. 


I think the second recce car may get a different turret.  The first one is mostly done and came out okay, but I liked the look of it better on the drawing.  The other version that I sketched out looks a bit more like the turret of the BTR-80A.  I figure the cars can be a Mk I and a Mk II.  We'll see.

Saturday, July 19, 2014

WIP: 28mm Sci-Fi Armored Infantry Carrier

Made a little progress on my 28mm sci-fi APC tonight, so thought I'd post a few pics:


The last couple photos include a Copplestone scavenger (left), and a plastic Space Marine (right) for size reference.

I'll post more pics when I get the turret roughed out.

Saturday, June 15, 2013

The Job Pod, Not Quite a Spaceship in 28mm

Told ya' I wasn't dead yet.  Six weeks ago, I thought the crazy at work had stopped, but then had a relapse of 14 hour days.  In a way, it was a good thing, as my first hobby project of the year was inspired by a project at work.

Among my interests are near-future, sci-fi, and post-apoc games, subjects that I haven't done much with in the last two years.  One of my gamers block victims has been creating a spaceship for the Alpha Forge Asteroid Miners that I purchased several years ago.  I had pictured them as being what hopped out of the flying saucer near that small "out west" town for my locals vs. the alien invaders scenarios.  I had also planned to use them as part of my post-apoc  silliness.  But I could not come up with the right delivery vehicle to transport them from their storage box to my game table.

Well, about three weeks ago, while reviewing about a million  photos at work, I receive a message from the gaming gods.  Inspiration came in the way of a SEM photograph of a spark.  You know, a little piece of metal that was sheared off of something, glowed for a second, and then ended its life as a piece of dust.  I glanced at the photo, and immediately I saw it for what it was.  Before me was a means of inter-stellar transport.  Well, sort of. 

What I saw was basically a steel bubble that had burst on impact with the floor.  A magnificent little thing, with a pebbled exterior, cris-crossed with shallow valleys, splayed open and exposing a cratered moonscape interior.  I also saw it setting in an impact crater , smoking, with a ship of sorts contained on the inside, and asteroid miners exiting their transport cells.  This is what too many long hours will do to you.

I realized that I suddenly had my "spaceship", and that I could now continue with the end of the world.  So, I managed through three more weeks of 14 hour workdays, and have finally begun my alien "spaceship".

I worked up some very basic sketches, along with some background story for my games.  The ship quickly morphed into a more of a time machine/alternate universe portal type thingy, consisting of a shallow impact crater, an exploded bubble of rocky looking material, and a containment vessel for the critters inside.  Here are a few of the sketches (sorry they aren't better quality, but I was in a bit of a hurry):

Above is the initial concept, the burst "bubble" setting in the impact crater.
 
 
In the bubble is the "shipping container" for the "work crew" of asteroid miners.  A series of small chambers and equipment "cells" linked together through a series of beams, tubes, and cables, suspended within the bubble by a series of stabilizing arms.
 
The individual chambers will be eight sided cells, about 2-3 inches across.
 
Upon getting a free evening, I quickly cut up some foam, and began work on the crater. Below are materials and tools needed for this phase of the project. 
 
The foam is from Lowes, 3M Styrofoam spray adhesive, a surform tool, and a hack saw blade.


First, I roughed out the basic pieces of the crater with the hack saw blade, mounted the pieces with spray adhesive, shaped it a little more with the hack saw blade, and then shaped it with the surform.  The rough crater measures about 26 inches across and three inches high.


A 28mm Copplestone scavenger stands in the middle of the crater to give a sense of scale.
 
Next I need to rough out the bubble. Once I have the basic bubble shape completed, I will refine the crater so that the two pieces fit properly, and finish detailing the shape of the crater. 
 
I've got to head back in to work now, but expect to work on the bubble tonight and tomorrow.  Hopefully I will have another post up before the weekend is out.  Once I get this together, I will post some of the background story trying to justify this silliness.