Showing posts with label 15mm Modern. Show all posts

Monday, January 18, 2016

The Uwanda/Mugabia War: A Turn for the Worst

This weekend I spent some time thinking about the war between Uwanda and Mugabia, rolled some dice, and thought a bit about things some more.  I also caught all of the lists and records up to date and began preparing for the future.   So here is a window looking into the direction of the war between the nations of Uwanda and Mugabia. 
______________________

The Mugabian President stood in the conference room and frowned at his generals.

"What do you mean, Mugabia's greatest war hero is an a Uwandan hospital?  Uwanda's troops stand on Mugabian soil; our hero lies in their hospital, and you have nothing to say?  Tell me, do you enjoy breathing?"

As always, the President found just the right words to motivate his officers.  A plan was quickly offered to remove the Uwandan troops from Mugabia, and shortly afterward, a second plan put forth for the liberation of Mugabia's greatest hero.

Mugabia's President Upepo-mfuko reviews the elite Presidential Guard. 

______________________

Uwanda's chief of staff looked across the table, meeting the eyes of each of the generals seated there.  He began, "Well gentlemen, what do we do now?  I am open to suggestions."

The attack at B15 did not lead to the string of anticipated successes, largely due to the leadership of a man now recovering from his wounds in a Uwandan hospital.

The Uwandan chiefs considered a number of options, and in time a consensus was reached.  It was finally time to go to war.  To this point, even the action at B15 had been conducted with a minimum commitment.  Every effort had been made to avoid escalating the scope of the conflict. But a year had passed, as had the appeals by Uwanda to find a peaceful solution.  Mugabia's occupation of Uwanda's territory could no longer be tolerated, and the ULF's absurd demands simply could not be met. 

Uwanda would mobilize.  Requests to allies for help achieving a peaceful solution would be replaced by orders for war materials. Uwanda would aggressively protect its sovereignty. A large scale offensive would be launched with the aim of regaining lost territory, destroying Mugabia's ability to make war, and to capture or kill the Mugabian president.  Preparations were under way...

Vickers Mk.III main battle tanks of the Uwandan army on maneuvers.


Note: Vehicles and Mugabian Presidential Guard (Soviet naval infantry)  by QRF, the president and officer figures by Peter Pig.


Friday, October 30, 2015

AAR18: Silence of the Priests

Well, I didn't get this up as "shortly" as I expected, when writing AAR 17, but here it is, finally.  This is what happened to the Priests supporting Uwandan forces south of objective B14.

View looking south of the M7 Priests supporting
Uwanda forces south of B14.
 
As the battle south of B14 started to heat up, the battery of M7 Priests supporting the Uwandan forces found a little heat of their own.  Shortly after firing its first volley, the battery was discovered by ULF fighters, who quickly moved into position to the rear and right of the Priests.

As soon as Wakili heard the sound of the cannons, he knew his luck had changed.  After a short advance through the trees, he saw his prize and barked at his troops "Abdi, take your men and attack from their right. Go! Go!...On my signal!"

ULF fighters advance north, to the rear of the Priests.

The battery, its supporting trucks and HQ were busy supporting the battle north of them, when machinegun fire and RPGs blew up a truck and two Priests.  Chaos ensued, and in the next minute, two more trucks and three more Priests were destroyed.  Crewmen futilely tried to return fire to their rear and right, but the damage was done.  Quickly, the ULF retreated back into the woods, and the surviving Priest and command track rushed forward to get away from the attack, leaving Uwandan forces at B14 without artillery support.

The battery destroyed.

It wasn't much of a battle, in less than two minutes the battery was converted from a death machine to a dead machine.  Loses were as follows:

Uwanda
5x M7 Priest
3x truck
26x crew

ULF
1x fighter

Edit:  Forgot to mention that I had to use a couple of Sherman hulls as M7s, as I was two models short.  Been a long time since I had to do that.  Also, ULF force consisted of 28 men.

Saturday, August 1, 2015

AAR17: On the Cusp... (A battle of the Uwanda-Mugabia War)

As Uwanda's second attack on objective B-15 began, Mugabian reinforcements started their advance to B-15 as well.  The reinforcements quickly got word that the attack had begun, and that they could not possibly get there in time to help.

Later, the reinforcements did link up with the Mugabian forces retreating from B-15, and a decision was made to establish a line of defense just south of B-14.  The combined force had a little time to dig in, and did so with Col. Chumah in command.

Objective B-14 is in the lower portion of the map, right of center.

The Uwandan forces stopped long enough at B-15 to re-group and reload, before advancing to objective B-14.  Without sufficient reconnaissance or air cover, the advance was a little more cautious than it might otherwise have been.  This served the Mugabian forces, allowing time to prepare for the defence of B-14.

As soon as Col. Chumah saw the reinforcements, he bagan to consider how best to stop the Uwandan advance.  Though somewhere in the back of his mind, he felt a brief sense of relief, he hated himself for it, and re-focused on his mission even more so.

Somewhat surprisingly, central command placed the delaying force under the command of the Col. Chumah.  Apparently his success in the first defense of B-15, outweighed his failure in the second. 

Col. Chumah's  combined forces consisted of 3x SU100, 3x T34/85, and 6x BTR152 with 46 troops.  He chose a to defend along a tree line running perpendicular to the main road, and looking across the open ground of farm fields. 

The Mugabian view looking south.

Uwandan forces were more numerous with 3x Ferrets, 7x Fireflies, 11x M3 halftrack, 6x Saracens, 2x Wombats in Landrovers, and a single M42 AA gun all supported by a battery of six M7 Priests.

Uwanda's view looking north.

The Uwandans advanced in column, up the road, with the Ferrets single file and some distance in the lead.  Hopefully when the first shot came, the worst result would be the loss of a Ferret. 

They call it, "Tip of the Spear", But Cpl. Zuberi called it, "First to die."  As his Ferret clumsily advanced down the dirt track, violating almost everything he had been taught as a scout, Zuberi only hoped that the first Mugabian to shoot, was as short sighted as his commander's orders.

Uwanan Ferrets advance.

As the lead Ferret clear another clump of forest, and entered into an open area of road, straddled by farm fields, the report of a 100mm gun was heard.

The SU100's view looking southwest.  Cpl. Zuberi's Ferret is in the distance
near the puff  of smoke in the upper right of the photo.

Cpl. Zuberi thought dying would be more painful, then realized that the giant hammer blow didn't kill him.  As he and his gunner both managed to escape the smashed armored car, he immediately began looking for his would-be killer.

The other Ferrets slowly advanced in cover, one soon destroyed by the SU100 on the rise to the Uwandan right, but not within sight of the other scouts.  The Uwandan commander carefully advanced dismounted infantry and advanced on the Uwandan right, hoping to make contact.

Uwanda infantry advanced over the rise opposite the SU100.

Advancing ever so slowly, the infantry finally found their Mugabian counterparts, and after a few rounds from the Priests, both the Mugabian infantry and the previously unseen SU100 withdrew.  The Uwandan infantry platoon continued to advance, exchanging fire with Mugabians, and finally killed the SU100 with a LAW rocket.  Despite repeated calls, the fire from the Priests stopped.  Nobody knew why.

Uwanda infantry advance down the rise, after destroying the SU100.

A second infantry platoon advanced with the first, and slowly, the Mugabian left began to be rolled up.  The Mugabians shifted some of their armor to better support their left, and at about that time the Uwandan commander, feeling pretty good about how the advance was progressing, ordered a general advance of his other infantry and armor across the fields. 

Looking south at the advancing Uwanan forces.  The rise, where heavy infantry
action was centered, is at the left, almost out of the photo.
 
Mugabian infantry on the left began withdrawing from their  positions, as Uwandan infantry began entering the Mugabian tree line, supported by M3s and their .50cal HMGs.  Uwandan infantry took cover in the bushes separating the fields, and Fireflies looked for targets in the tree-line.
Looking southeast, Uwandan forces advance across the fields.

The Fireflies found targets, but couldn't hit them.  Their targets had more luck, and in a very brief time, four Fireflies, and three more M3 halftracks were destroyed for the cost of a single T34.  At the same time, the advancing Uwandan infantry in the Mugabian tree line were blind-sided by a captured Saracen, resulting in the temporary halt of the Uwandan success.
The situation suddenly changes.

At about this time, Col Chumah was hit by fire from the Uwandan infantry in the fields.  One of his command team panicked, and ordered a general withdraw.  The fighting ended with Uwandan M3s destroying the captured Saracen, while all of the other Mugabian forces withdrew from the action.

Wounded, captured, his forces withdrawing, it would be some time, before Col. Chumah would discover that he was a recognized as a hero for his victory south the village at B-14. He was angry with himself for the slight sense of relief he felt at the sight of the Uwanadan medic.

Another view of the Uwandan losses at the time of the Mugabian withdraw.

Suddenly, the Uwandan commander was left with the treeline, no enemy, and insufficient resources with which to continue the advance. A battle won and lost in the same moment.
______

This was a bizarre game.  The Uwandan dismounted infantry advance was painfully slow.  Then, once they made contact, an intense infantry battle took place for dozens of turns. 

For the longest time, it appeared that the Uwandans had wrapped up the battle, Mugabians had lost a lot of troops, they were withdrawing, etc.  Then in a couple of turns, the Uwandans took a bunch of casualties to their armor and APCs, and the Mugabians just disappeared. The End.  Oh yeah, and the Priests just vanished, a third of the way into the game.

Losses were also weird (I'll get to that in a minute), and were as follows:
Uwanda
1x Ferret (1 more tracked)
4x Firefly (2 more tracked)
5x M3 halftrack (2 more tracked)

Mugabia
1x T34/85
1x BTR152 (captured by Uwanda)
1x Saracen (previously captured by Mugabia)

And the weird part:
Uwanda
7x KIA
16WIA

Mugabia
3x KIA
13 WIA all taken prisoner by Uwanda

I'm pretty sure that I rolled over a thousand small-arms rolls (this game lasted over 130 turns), and there were only 10 infantry killed (and three of those were from cannon fire).

Combined with their previous losses at B-15, Uwanda's equipment  losses were too great, and their offensive has stalled.  By the time they could get to B-14 proper, the entire Muagbian army could be there. The Uwandans will withdraw back to objective B-15.  I'll have to hit up the "fate tables" to see what happens next.

Oh, and the deal on the Priests will be explained in AA18, coming up shortly.

Saturday, July 4, 2015

Mugabian Border Post (Modern 15mm Imagi-Nation)

I finally managed to build the rest of the stuff needed for my 15mm Mugabian border crossing.  In addition to the watch tower that I build previously, I completed two customs buildings, some signs and fences. The buildings and other odds and ends are based on or inspired by various border crossings between Kenya and its neighbors.


The building walls are made of blue foam, the roofs are textured styrene from Evergreen and Plastruct. 


The fence is HO scale Hairpin Fence from Atlas.


The signs were made with Photoshop, printed and sealed and glued onto styrene  and brass sign posts.


With this stuff done, I can finally get some battles on the table top.

Sunday, February 27, 2011

A Hummer of a Weekend

Though I hadn't been able to work on anything for almost two weeks, when I finally got down to the basement this weekend, instead of jumping back into the post apocalypse, I decided to do some cleaning.  Well, actually, my wife decided that I was going to do some cleaning.  As it turns out, creating the post apocalypse is messy work, and the mess had started migrating into the rest of the house, so darling wife suggested that I put a lid on the mess, before she put a lid on me.

Anyway, as I started cleaning up the smaller of the two work tables, I realized that I had castings all over it and my painting table for various vehicles that I have mastered over the last couple of years, and the best way to clean up, was to assemble some of that heap into useful miniatures.

So, in keeping with my wife's demands, I assembled about over 30 15mm vehicles this weekend. 


All of the primered vehicles are new builds.  I rounded out my fleet of M1114 Humvees for the Middle East and African ops (14 new minis), 6 more Humvees to get woodland camo, 6 M2A2 Bradleys, and 8 VBLs. 

With any luck, darling wife will next demand that I finish some painting that needs done around the house...

Thursday, November 4, 2010

15mm M2A2 Progress

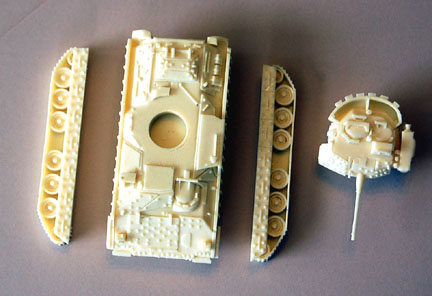
Though I'd post a few pics of the completed model, as the Bradley is coming along with production molds finally in progress. The basic plan is for a 4 piece kit, though the gun barrel may end up being a separate piece, as the deep undcuts on the turret make it a little challanging. I 've made molds with the barrel attached and separate, so we'll see how each one goes.


Below is a view of the assembled raw casting. I'm pretty happy with it overall.

And few pics of it primed, this one has a few blemishes, but came out pretty good overall. I've pretty much de-bugged the mold, but took a couple more tries than usual with the Bradley. I'm using a different method in the construction and molding of the turret, and the hull just has so many nubs, it took a couple of more tries than usual. The rebuild of the turret has lead to much better results with the castings.


As soon as I can go on a casting binge, I will make some available for sale. It will also finally be nice to have some serious rides for my figs. My US troops are tired of walking everywhere they go.

Sunday, September 26, 2010

15mm AAV7A1 WIPS

While my Bradley sets in the middle of the mold making process, before setting up to cast, I decided to try to make a little headway on my other "forever" project, my AAV7A1.

I think that I started this prior to the Bradley, but it got misplaced for quite some time, and once found, bumped for other projects, home repairs, family stuff, etc., etc. When I started it, I was planning to order some of the Peter Pig U.S. Marines, but the economy stalled, and so did my project. Hopefully, I'll have reason to order those Marines soon.
As you can see, it is still some ways from being done, but a late October/early November target shouldn't be pushing it.

Here is a size comparison shot with one of my Humvees. It will ride about 10 percent higher when the track is added and spaced properly from the hull.

Again next to my Humvee, it is a beast.

And lastly, next to a QRF BMP-1, and an Old Glory T-55.

Saturday, September 18, 2010

15mm (1/100) M2A2 Bradley Master

I thought I'd post some photos of my reworked 15mm M2A2 Bradley master. Though my Vietnam terrain has been screaming at me for a month to get it done, I have been focussing what little free time I have on my Bradley master.

I started this thing almost two years ago, and have gone through three stages of altering, updating, and redesigning. It has been waiting for quite some time for me to finish some track and hull detail after changing the skirt and track assembly for ease of casting. I still need to add some of the fasteners for the applique armor, but I expect to finish that tonight.


Above is a size comparison shot with one of my 15mm Humvees.


And a size comparison shot with my Humvee and 15mm infantry figs as follows; Peter Pig FFL, Old Glory Modern US, OG Afghan, and I believe a QRF Soviet (could be a JR Soviet though).


And what is it about work benches? I cleaned this up a couple of weeks back, work on a project for an hour, and am left with an area about the size of my hand to work on the project.