Thursday, June 20, 2013

Space Bubble Update

Progress has been a little slower than I had hoped, but here are a few more WIPs of progress on my "space bubble".  I've managed to get a start on the "ship" part of the model that sets (and travels) inside the space bubble. 

Construction will mostly be from styrene sheets and shapes from Evergreen and Plastruct, as well as, a few beads and whatnot from the craft store.


Unfortunately, I don't have a way to hold the other pieces in place yet, so it doesn't look like much yet.  The legs need to be shortened and adjusted for fitting inside the bubble, and lots of bits need to be added yet.

The idea is that this thing will fit in the bubble and is the actual container in which the asteroid miners are transported.


And , here's a pic where you can actually see an asteroid miner for size reference.
 

In retrospect, I probably should have made the "ship" about 15-20 percent smaller, as it would have fit in the bubble a little better and would have still looked to accommodate the figs, but I'm committed now.

I expect to work on it this weekend, so will probably post a few more pics Saturday or Sunday evening.

Monday, June 17, 2013

28mm Not Quite a Spacehip Update - Space Bubble Takes Shape

I managed to nearly complete construction of the space bubble part of my contraption yesterday, so thought I'd share a few more pics. 


The exterior has a scale-like texture created with one of the Foam Factory hotwire tools, while the pitted interior texture was "dremelled" into the model.  It still needs a little clean-up work, but is mostly ready for priming and painting.  The fig is again the 28mm Copplestone scavenger for size reference.

I know that a number of people have been looking at this project thinking that I've totally lost it (including my wife an daughter, who offered, "I thought you were making something for gaming, what's with the dinosaur egg?)  The "space bubble" is basically the skin of the vessel that will transport the aliens to earth.  Inside will be a more "conventional" structure containing the aliens themselves (which I did get a small start on yesterday). 

I'm hoping to get the next piece mostly together today, so hopefully another post will appear tonight or tomorrow.


Sunday, June 16, 2013

The Space Bubble - Still Not Quite a Spaceship in 28mm

Here are a few photos of the "space bubble", the second part of my 28mm pseudo-spaceship/time machine/alternate universe portal thingy.

I got a couple of hours to rough the thing out tonight, using the same tools and materials as for the crater with the addition of the Foam Factory foam cutter.  I am surprised that I got as far along as I did, though there is still a lot of work to be done, it has definitely taken shape.

The first three views show the process of mounting up the layers of 1 inch thick foam and cutting the basic bowl shape with the hot wire foam cutter and surform.


The next view shows the complete bubble roughed out, with sides splayed open after impact.. 
 
 
The last three views are of the bubble resting in the crater.


There is still a ton of work left to do, the walls need to be thinned to around 3/4 inch thickness (they vary up to 3 inches thick right now), and then textured inside and out.  I'm hoping to get most of that done tomorrow, and maybe a start on the conveyance inside as well.

I'll post some more WIPs in the next day or two.

Saturday, June 15, 2013

The Job Pod, Not Quite a Spaceship in 28mm

Told ya' I wasn't dead yet.  Six weeks ago, I thought the crazy at work had stopped, but then had a relapse of 14 hour days.  In a way, it was a good thing, as my first hobby project of the year was inspired by a project at work.

Among my interests are near-future, sci-fi, and post-apoc games, subjects that I haven't done much with in the last two years.  One of my gamers block victims has been creating a spaceship for the Alpha Forge Asteroid Miners that I purchased several years ago.  I had pictured them as being what hopped out of the flying saucer near that small "out west" town for my locals vs. the alien invaders scenarios.  I had also planned to use them as part of my post-apoc  silliness.  But I could not come up with the right delivery vehicle to transport them from their storage box to my game table.

Well, about three weeks ago, while reviewing about a million  photos at work, I receive a message from the gaming gods.  Inspiration came in the way of a SEM photograph of a spark.  You know, a little piece of metal that was sheared off of something, glowed for a second, and then ended its life as a piece of dust.  I glanced at the photo, and immediately I saw it for what it was.  Before me was a means of inter-stellar transport.  Well, sort of. 

What I saw was basically a steel bubble that had burst on impact with the floor.  A magnificent little thing, with a pebbled exterior, cris-crossed with shallow valleys, splayed open and exposing a cratered moonscape interior.  I also saw it setting in an impact crater , smoking, with a ship of sorts contained on the inside, and asteroid miners exiting their transport cells.  This is what too many long hours will do to you.

I realized that I suddenly had my "spaceship", and that I could now continue with the end of the world.  So, I managed through three more weeks of 14 hour workdays, and have finally begun my alien "spaceship".

I worked up some very basic sketches, along with some background story for my games.  The ship quickly morphed into a more of a time machine/alternate universe portal type thingy, consisting of a shallow impact crater, an exploded bubble of rocky looking material, and a containment vessel for the critters inside.  Here are a few of the sketches (sorry they aren't better quality, but I was in a bit of a hurry):

Above is the initial concept, the burst "bubble" setting in the impact crater.
 
 
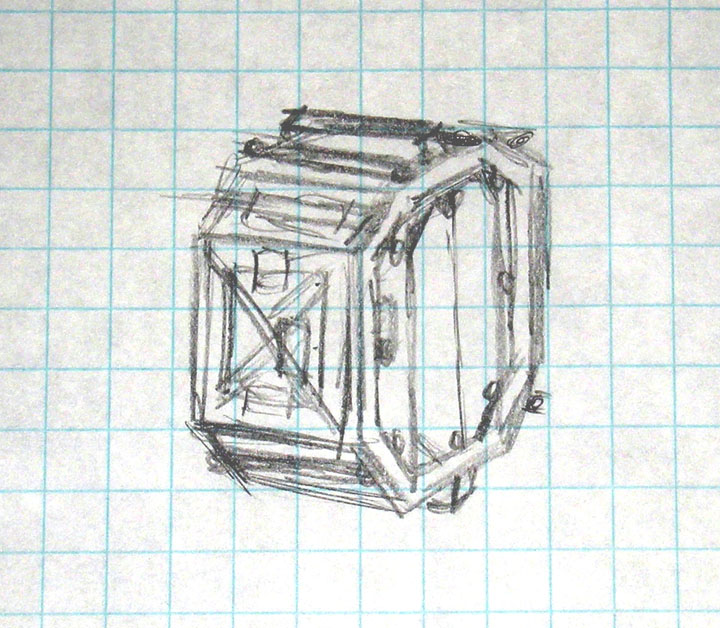
In the bubble is the "shipping container" for the "work crew" of asteroid miners.  A series of small chambers and equipment "cells" linked together through a series of beams, tubes, and cables, suspended within the bubble by a series of stabilizing arms.
 
The individual chambers will be eight sided cells, about 2-3 inches across.
 
Upon getting a free evening, I quickly cut up some foam, and began work on the crater. Below are materials and tools needed for this phase of the project. 
 
The foam is from Lowes, 3M Styrofoam spray adhesive, a surform tool, and a hack saw blade.


First, I roughed out the basic pieces of the crater with the hack saw blade, mounted the pieces with spray adhesive, shaped it a little more with the hack saw blade, and then shaped it with the surform.  The rough crater measures about 26 inches across and three inches high.


A 28mm Copplestone scavenger stands in the middle of the crater to give a sense of scale.
 
Next I need to rough out the bubble. Once I have the basic bubble shape completed, I will refine the crater so that the two pieces fit properly, and finish detailing the shape of the crater. 
 
I've got to head back in to work now, but expect to work on the bubble tonight and tomorrow.  Hopefully I will have another post up before the weekend is out.  Once I get this together, I will post some of the background story trying to justify this silliness.


Saturday, May 4, 2013

I'm Not Dead Yet...

... and even if I was, I don't see that as any reason to quit the hobby.   So I just thought I'd post a note for those that pass by here, that despite being a little (Hah!) busy these last few months, I am still  chasing my dreams of toy soldiers settling the arguments of the past, present and future.

After all of these months with virtually no gaming activity. I am not sure where I will head as I ease back into things, but it has been a long, long time since I visited the battlefields of May 1940.  And, I have been missing my old friend (and the coolest tank ever), the Char B1 Bis, so maybe it will soon be time for a visit.


Saturday, December 8, 2012

A Sci-Fi Communication Tower in 28mm

This post is in response to questions about construction of my Comm Tower that appeared in the photos with my 28mm bunker complex that were posted sometime back.  Some of the following is a rehash from my long dead website, mixed with some additional info.

The Comm Tower is was conceived as communications station capable of deep space communications on a newly settled world. The base consists of a small bunker that can house a few troops during times of need, and the communications mast.  The idea is that bunker is a precast standardized component designed to mainly resist tampering by civilians or alien fauna.  The  main access door opens into an equipment room with tiny quarters inside. It has two roof hatches to permit access to whatever sort of equipment might be mounted on top.


The design was first sketched out on graph paper in full scale.  Basic construction was is from .06" styrene plastic, solvent welded  with a disposable syringe and Tenax 7R solvent.  The tubes for the roof hatches are acrylic, I think from Plastruct.  They were super glued in place and blended into the basic shape with styrene sheet and automotive glazing compound or putty.  For sanding the styrene and putty, I find that the Squadron wet/dry sanding stick are quite helpful.  Yes, all of the doors and hatches are pinned and hinged.  I am that sad.

  The view below gives some idea of the size with older GW Imperial Guard figs posted next to the door.  
  A view from the rear showing the equipment boxes extending from the back of the base.  They are made from styrene and patterned sheet from Evergreen.  The stairs are part of an Evergreen  kit; the railing is Brass wire from K&S.  
  The comm mast was made from Evergreen tube, sheet, and Plastruct vessel flanges (the gray rings near the top of the mast).  The catwalk is wide enough to permit access by the GW style bases on many of my sci-fi figs.

The comm mast was assembled to allow the later addition of wires for LEDs to give a little more life to the contraption, though I don't know if i will ever get around to it.

  The antenna array complete.  The dome and dish are parts from Plastruct, as are the cage and ladder, the phased-array looking panels are patterned tile sheet from Evergreen.   
  Triangular supports for the catwalk extend beyond the edge of the platform to give a rigid mounting point for the vertical rail supports. The rail itself is made from .02" thick by '06 wide styrene strip. I curved the strip by rapping it around a small bottle, attached one end to a support, then worked may way around the the catwalk, attaching to the supports with solvent as I went. A second strip was glued inside the fist to give the rail more strength.

 
  The base is painted with Polly Scale Israeli Khaki, "metal" parts are painted with Vallejo Russian Green. The base was then weathered with a several mixes of Polly scale Old concrete and Israeli khaki to bring out the waffle pattern a bit and dust up the green parts.

The waffle pattern was made by painting a coat of artist's acrylic paste onto the masonry surfaces of the bunker, letting it surface dry, and then pressing fiberglass drywall tape into the semi dried paste. The result is a Zimmerit-like texture.  
  The roof of the bunker is press fit in place, and is removable to permit eventual interior detailing and battery installation for the LEDs  
  A few more pics, showing how the roof and mast fit into the base unit.  
   

And lastly, a view of the unfinished interior.The plan is to someday put an electronics control bay to the front of the interior, and a submarine-like quarters for 2-4 for those when the natives are restless.

  And there you have the communications tower, a lovely target for any season.

Thursday, November 22, 2012

AAR9 - Closing the Gate

This is the second of three after action reports on the Mugabian effort to secure Pettu tribal territory in Uwanda.

The battle took place at objective A58 on the map below.  The river crossing there is the only direct road access to the Pettu territory.  Securing the crossing and village would severely limit Uwanda's ability to reclaim the Pettu territory.  On the map below the solid black line is the border between Uwanda (left) and Mugabia (right).  The Pettu territory is identified by the dashed black line and is currently occupied by Mugabian and ULF (Uwanda Liberation Front) forces.


The river obstacle introduced a problem not previously encountered by Mugabin forces, and despite its small size, only light and amphibious armored vehicles were employed in the attack.  Mugabian forces included a mechanized infantry company in BTR60s, three PT76s, two SA9 air defense systems, three BRDM2s, two towed 85mm guns, more than 50 truck mounted ULF militia lead by Mugabi army advisers, and two batteries of 152mm howitzers.

Uwanda understood the importance of objective A58 and had a significant force holding the crossing and village there.  Forces included an mechanised infantry company in M3 halftracks, a platoon of four Fireflies, three Saladins, four Ferrets, a single M42 for air defense, a battery of 155mm howitzers and as A58 had become a border checkpoint, one squad of National Border Police.  Limited air support was also possible.


The Uwandan view of the battlefield.


The Mugabian view of things.

The Magabian plan was to lead off with an artillery barrage, then attack both Uwandan flanks, the ULF militia on one end, and a force of Pt76s and BTR60s at the other.  Once the flanks had been compromised, The remaining infantry in BTR60 would race into town and overrun any remaining forces.  Artillery would pound the village and surrounding defences the entire time.

Uwanda deployed infantry along the Ukingo River as the first line of defence, with remaining forces positioned to respond as needed, and able to build a second defensive line using the field lines and village.

Typical Uwandan infantry position along the river.


A Saladin waits to spring into action.

As they advanced, listening to the artillery barrage ahead, Captain Bahati had mixed feelings about commanding the militiamen in battle.  He had helped train them, but they were still not regular Mugabian Army soldiers.  They seemed like good men, but would they stand in the face of battle.

The battle started with with a relentless artillery barrage that injured or killed nearly a third of the deployed Uwandan infantry.  The barrage was unlike anything seen previously by Uwandan forces and caused extensive damage and injury to the defenses.

A view of the aftermath of the artillery barrage from the Uwandan left flank.

Mugabian forces moved into position during the barrage.  On the Uwandan left flank, artillery continued to pound the defenses as the Mugabian force advanced.


Uwandan forces at their extreme left simply ceased to exist with HQ not understanding the severity of the situation. On the right flank the large ULF militia force advance under the direction of Mugabi Army leadership.


As the militia began crossing the water, the flank burst into a flurry of small arms fire.  Uwandan forces were already thin due to the barrage, and could not hold for long.  Despite valiant fighting, Uwandan forces had to drop back and consolidate.  Still the semi-trained militia took a long time to cross the river and take advantage of the situation, much to the frustration of the Mugabian army leader.

With both flanks in trouble, Uwanda's HQ began to order reserves into position.  Light armor and infantry hastily moved into a second line of defense.

Armored infantry and Saladins move to reinforce the Uwandan left, as border
police advance through the village to strengthen the bridge defenses.

As reserve forces moved into position, Mugabian artillery moved to the village, destroying many of the reserves before they could get into position. 


The overall situation began to look quite bleak for Uwanda with desperate fighting taking place on both flanks. The Mugabian advance was starting to slow as losses were starting to mount.  For the moment though, Mugabian leadership stood firm, and their troops continued to advance.


The last PT76 crossed the river followed by infantry on the Uwandan left flank, looking for someone to fight, but there weren't many Uwandans left.


Meanwhile , on the right flank, the advance began to bog down, despite light opposition.


The last infantry reserves  and armor were deployed to reinforce the second line that had formed on the Uwandan right..


... and that is when something unique happened.  The ULF militia  taking only light casualties, refused to advance. 


Captain Bahati could not believe what was happening.  Yes, they had taken casualties, but no so many. They had caused far more than were taken, and had forced the Uwandans to retreat.  They could easily continue and push all the way to the village.  As he threatened to shoot the next man who refused to advance, he never imagined that he would be forced to do so.  Surrounded by the sounds of war, surrounded by his men, he never felt so alone.  As the man stood defiant, Captain Bahati pulled the trigger.  Time slowed, Bahati stood and watched as the man fell to his knees.  He watched as seven other militiamen raised there weapons.  Slowly, Bahati lowered his weapon, and then he watched no more.

Though unknown to the Uwandans, the right flank was safe, but the left flank was still in question.


Losses had mounted significantly for the Mugabians, and as the last of their troops crossed the river, the Uwandan reserves got into position.  Only moments after it looked like all was lost, the pendulum was swinging hard the other way.


Though both flank attacks had lost their momentum, the main Mugabian thrust now charged down the main road.  BTR60s advancing at speed in an effort to flood into the village.  With drama unfolding all around, a CNN camera crew ventured out to record the happenings.


At about this time, Mugabian artillery switched back to the village in an effort to support the final thrust.  The CNN crew was not seen again.


With artillery pounding the earth behind it, a Uwandan Firefly saw an opportunity to slow the advancing column, and managed a hit on the lead BTR.


Almost simultaneously, Uwandan artillery started hitting the main road, BTRs unwittingly advanced into it as it hit, and in an instant, the lead platoon was gone.

In rapid succession, the Mugabian battlefield commander lost contact with the troops attacking on his left flank, his right flank, and with the lead section of the main column.  The remaining BTRs broke off of the attack, and in an instant the battle was lost.

Uwandan forces mopped up their left flank, taking a small number of prisoners int he process.


Realizing that the Mugabians had been turned away,  the Uwandan forces consoidated, preparing for a follow-up attack that never came.  Uwandan air forces jets finally showed up ( a little later than hoped) and managed to chase down some of the Mugabian artillery and destroyed it.
The battle was over, the gate had slammed shut, the Mugabians would not advance their interests on this day!
The artillery barrage was very successful, putting the Uwandans on the verge of calapse for the entire game (the Uwandans have a level higher morale than the Mugabians within my rules).  Ironically the ULF force had a catastrophic morale failing at the point where they could have broken the Uwandans.  From that point, their game long dominance failed in rapid succession across the table over the next couple of turns.  It was a very interesting game with major losses on both sides.

Losses were as follows:
Mugabia:                       Uwanda:
85  Troops                     62 Troops
3   PT76                        1   Firefly 
2   BRDM2                    3   Ferret
2   85mm guns              1 Saladin
5   BTR60                      5   M3  
5   Trucks                     1 Universal Carrier

Mugabia also lost two 152mm guns, 6 trucks and 32 crew to air attacks by the Uwandan Air Force.